
December rolls around, very soon, and you want your home to sparkle with holiday cheer, but your budget—and maybe even your DIY confidence—feels more “Charlie Brown Christmas tree” than “department store wonderland”? I’ve been there. and let me tell you, even small changes make a huge difference. In this article, I’ll walk you through 11 budget Christmas decor ideas I’ve personally tried, refined, and literally lived with during the holidays. They’re doable, easy on the wallet, and don’t require a workshop full of tools. By the end, you’ll have a clear, realistic plan that fits your home, your time, and your style. No vague Pinterest dreams here—just real projects from someone who’s spent years making homes feel festive, cozy, and welcoming.
Why Budget Decor Matters, and How to Think About Seasonal Updates
When I first started decorating my own home for Christmas, I’d browse inspiration sites and feel instantly overwhelmed. There’s a myth that holiday decor has to be magazine-perfect, or that you need to buy all new stuff every year. That mindset burns out your budget and your creative energy. I’ve found that the most memorable, cozy holiday homes are the ones that reflect the people who live there, not a showroom.
Seasonal decor isn’t about creating a flawless backdrop—it’s about adding warmth, light, and memories. Every project in this list is designed for real people who want real results. Some will take 20 minutes, some a spare afternoon, but all will make your home feel like Christmas.
Sheet Music Wall Trees (Under 30 Minutes)

Materials: Old book pages, sheet music, or even scrap paper; scissors; double-sided tape or glue dots
Difficulty: Beginner
Time: 20–30 minutes
I tried this last year in my living room, and it was a hit—even for guests who aren’t “into” crafts. Gather old books, music sheets, or any neutral-toned paper. Cut out simple tree shapes (you can freehand or use a template), and stick them in a cluster on your main wall with tape or glue dots. They’re lightweight, so no nails are needed.
Pro tip: Mix paper types (song lyrics, old recipes, even pages from a novel you’ll never read again) for texture. Go for a loose, asymmetrical arrangement rather than a perfect grid.
Avoid this: Don’t use originals or irreplaceable books if you can help it. Stick to duplicates or simple paper you don’t mind cutting.
Rustic Jute-Wrapped Candle Holders

Materials: Plain glass candle holders or jars (12–14 cm tall / 4.5–5.5 in); jute twine; hot glue gun or craft glue; tea lights
Difficulty: Beginner
Time: 15 minutes per holder
If you’ve ever burned your fingers on a hot glue gun (like I have), this one’s a breeze. Wrap jute twine around your candle holder, glueing at the start and endpoint. Add a loop at the top to hang them, or fill with a tea light for a soft glow. These look especially cozy on a mantel or dining table.
What works best: Use holders of different heights for visual interest, and keep the twine wrapping loose for a relaxed vibe.
Common mistake: Gluing too much at once—just a dab every 10 cm (4 in) is enough. Too much glue, and the twine gets sticky.
Upcycled Tin Can Luminary Pathway
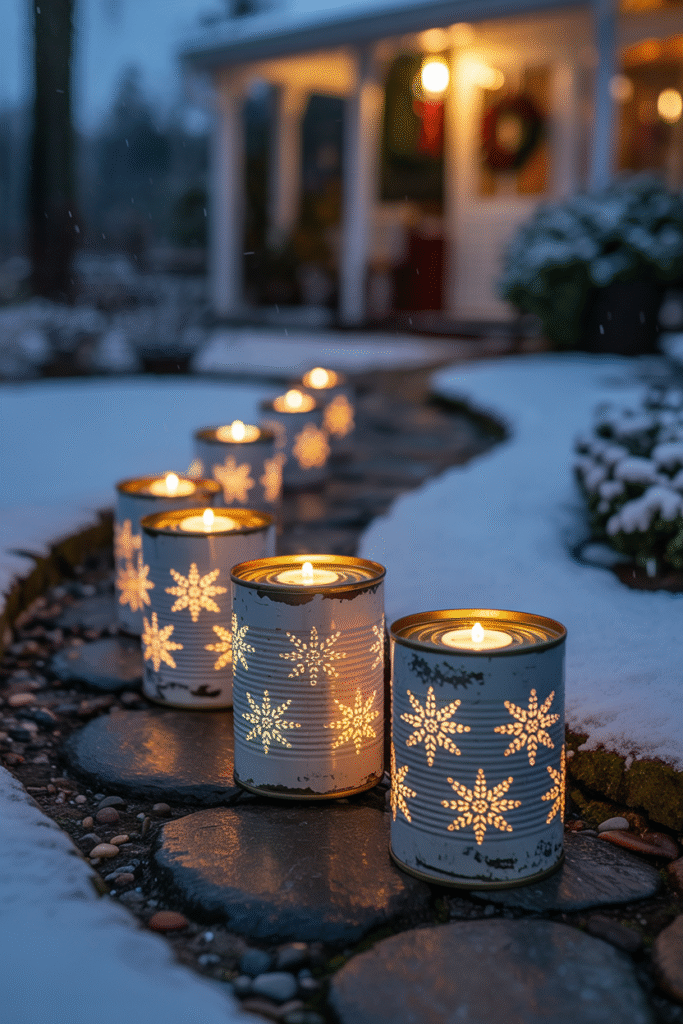
Materials: Clean, empty tin cans (200–400 ml / 7–14 oz); awl or nail; hammer; battery-operated tea lights
Difficulty: Intermediate
Time: 30–60 minutes
Poke small holes in your cans with an awl (or hammer and nail) to create stars, Christmas trees, or simple dots. Place a battery tea light inside. I use these outdoors along my front path, but they work indoors too—just skip the real candles for safety.
Personal example: Last Christmas, my neighbor and I set up 15 of these on his front walkway. We did the cans together, and even his kids could help with the simpler patterns.
Tip: If you don’t want to punch holes, spray-paint the cans white or silver and fill with pinecones and lights.
Clothespin Sleds for Mini Displays

Materials: Wooden clothespins, craft glue, twine, mini figures, small artificial snow, acrylic paint
Difficulty: Beginner
Time: 30 minutes
One of my favorite discoveries: hot glue two full clothespins together (flat sides out) at a slight angle to make a sled shape. Paint them red, white, or leave them bare for a natural look. Glue a twine “pull,” add mini reindeer or snowmen, and you’ve got instant holiday vignettes.
What works best: If you paint them, use two coats for durability. Add a sprinkle of fake snow for extra charm.
Avoid this: Don’t overload the sled—keep the figures small and lightweight.
Felted Wool Ball Garland (Bonus: It’s Odor-Absorbing)
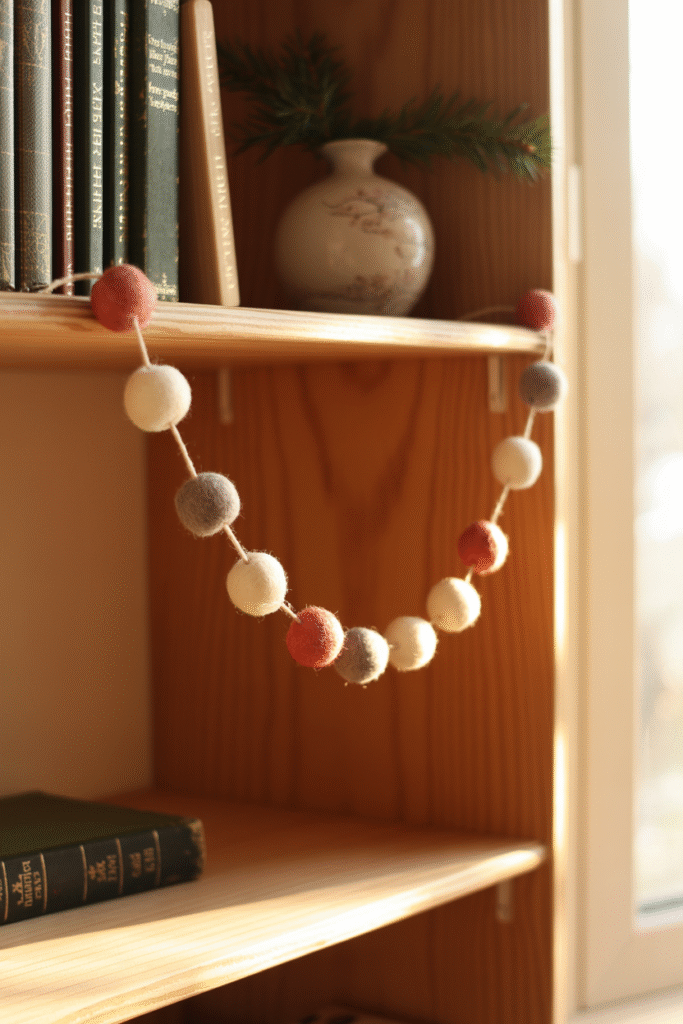
Materials: Wool roving or old felt scraps, felting needle, fishing line or cotton string
Difficulty: Beginner/Intermediate
Time: 60–90 minutes
Roll roving or felt scraps into balls, and felt them (or skip that step for simplicity). Thread onto fishing line for a garland that smells faintly like wool and lasts years. I drape mine across my bookshelves every year, and it never gets old.
Honest talk: Needle felting is fun but requires patience—try dry felting kits if you’re new. Or skip the felting and just roll up felt strips for a similar look.
Tip: Mix sizes and colors for visual interest—no need to be perfect.
String Art Christmas Trees on Reclaimed Wood
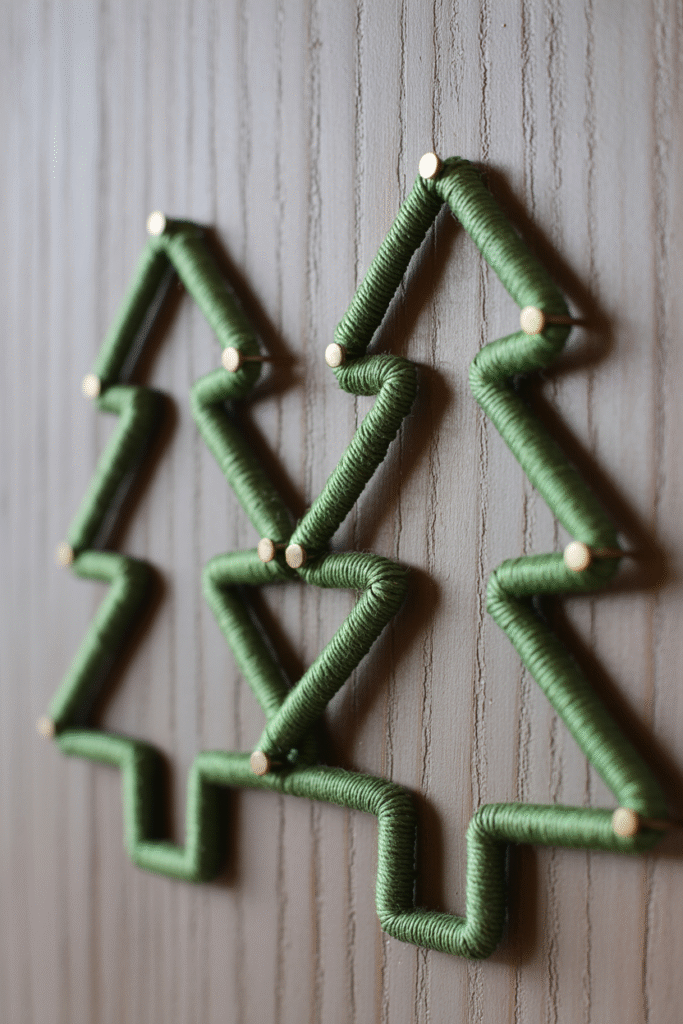
Materials: Scrap wood (20 x 30 cm / 8 x 12 in), nails, green thread or embroidery floss
Difficulty: Intermediate
Time: 60 minutes
Hammer nails into a triangle tree shape on your wood scrap, then wind thread around the nails to fill in the shape. I worked on this with my niece last year, and her messy, uneven tree turned out the most charming.
Common mistake: Don’t space the nails too close—about 2.5 cm (1 in) apart is plenty.
Variation: Use different colors for a gradient effect, or let kids do their own designs.
Mason Jar Snow Globe Centerpieces
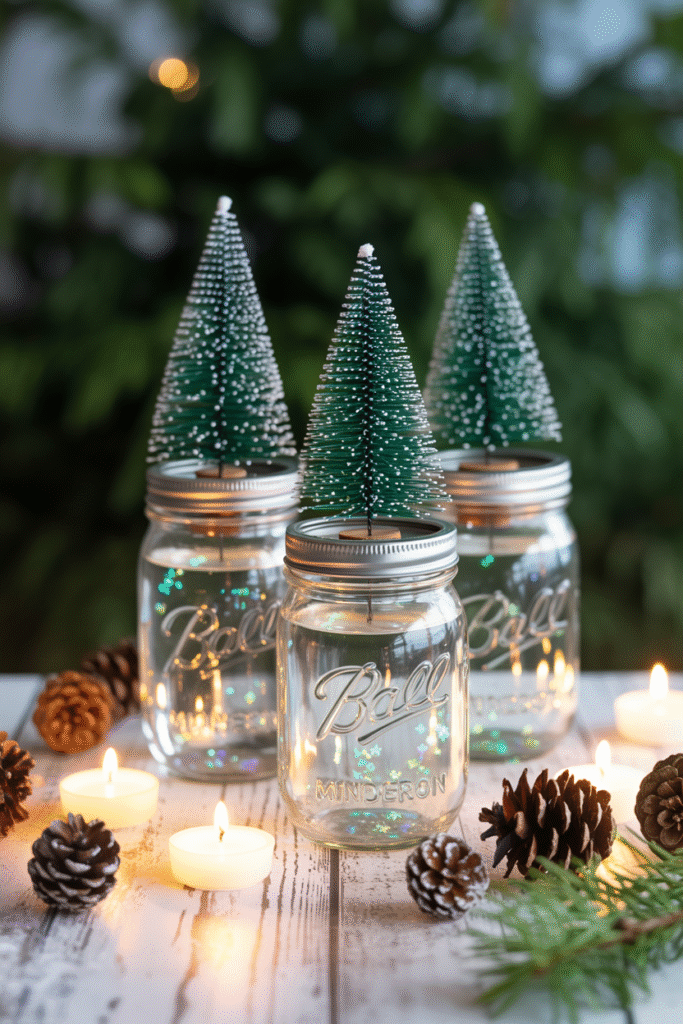
Materials: Small mason jars (250–500 ml / 1–2 cups), small plastic Christmas trees or figurines, white glitter, glycerin (optional), glue
Difficulty: Beginner
Time: 20 minutes per globe
Glue a tree or figure to the inside of the lid, fill the jar with water and glitter, add a tiny bit of glycerin to slow the glitter’s fall, then screw the lid tightly. These look magical on tables, especially in candlelight.
Pro tip: Buy small tree figurines at a dollar store, or use old Christmas ornaments. Extra glitter is always a win.
Safety: Superglue the figure to the lid so it doesn’t tip over, and avoid glass breakage by using plastic jars if you’re worried.
Burlap and Twig Table Runner

Materials: Burlap cut to fit your table, small twigs (2–3 cm thick), twine, greenery sprigs, pinecones
Difficulty: Beginner
Time: 30 minutes
Cut burlap to your table’s length, lay it flat, and arrange twigs diagonally across the runner. Tie with twine at intersections. Tuck in sprigs of greenery and pinecones for texture. I use this one every year, and guests always ask where I bought it.
What works best: Use real greenery if you can—it smells amazing.
Avoid this: Don’t glue anything, or you won’t be able to repurpose the burlap. Just tuck and tie.
Paper Snowflakes as Window Clings
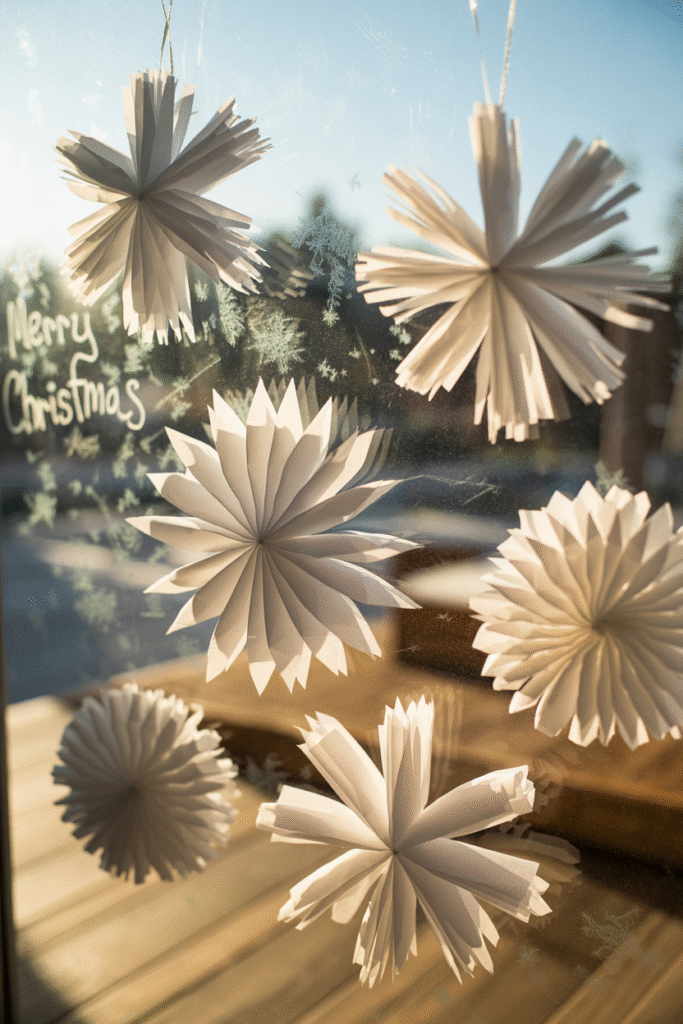
Materials: White tissue paper or coffee filters, scissors, water, paintbrush
Difficulty: Beginner
Time: 30 minutes
Mix equal parts water and glue, dip your folded coffee filters or tissue paper circles, flatten on a smooth surface, let dry, peel, and stick to windows using the dried glue film as a cling. I made these in my kitchen, and even on cloudy days, they look like real snow.
Personal anecdote: My niece and I did this one afternoon, and her less-than-perfect snowflakes looked adorable. Don’t stress precision—let kids go wild.
Painted Branch Ornament Tree

Materials: Straight branches (30–60 cm long / 12–24 in), spray paint (optional), twine or ribbon, mini ornaments
Difficulty: Beginner
Time: 15 minutes
Find a straight, forked branch, spray paint it white or leave it natural, and lay it flat on your mantel or table. Drape tiny ornaments from the fork using twine. I’ve used this as a minimalist tree alternative for years—it’s especially great for small spaces.
Variation: Hang three in a row, varying heights, for a winter forest look.
Vintage Book Stack Advent Calendar

Materials: Old books, small envelopes (5 x 8 cm / 2 x 3 in), 24 tiny slips of paper, twine, craft glue
Difficulty: Beginner
Time: 45 minutes
Choose three thick books, stack them, and glue 24 small envelopes (label with numbers 1–24) to the covers. Fill each with a slip of paper—a holiday activity, treat, or mini gift card. This one doubles as decor and a fun tradition. I did this for my neighbor’s kids last year, and they loved the daily surprise.
What works best: Pick books with red, green, or gold spines. Old cookbooks with holiday recipes work perfectly.
FAQs
How do I make these ideas work in a small space?
Focus on vertical and tabletop decor—things like window clings, paper trees, and branch ornament trees keep the holiday vibe without crowding your surfaces. I’ve used all these ideas in tiny Mumbai apartments, and they fit just fine.
What if I’m not crafty?
Pick the easiest projects: paper snowflakes, clothespin sleds, or upcycled luminary cans. All take under an hour, and no one will judge if yours aren’t “Pinterest perfect.”
How do I keep things fresh year after year?
Stash your handmade decor carefully, and swap out combinations each season. Last year’s felted garland plus this year’s twig table runner makes it feel new. I keep a “holiday box” and play editor each December.
Do these ideas work for outdoors too?
Yes, but use battery-operated lights, avoid paper outside, and make sure nothing blows away. I’ve used tin can luminaries and branch trees on porches with great success.
What’s the best way to let kids help?
Hand them the simplest tasks—cutting snowflakes, painting clothespins, or placing ornaments. The imperfections make it memorable.
How do I know I’m not just making more clutter?
Pick projects you truly love, and keep the rest minimal. I decorate one main wall, my entryway, and the dining table—that’s it. The rest stays uncluttered.
Wrapping Things Up
Holiday decorating doesn’t have to mean a big budget or a marathon weekend of crafts. The best, warmest homes use bits of creativity, what’s already lying around, and a little time for tradition. These 11 ideas are all things I’ve personally tried, and I’m confident you can make your home feel festive—and authentic—on any budget.