

We’ve all been there, staring at a pile of laundry, wondering how it all fits (or doesn’t) into that one closet or alcove labeled “laundry room.” Maybe you’re juggling detergent bottles, mismatched hangers, and that ever-growing sock collection with no home. Honestly, most laundry spaces I’ve helped organize start out the same: cluttered, uninspired, and fighting for every bit of storage real estate. But here’s the promise: with a few smart tweaks, you can transform your laundry area from chaotic to calm and functional. No big remodels, no “luxury” budgets just practical, real-life solutions that I’ve tried myself or seen work for dozens of homeowners, from cozy apartments to sprawling houses.
In this guide, I’ll walk you through 11 storage and organization ideas you can use right now, with clear steps, honest costs, and even the mistakes I’ve made (so you don’t have to). Whether you’re a hands-on DIY-er or just want things to look a bit neater without all the fuss, I’ll show you what’s actually worked in my own projects not just copied from Pinterest, but tested in real, sometimes messy, laundry rooms.
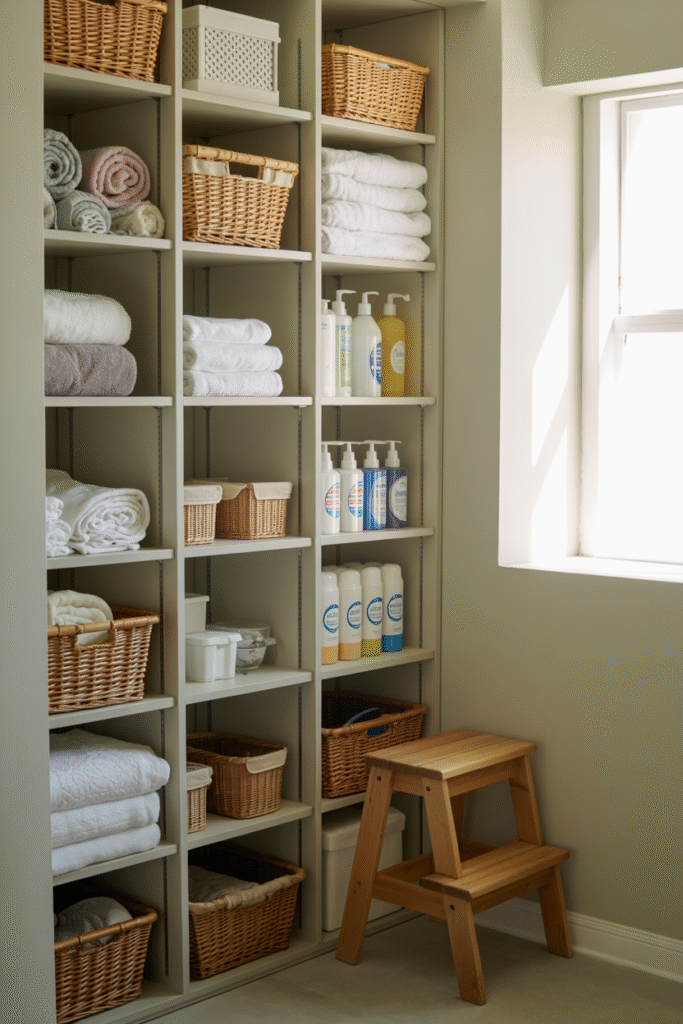
Start With a Practical Assessment: What Really Lives Here?
Before you even pick up a storage basket, step back and take inventory. I always tell my clients to dump everything out (yes, onto the floor if you have to!) and sort it into categories detergents, stain removers, ironing tools, clothing, random extras. You’d be surprised how much lives in your laundry area “temporarily” but never leaves. Once, I found three old college sweatshirts and a bag of mittens from last winter, all stuffed in a forgotten corner behind the dryer.
Pro tip:
Get your laundry space down to just the essentials things you use regularly. If you wash pet blankets, keep a spot for those. If you iron weekly, make space for your board and steamer. The rest? Donate or relocate.
Vertical Space: The Forgotten Goldmine
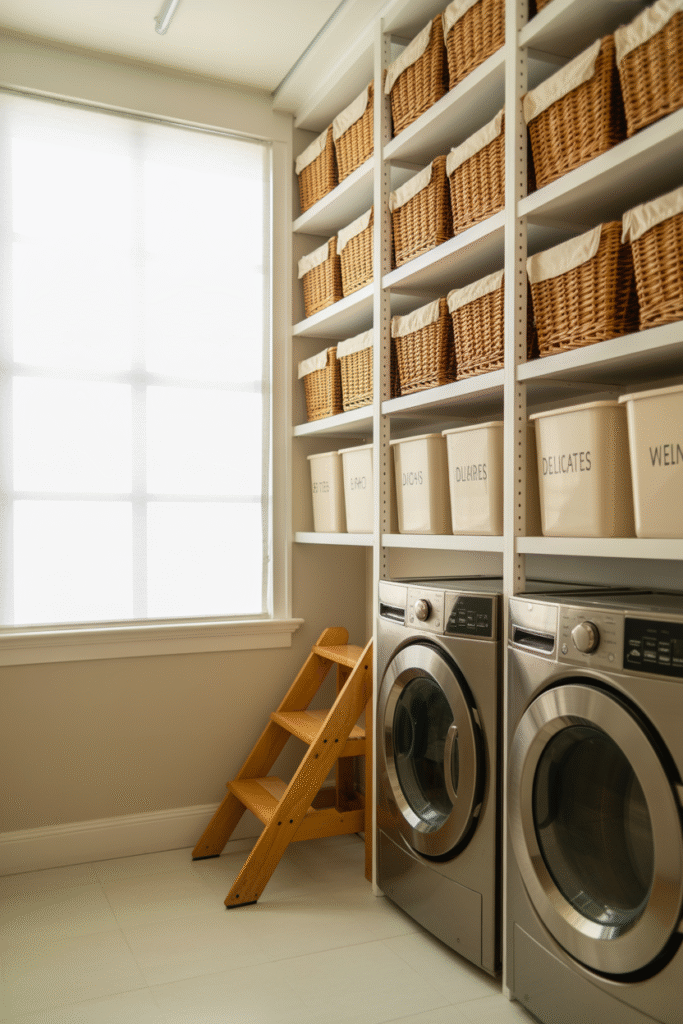
If you only remember one trick from this article, let it be this: go up. Most laundry rooms have untapped storage above eye level—open shelving, wall-mounted cabinets, even ceiling-mounted rods for hanging. In my current house, I installed open shelves above the washer and dryer at 240 cm (7’10”) from the floor. They keep rarely used items (luggage, off-season bedding) out of the way but still accessible.
- Cost: Basic shelving hardware + pine boards—around ($30–$50 USD)
- Time: 2–3 hours for install (beginner level)
- Skill: Basic drilling and measuring; pre-cut boards from the hardware store make this easier
- Avoid this: Overloading shelves or using flimsy brackets—heavy detergent bottles add up in weight fast!
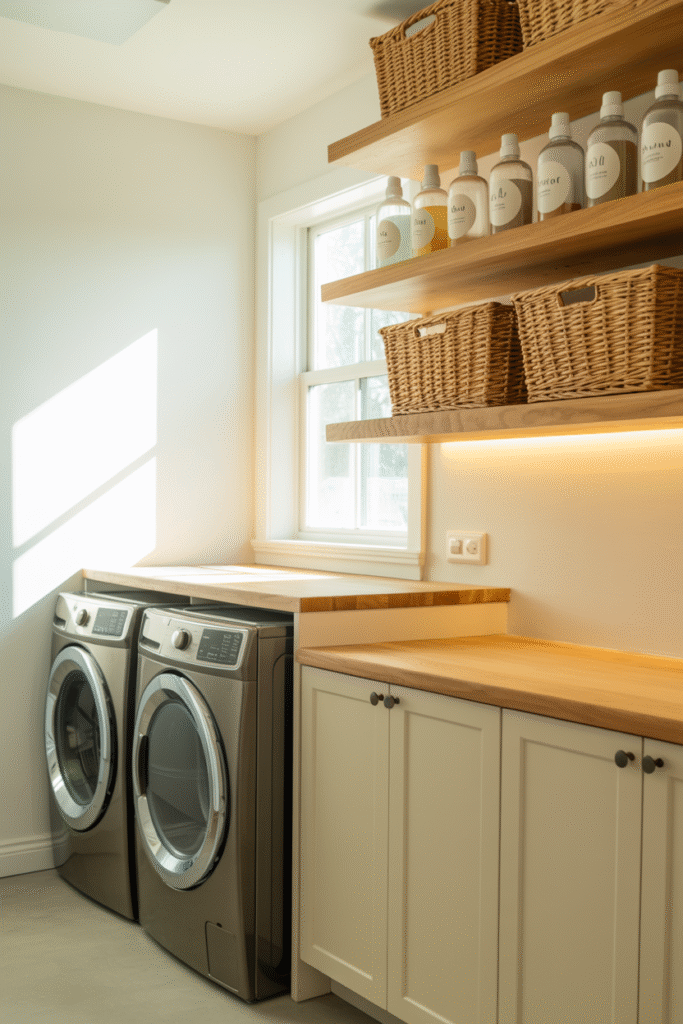
Custom Countertops for Multitasking
One of my favorite DIY upgrades is a custom counter over your front-loading machines. I’ve built mine from waterproof plywood (MDF and regular wood warp with humidity), cut to fit snugly between walls or cabinets. My current counter is 92 cm (36”) deep and spans the full width of the machines—about 1.2 meters (4’) wide. It gives me a spot for folding fresh laundry, a staging area for ironing, and hides the machines from view when everything is put away.
- Materials: 2-cm (¾”) thick waterproof plywood, wood stain or primer/paint, edge trim
- Cost: ($60–$100 USD), plus a weekend of your time
- Skill: Moderate requires basic cutting and finishing
- Alternative: Ready-made folding tables exist, but custom builds fit awkward spaces perfectly
Pull-Out Hampers and Divided Sorting Stations
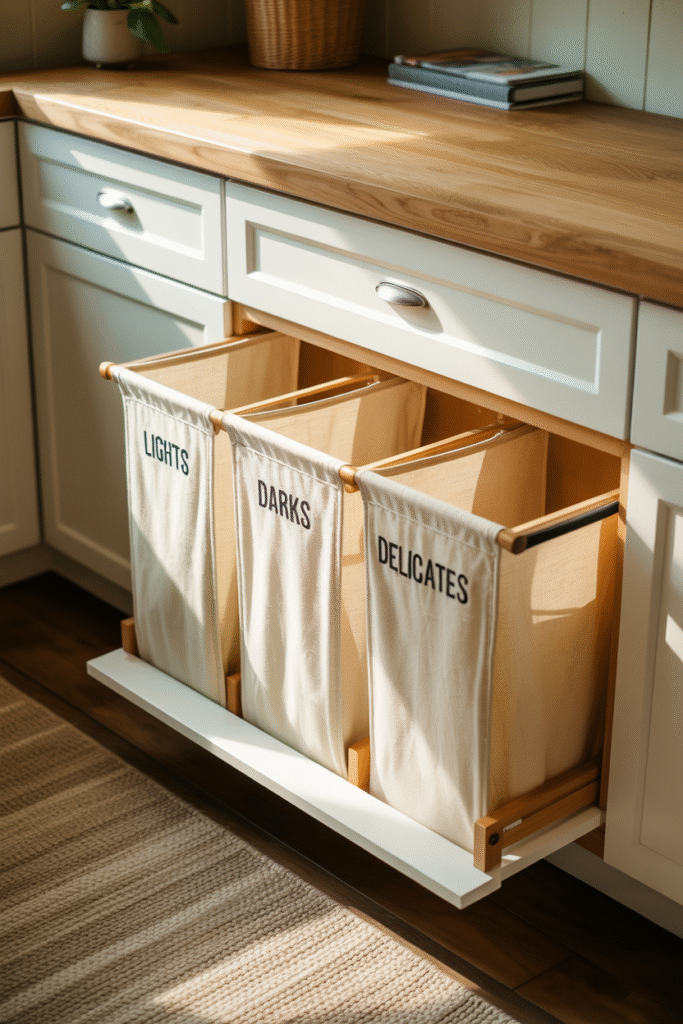
If you’ve ever emptied a hamper just to sort dirty clothes, try this: built-in pull-out sorting bins. My first project was a set of three canvas bins in a wooden frame, on drawer slides (ball-bearing, not cheap nylon). Each bin is about 40 cm × 60 cm (16” × 24”)—ideal for lights, darks, and delicates. The key? Label each bin clearly, and use vinyl or chalkboard stickers so you can adjust categories as your habits change.
- Materials: Plywood, drawer slides, canvas bins, labels, wood screws
- Cost: ($40–$80 USD)
- Time: About half a day for a sturdy version
- Skill: Beginner if you’re patient; advanced if you want seamless finishes
- Lesser-known tip: Consider a fourth bin for “dry clean only”—prevents last-minute panics!
Wall-Mounted Drying Racks That Disappear
Hanging space in a laundry room is priceless, but bulky drying racks eat up floor area. I discovered European-style wall-mounted racks years ago; mine folds up flat against the wall and pulls out to hold a full load of damp clothes. The model I use is 120 cm (4’) long and supports about 5 kg (11 lbs) of wet laundry easily.
- Cost: ($40–$80 USD)
- Install: Needs secure wall anchoring—find a stud, not just drywall
- Alternative: Over-the-door hanger racks work in tight rentals
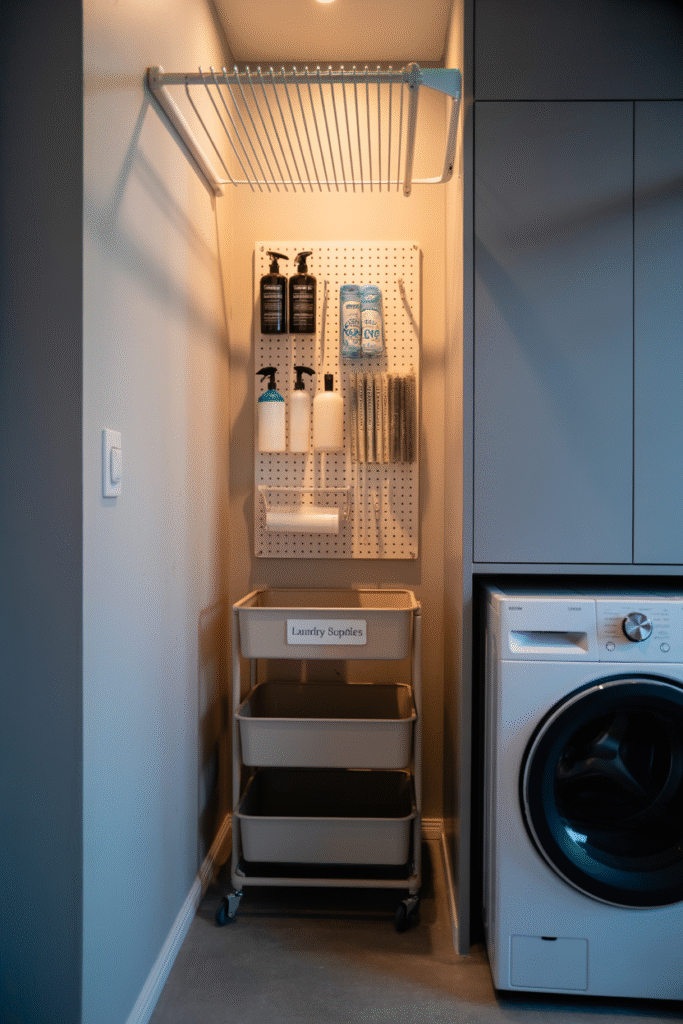
Pegboard Panels for All Your Accessories
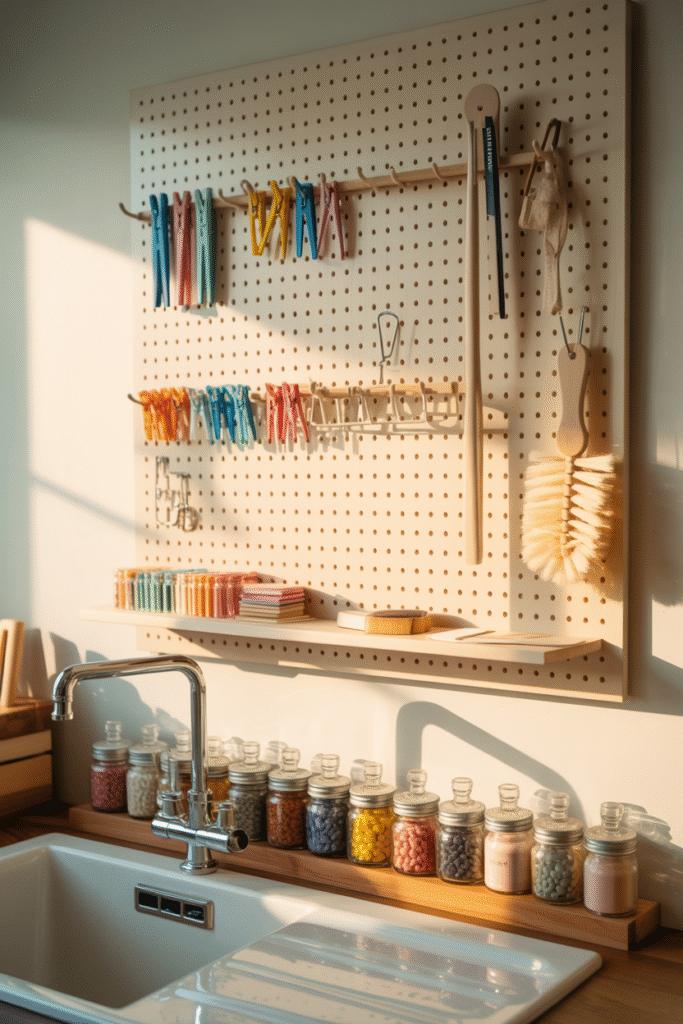
Pegboard is not just for garages—it’s a laundry room MVP. I have a 60 cm × 120 cm (2’ × 4’) pegboard panel above my sink, with hooks for small spray bottles, lint rollers, and clothespins. It’s adjustable, cheap, and takes 45 minutes to install with basic tools.
- Materials: Pegboard, hooks, wall anchors
- Cost: ($12–$25 USD)
- Pro tip: Spray-paint the pegboard to match your color scheme; it looks intentional, not industrial
Rolling Carts: Flexible, Not Flimsy
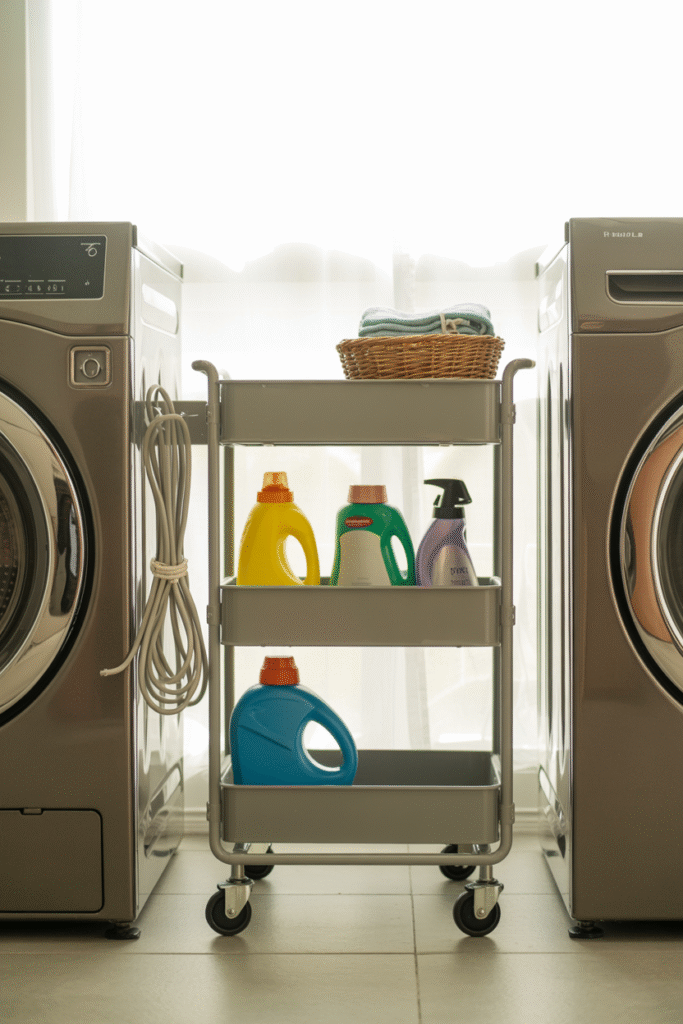
I resisted rolling carts for years, assuming they’d feel cheap or clunky. But a good metal cart with locking wheels is a game-saver for small laundry nooks. Mine slides between washer and dryer (40 cm/16” wide), holds ironing supplies, and rolls out for folding. Look for powder-coated metal frames—plastic bins warp over time.
- Cost: ($25–$65 USD)
- Time: Assembly in 20–30 minutes
- Skill: Anyone can manage this
Hidden Storage Behind Doors and Under Sinks
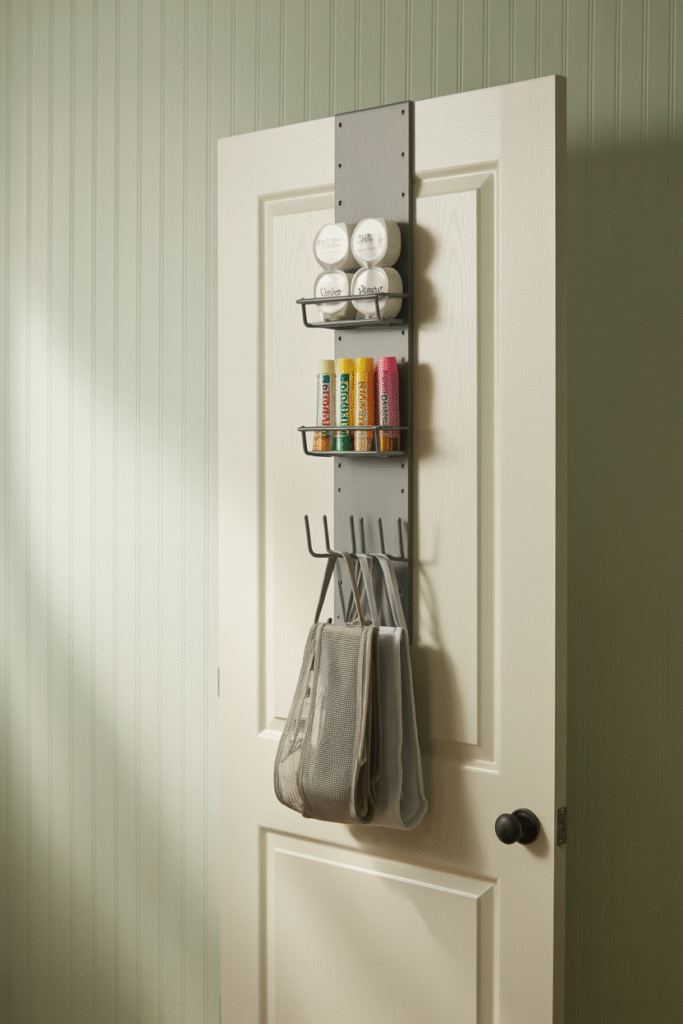
Don’t overlook the space behind your laundry room door. I installed a narrow shelving unit (18 cm/7” deep) that holds detergent pods, spare sponges, and stain sticks. Under the sink, a simple tension rod creates a spot for hanging spray bottles and drip-dry gloves.
- Cost: ($6–$20 USD)
- Time: 30 minutes per project
- Skill: As easy as hanging a coat hook
Lidded Bins for Odor Control
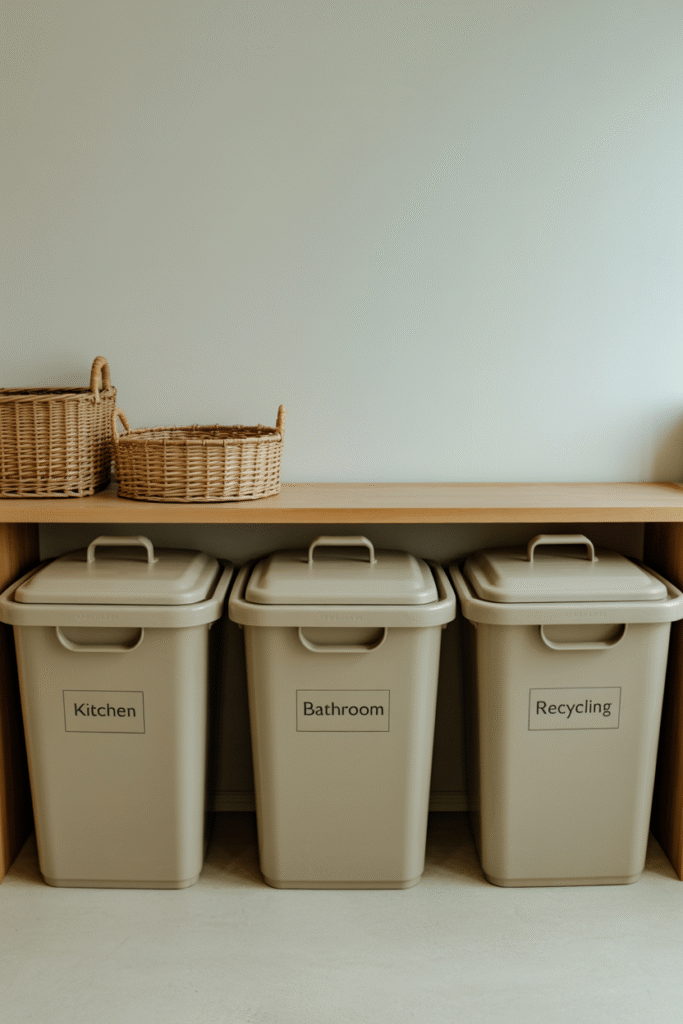
I learned this one the hard way: wet towels left in an open hamper start to smell by day two. Now, I use lidded plastic bins for dirty laundry—especially with kids or pets involved. Bins with handles are easier to carry to the machines. My go-to size is 60 liters (16 gallons), which fits a standard load.
- Cost: ($4–$13 USD) per bin
- Bonus: Label bins by room or person for easy sorting
Built-In Ironing Boards You’ll Actually Use
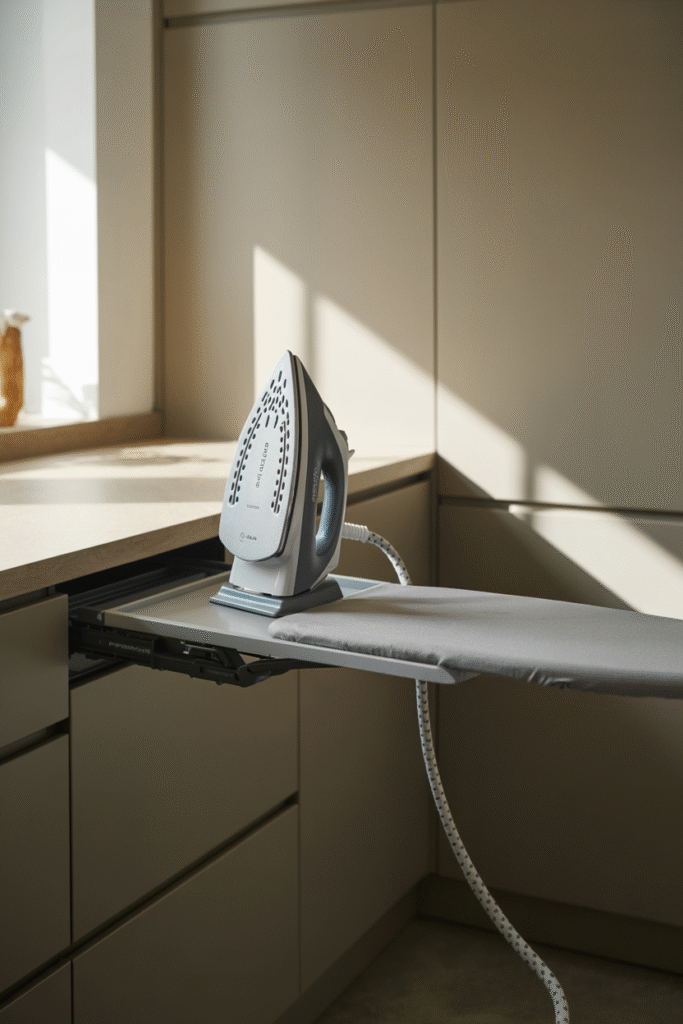
Pull-down or slide-out ironing boards may seem gimmicky, but they’re a revelation if you iron regularly. I built a simple slide-out board under my counter—it pulls out like a drawer, rests on a support leg, and tucks away when done. The board itself is 40 cm × 120 cm (16” × 48”), padded with heat-resistant fabric from a local upholsterer.
- Materials: Plywood, drawer slides, padding/fabric, leg
- Cost: ($40–$80 USD)
- Skill: Moderate; requires precise measurements
Lighting That Makes the Job Easier
Overhead lighting is rarely enough for spotting stains or matching socks at night. I added LED strip lights under my shelving total cost was about ₹1,500 ($19 USD), and the difference was immediate. For a bigger project, consider a dimmable ceiling fixture.
- Cost: ($12–$38 USD)
- Time: 30 minutes to an hour
- Skill: Beginner-friendly with plug-in options
Repurpose and Upcycle: Think Outside the Laundry Room

Sometimes the best solutions are borrowed from other spaces. An old freestanding cabinet became my detergent and supply station I painted it robin’s egg blue, added new knobs, and now it’s the prettiest thing in the room. If you’re on a budget, check local buy/sell groups or flea markets for solid wood pieces.
- Cost: Free to ($0–$25 USD) plus a weekend of DIY love
- Skill: Basic sanding and painting
Common Mistakes (And How to Skip Them)
- Buying baskets before measuring: I once bought six beautiful bins, only to find they didn’t fit side by side. Always measure twice.
- Ignoring humidity: Laundry rooms can get damp. Choose materials that resist moisture—plywood over MDF, metal over cardboard.
- Forgetting about ergonomics: Don’t put heavy items up high or hampers too low—your back will thank you.
- Over-organizing: Fancy systems are great, but if they’re too complicated, you won’t use them. Keep it simple.
What If You Rent?
Not everyone can drill holes or build custom counters. Tension rods, over-the-door organizers, and freestanding shelving work in rentals. Command hooks and peel-and-stick tiles can personalize your space without damage.
Bringing It All Together
Organizing a laundry room isn’t about perfection it’s about making your life a little easier every time you toss in a load. Start small: pick one or two ideas from this list that fit your space and habits. I promise, even a single change, like adding a pegboard or a rolling cart, can transform your laundry routine.
Laundry Room Organization FAQs
Q: How do I keep laundry room cupboards from smelling musty?
A: Line shelves with adhesive shelf liner, leave the doors open for airflow when possible, and stash a small box of baking soda or charcoal in a corner. I do this every season, and it works wonders.
Q: What’s the best way to store cleaning chemicals safely with kids and pets?
A: Use high shelves or locked cabinets—don’t rely on childproof latches alone. I keep mine in a lidded bin on the top shelf, clearly labeled, and always out of reach.
Q: How often should I deep clean and organize my laundry space?
A: Once a season is plenty for most people. I do a quick wipe-down of surfaces weekly, and a full clear-out in spring and fall—that’s when I switch out seasonal linens and review what’s actually getting used.
Q: Can I install a counter over top-loading machines?
A: You can, but it’s trickier. You’ll need a split counter or a folding design that lifts when you open the lid. I’ve seen hinged panels that work, but they take more skill to build.
Q: My laundry room is tiny—any hope for me?
A: Absolutely! Focus on vertical storage, slim rolling carts, and multi-use solutions. I once helped a client with a closet-sized laundry “room”—we used the back of the door for drying racks and wall-mounted everything else. It’s cozy but fully functional.
Q: What’s a realistic budget for a laundry room makeover?
A: You can make a big difference for ($60–$180 USD), depending on materials and how much DIY you do. Splurge on one or two quality items (like a counter or shelving), and be creative with the rest.
Ready, Set, Organize
There you have it real, tested, from-my-laundry-room-to-yours advice. Remember, the goal isn’t a magazine-worthy space (though that’s fine too!), but a room that works for your life. Pick a weekend, grab a coffee, and start with one corner. You’ll be folding with a smile before you know it.