

Some kitchens look messy even when they’re technically “clean.”
You know that feeling? The counters are full, drawers are jammed, and you can never find the scissors when you need them.
In my experience, most people don’t need a bigger kitchen. They just need a smarter one. When you give every item a clear “home” and set up simple systems, your kitchen suddenly feels calmer, easier to cook in, and way faster to clean.
In this guide, I’ll walk you through 18 practical kitchen organization ideas I actually use in real homes and in my own kitchen. Every idea includes what you need, rough cost, how long it takes, and what to watch out for, so you can start implementing them today one small win at a time.
1. Start With a One-Drawer “Win” Zone
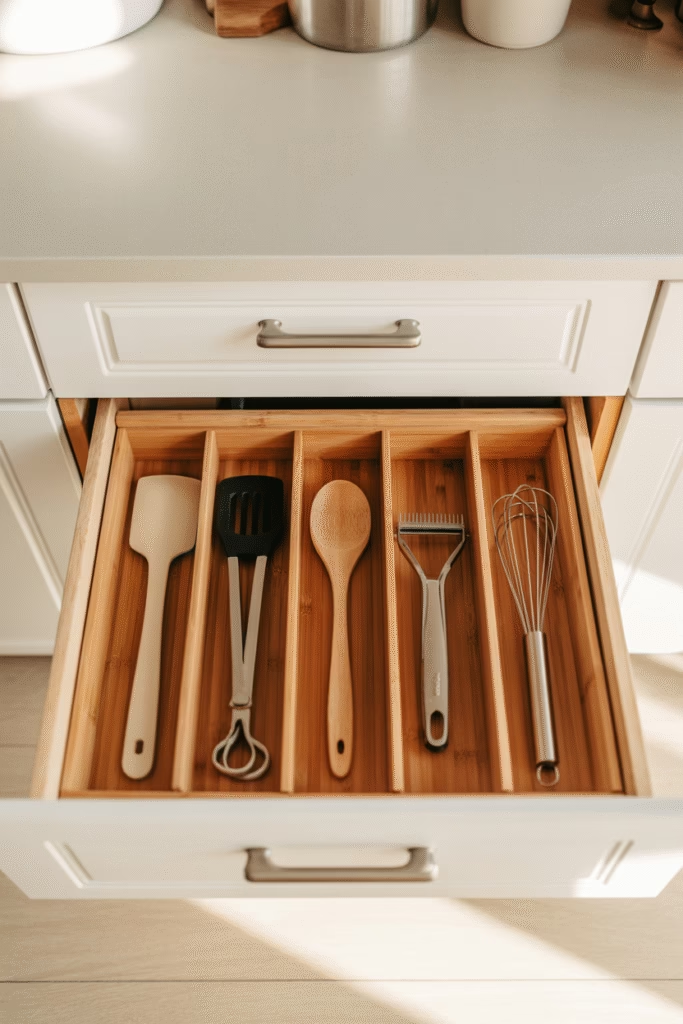
Instead of tackling the whole kitchen and burning out, start with one drawer and turn it into your “win zone.”
Pick the drawer you open the most—usually the one near the stove or your prep area.
Goal: Make this your “smooth cooking” drawer: essentials only.
What you’ll need:
- Simple drawer organizers (plastic, bamboo, or acrylic)
- Measuring tape
- A donation/declutter box
Steps:
- Empty the drawer completely.
- Wipe it down with a mild cleaner.
- Sort items into:
- Daily use
- Occasional use
- Never use
- Only put daily use items back: spatulas, tongs, favorite spoon, peeler, etc.
- Use organizers to keep tools separated.
In my experience, once people feel how good this one organized drawer feels, they naturally want to fix the rest.
Time: 20–30 minutes
Cost: €10–€30 (about $10–$30) depending on organizers
Difficulty: Easy
Avoid this: Don’t overfill the drawer “just because it fits.” Empty space is your friend.
2. Create Clear Cooking “Zones” Instead of Random Storage

Most disorganized kitchens have one big problem: stuff is stored by where it fits, not how it’s used.
What works best is to divide your kitchen into zones:
- Prep zone: cutting boards, knives, mixing bowls
- Cooking zone: pots, pans, spatulas, spices, oils
- Cleaning zone: dish soap, sponges, towels
- Coffee/tea zone: mugs, filters, kettle, sugar
- Storage zone: containers, wraps, foil, bags
Steps:
- Stand in front of your stove. Anything you cook with daily should be within one step and one arm’s reach.
- Move pots and pans to the cabinet closest to the stove.
- Keep spices and oils on a nearby shelf or pull-out organizer.
- Put cutting boards and knives near the main prep surface.
I’ve found that even without buying anything new, just reshuffling into zones makes a kitchen feel 50% more functional.
Time: 1–2 hours
Cost: Free, unless you buy extra organizers
Difficulty: Medium (because you’ll make a mess before it gets better)
3. Use Vertical Space Inside Cabinets (Double Your Shelves)
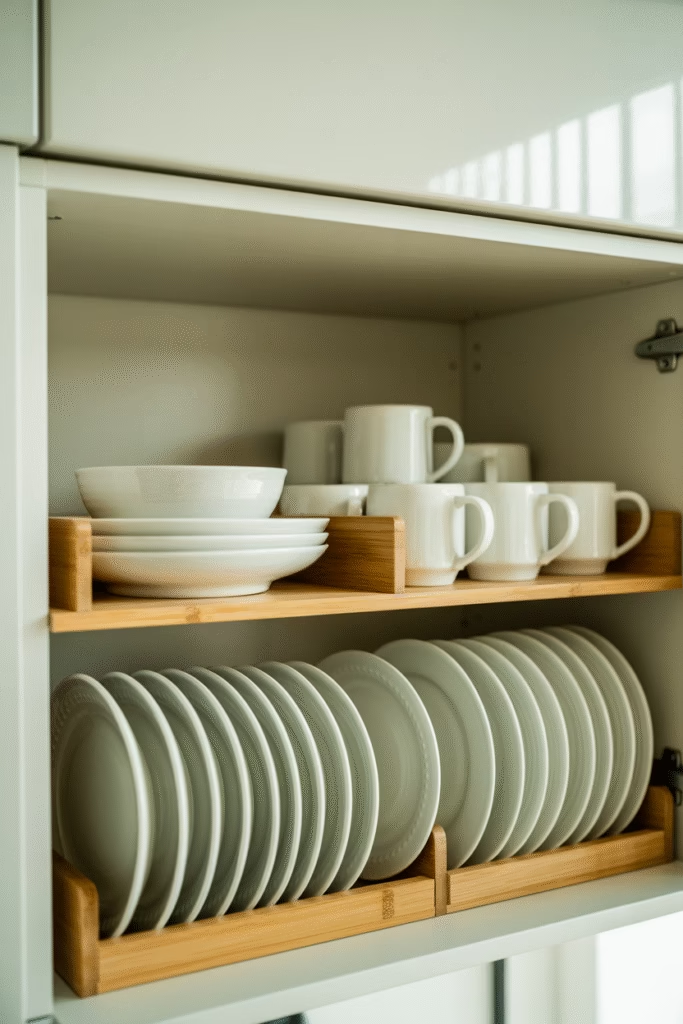
Most cabinets waste the top half of the interior space. You open the door and see a big gap above your plates or mugs.
The easiest fix? Shelf risers.
What you’ll need:
- Metal or bamboo shelf risers (height around 15–20 cm / 6–8 in)
- Measuring tape
Best places to use them:
- Under mugs, so you can have two levels
- With plates and bowls
- For canned goods
In my projects, I use these a lot in smaller kitchens. Suddenly, one shelf holds twice as much, but everything is still visible and reachable.
Time: 10–15 minutes per cabinet
Cost: €8–€20 per riser ($8–$20)
Difficulty: Easy
Pro tip: Measure the interior depth of your cabinet before buying. Many people get risers that are too deep and then the door won’t close properly.
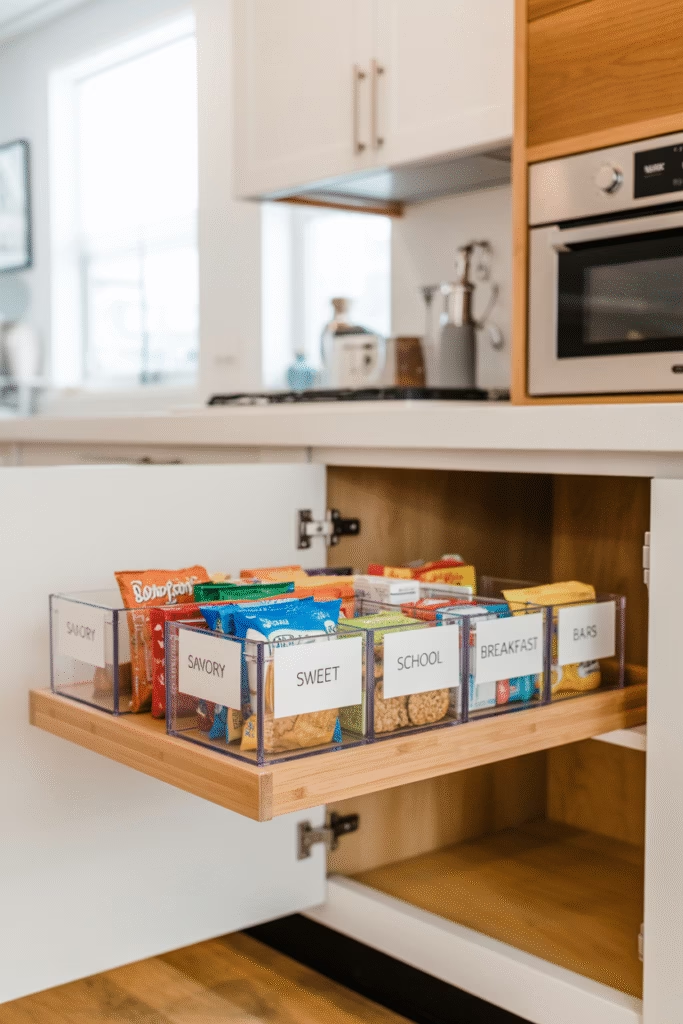
4. Turn One Cabinet Into a Pull-Out “Snack Station”
If you have kids, or honestly even just snack-loving adults, you’ll love this.
What works best is dedicating one lower cabinet or deep drawer to snacks and making it super easy to access and see everything.
What you’ll need:
- 2–4 plastic or bamboo bins
- Labels or a label maker
- Optional: clear jars for decanting loose snacks
Steps:
- Choose a low cabinet so kids can reach it safely.
- Group snacks into categories:
- Savory
- Sweet
- School/work snacks
- Breakfast bars
- Assign each bin a category and label it.
In my experience with families, this reduces “Mum, where are the biscuits?” by at least 70%. It also helps you see when you’re running low.
Time: 30–45 minutes
Cost: €15–€40 ($15–$40)
Difficulty: Easy
Avoid this: Don’t overfill the bins. If it doesn’t fit, don’t buy more of that snack. The bin is a natural limit.
5. Use the Back of Doors for Hidden Storage
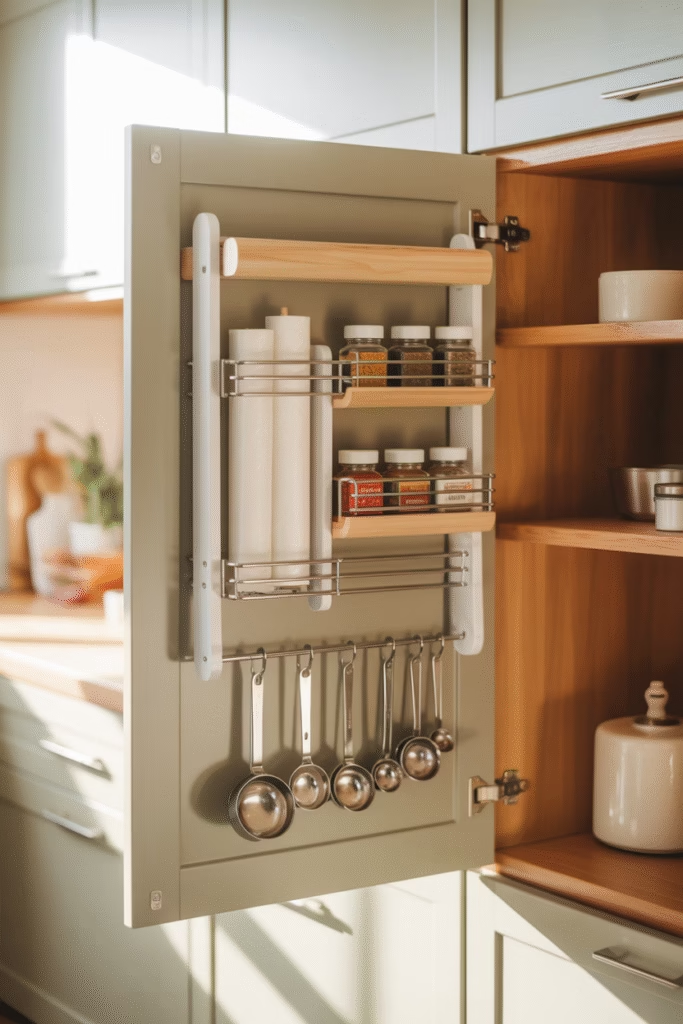
The back of cabinet doors is massively underused real estate.
In my own kitchen, the inside of doors holds:
- Chopping board
- Foil and cling film
- Small cleaning supplies
- Pot lid holders
Ideas you can implement:
- Spice racks on the inside of a pantry door
- Slim caddies for wraps and foil
- Hooks for oven mitts or measuring spoons
What you’ll need:
- Over-the-door organizers or screw-in racks
- Screws and screwdriver (if not over-the-door)
- Measuring tape
Time: 20–40 minutes
Cost: €10–€30 ($10–$30)
Difficulty: Easy
Safety note: If you’re screwing into the door, check thickness first. Use short screws (about 1–1.5 cm / 0.4–0.6 in) so they don’t poke through.
6. Tame the Plastic Container Chaos

Every home has that one cabinet where lids go to die.
In my experience, the only way to control food containers is to make lids and bases separate categories and to be a bit ruthless.
Steps:
- Pull out every container and lid.
- Match lids to containers. Any container without a lid (or vice versa) goes in the donate/recycle pile.
- Decide on a maximum of 2–3 shapes you’ll keep (for example: round, rectangle, and one large salad bowl).
- Nest containers by size, store lids vertically in a file organizer or narrow bin.
What you’ll need:
- Narrow bin or file sorter for lids
- Donation/recycle box
Time: 45–60 minutes
Cost: €5–€20 ($5–$20)
Difficulty: Medium (because of decisions)
Pro tip: Whenever you buy takeaway, don’t keep every container “just in case.” Decide on a limit: for example, no more than 10 extra containers at a time.
7. Use Lazy Susans in Corners and Deep Shelves
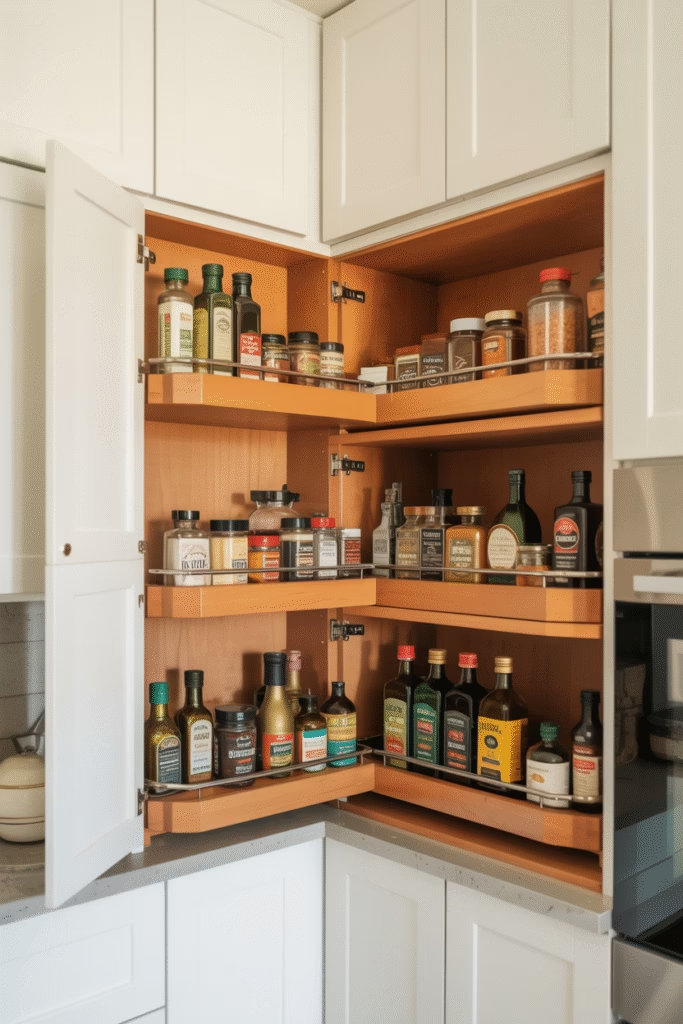
Those dark, deep corners of cabinets and fridges are where jars go to be forgotten.
What works best is using turntables (lazy Susans) so you can see everything with a quick spin.
Great places for lazy Susans:
- Corner base cabinets
- Upper corner cabinets for spices
- Fridge shelves for sauces and condiments
- Under-sink cleaning supplies
What you’ll need:
- 1–2 lazy Susans, 25–30 cm (10–12 in) diameter for cabinets
- Non-slip grip if your surfaces are slippery
In my projects, this alone reduces food waste because people actually use what they have.
Time: 10–20 minutes
Cost: €10–€25 per piece ($10–$25)
Difficulty: Easy
8. Install Tension Rods for Smart Vertical Dividers
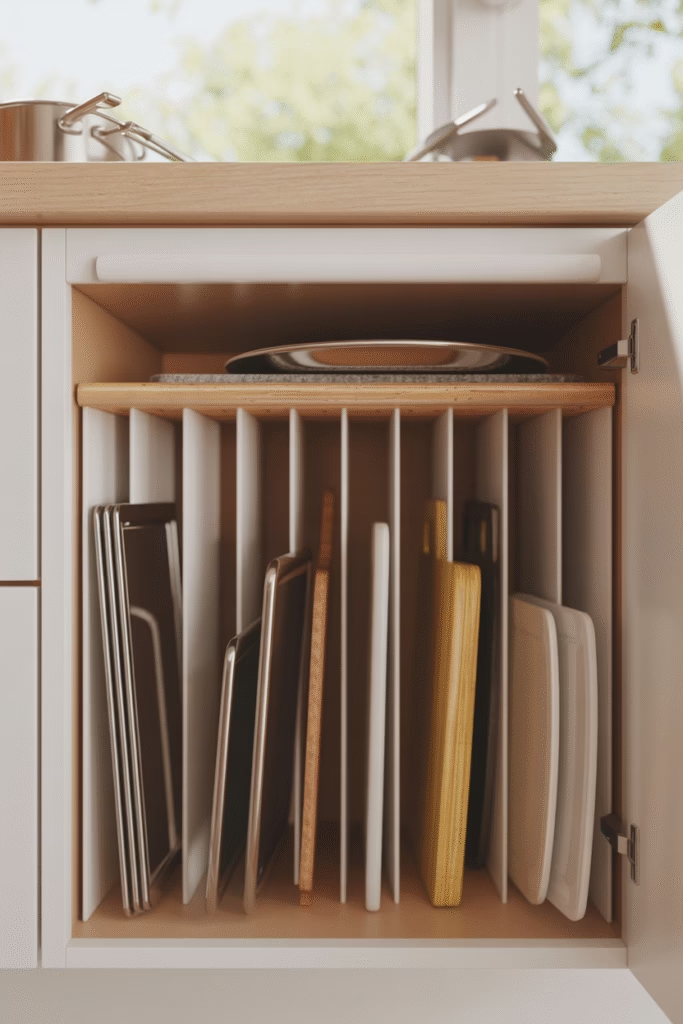
Tension rods aren’t just for curtains.
In my experience, they’re brilliant for standing things up vertically instead of stacking them in useless piles.
Ideas:
- Use 3–4 tension rods to create slots for:
- Baking sheets
- Cutting boards
- Trays
- Lids
- Use one under the sink to hang spray bottles by their trigger handles.
What you’ll need:
- Adjustable tension rods (30–60 cm / 12–24 in, depending on cabinet)
Steps for tray storage:
- Measure the interior width of your cabinet.
- Place rods vertically to create 10–15 cm (4–6 in) wide sections.
- Slide trays or boards between rods.
Time: 20–30 minutes
Cost: €10–€25 ($10–$25)
Difficulty: Easy
Avoid this: Don’t overload the rods with heavy cast iron. These are best for lighter items.
9. Make a “Coffee & Tea Corner” That Actually Works

Instead of scattering mugs, sugar, and tea everywhere, create one compact beverage zone.
In my kitchen, this small change made mornings feel so much calmer.
What you’ll need:
- Small tray (around 30–40 cm / 12–16 in)
- Canisters for tea, coffee, sugar
- Mug hooks or a nearby cabinet
Steps:
- Choose a spot near a socket for the kettle or coffee machine.
- Use a tray to gather coffee, tea, sugar, and spoons.
- Keep mugs directly above or next to this area.
Time: 20 minutes
Cost: €15–€50 ($15–$50) depending on what you already own
Difficulty: Easy
Pro tip: If counter space is tight, consider a slim wall shelf above the station for canisters, keeping the counter mostly clear.
10. Use Clear Bins in the Fridge (With Rules)

Fridge organization doesn’t have to be Instagram-perfect to work.
What matters most is visibility and access.
What you’ll need:
- 3–6 clear bins (width 10–15 cm / 4–6 in)
- Optional labels
Bin ideas:
- Breakfast (yogurt, spreads, boiled eggs)
- Grab-and-go snacks
- Vegetables that go bad quickly
- Leftovers
In my experience, the “leftovers” bin alone helps households stop losing small containers at the back.
Rules that help:
- Anything in the leftovers bin must be eaten within 2–3 days.
- Don’t stack bins more than one layer deep; it kills visibility.
Time: 30–45 minutes
Cost: €20–€50 ($20–$50)
Difficulty: Easy
Avoid this: Don’t decant everything into new containers if you hate extra work. Start with just 2–3 categories.
11. Assign a “Landing Zone” for Keys, Mail, and Random Stuff
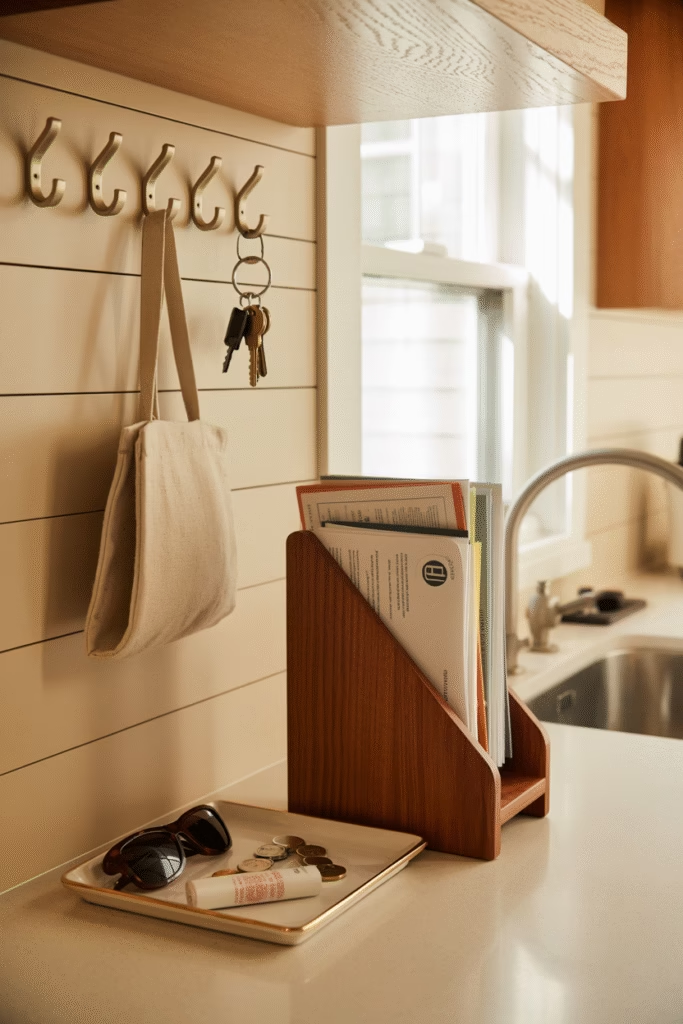
A lot of kitchen clutter isn’t kitchen-related at all. It’s keys, mail, receipts, sunglasses.
What works best is to accept that these will come in—and give them a proper spot.
What you’ll need:
- Small tray or shallow basket
- Wall hooks or a key rack
- Small file or letter holder for mail
Steps:
- Choose one spot near the entrance.
- Mount hooks for keys and bags.
- Add a tray for sunglasses, watch, etc.
- Use a small upright file for letters and bills.
In my experience, this prevents the entire counter from turning into a dumping ground.
Time: 30–60 minutes
Cost: €15–€40 ($15–$40)
Difficulty: Easy
12. Use Drawer Inserts for Cutlery AND Gadgets
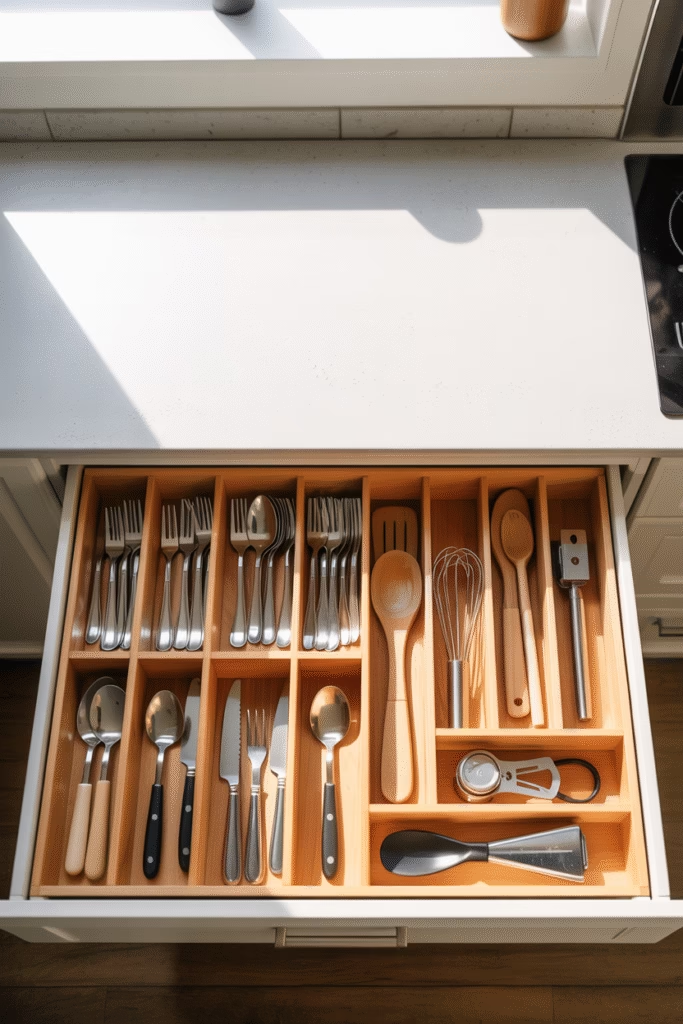
We all know about cutlery trays, but many people still have a “junk gadgets drawer.”
Instead of one giant chaotic drawer, split it into clear categories.
What you’ll need:
- Adjustable drawer dividers
- Or modular inserts that fit your drawer
Categories that work well:
- Everyday cooking tools (spatulas, wooden spoons)
- Baking tools (whisks, measuring spoons, spatulas)
- Small gadgets (peeler, garlic press, bottle opener)
When organizing clients’ kitchens, I always measure the drawer interior: width, depth, and height in cm and inches before buying inserts, to avoid that annoying 1 cm gap where nothing fits.
Time: 30–45 minutes
Cost: €20–€50 ($20–$50)
Difficulty: Easy
Avoid this: Don’t keep five identical peelers. Pick the best one and donate the rest.
13. Hang What You Can: Rails, Hooks, and Magnetic Strips

If drawer and cabinet space is limited, go vertical on your walls and backsplash.
Ideas:
- Magnetic knife strip instead of a block
- Rail with hooks for utensils, mugs, or small pots
- Ceiling-mounted rack (only if ceiling and beams can support it)
What you’ll need:
- Drill and wall anchors
- Knife strip or rails (length 40–60 cm / 16–24 in)
In my experience, a knife strip frees up a whole drawer and also feels more “chef-like” in the kitchen.
Safety note:
Install knife strips out of children’s reach and away from very humid areas to protect blades. Use proper wall anchors based on your wall type (plaster, brick, etc.).
Time: 30–90 minutes depending on tools
Cost: €20–€80 ($20–$80)
Difficulty: Medium (requires drilling)
14. Give Pots and Pans a Home That Matches Your Cooking Style

Pots and pans are bulky, so you need a clear plan.
There are three main approaches that have worked well in real kitchens:
- Deep drawer near the stove with pans stacked and lids vertical in a divider.
- Pull-out shelf retrofitted into a lower cabinet.
- Wall or ceiling rack (for people who love the “open kitchen” look).
What you’ll need (for cabinet solution):
- Pull-out hardware kit
- Screwdriver or drill
- Measuring tape
Measurements matter here. Measure:
- Interior width
- Interior depth
- Door clearance
Time:
- Simple rearrange: 30 minutes
- Install pull-out shelf: 1–2 hours
Cost:
- Rearranging: Free
- Pull-out shelf: €40–€120 ($40–$120)
Difficulty:
- Rearranging: Easy
- Pull-out installation: Medium
Pro tip: Keep only 1–2 pots and 2–3 pans you use constantly within easy reach. Backup pieces can live in a less accessible spot.
15. Label Strategically (Not Obsessively)

Labeling isn’t about being cute; it’s about helping everyone in the house follow the system.
In my experience, labels are most useful for:
- Shared spaces
- Deep pantries
- Bins and baskets where contents aren’t obvious
Good things to label:
- Pantry bins: “Pasta,” “Rice & Grains,” “Snacks,” “Baking”
- Fridge bins: “Leftovers,” “Dairy,” “Veg Ready-to-Eat”
- Lower kid-friendly drawers: “Plastic Cups,” “Kids Plates”
You can use:
- A basic label maker
- Chalkboard labels
- Masking tape + marker (simple and cheap)
Time: 20–40 minutes
Cost: €5–€40 ($5–$40)
Difficulty: Easy
Avoid this: Don’t label every single jar if you hate maintenance. Focus on categories and long-term containers.
16. Set Up a Simple Weekly “Reset” Basket
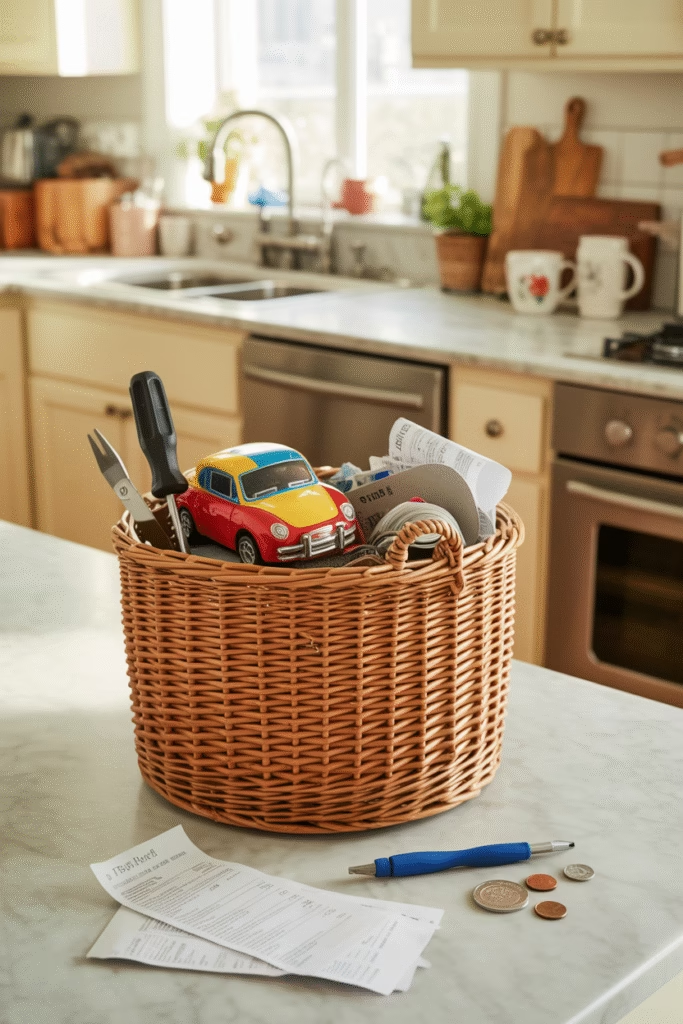
Even with great systems, kitchens drift toward chaos. That’s normal.
What works best is a small, weekly reset ritual rather than huge seasonal overhauls.
What you’ll need:
- One medium basket or tub (about 30–40 cm / 12–16 in wide)
Steps:
- Once a week (Sunday night works well), walk through the kitchen with the basket.
- Put in everything that’s out of place: random toy, screwdriver, stray pen, receipts.
- Return items to their proper room or drawer.
- Quickly scan the fridge for expired items.
In my experience, this 15–20 minute reset keeps things from ever getting truly overwhelming.
Time: 15–20 minutes per week
Cost: Whatever the basket costs, usually €5–€20 ($5–$20)
Difficulty: Easy
17. Rethink Your Countertops: Only “Active” Items Stay Out
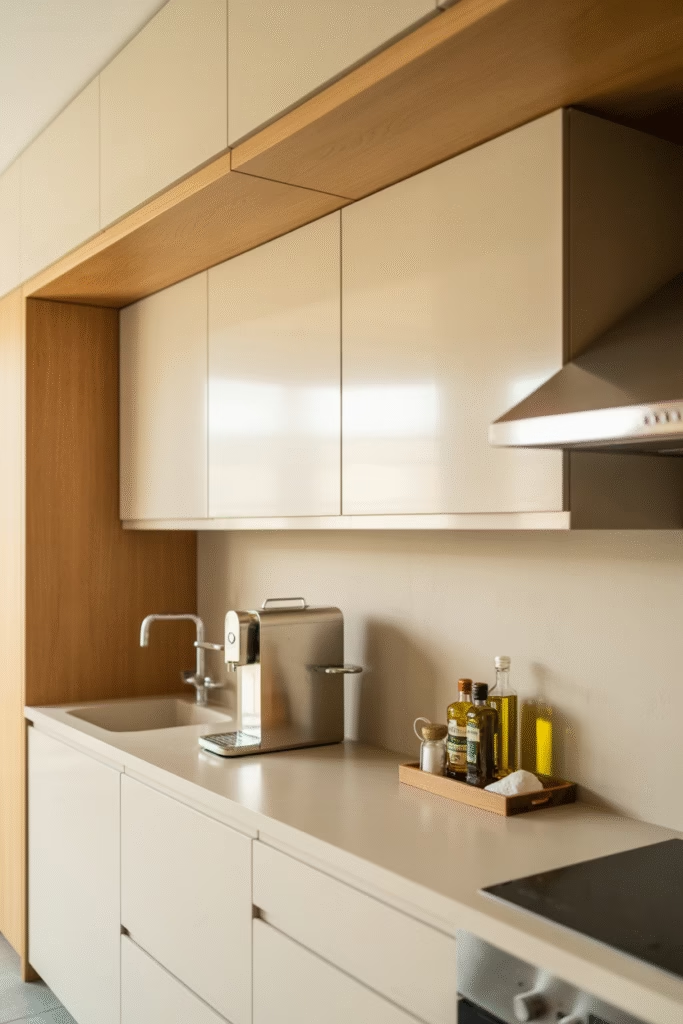
Visual clutter makes a kitchen feel messy, even when it’s technically organized.
A rule that works really well is:
Only keep what you use daily or multiple times a day on the countertop.
Typical “OK to stay out” items:
- Kettle or coffee machine
- Toaster (if used daily)
- Knife block or knife strip
- Frequently used oils and salt near the stove
Everything else should have a home in a cabinet, drawer, or pantry.
Steps:
- Clear the counters completely.
- Wipe everything down.
- Only put back what passes the “daily use” test.
I’ve seen kitchens feel bigger instantly just by removing 3–5 appliances from the counter.
Time: 30–60 minutes
Cost: Free
Difficulty: Easy
Pro tip: Store seldom-used appliances (waffle maker, slow cooker) together in one “appliance zone,” even if that’s in a nearby storage room.
18. Design a Realistic “Baking Station” (Even in Small Kitchens)
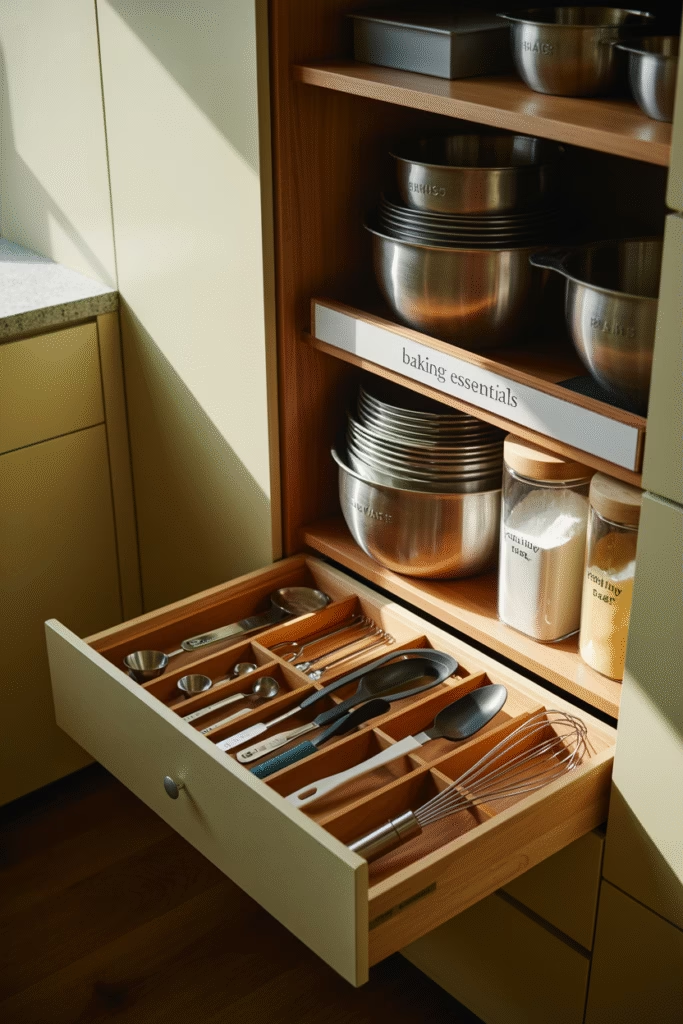
If you bake regularly, you’ll save so much time by creating a mini baking zone.
In my projects, this usually includes:
- Drawer: measuring spoons, cups, spatulas, whisks
- Cabinet: mixing bowls, baking pans, cooling racks
- Shelf or bin: flour, sugar, baking powder, cocoa
Steps:
- Pick one main surface where you usually roll dough or mix batter.
- Move all baking tools and ingredients to be within one or two steps of that spot.
- Use a bin labeled “Baking Essentials” for flour, sugar, etc., especially if you don’t have a big pantry.
What you’ll need:
- 1–2 bins
- A few airtight containers if you bake often
Time: 45–60 minutes
Cost: €20–€60 ($20–$60)
Difficulty: Easy–Medium
Avoid this: Don’t spread baking items across the whole kitchen. Keeping them clustered is what makes it feel “organized.”
FAQs: Real Questions Homeowners Actually Ask
1. Where should I start if my kitchen is a total mess?
Start with one drawer or one cabinet, not the whole room. Get a quick win so you stay motivated. The “win drawer” near your main prep area is usually the best place to begin.
2. How do I keep the kitchen organized when other family members don’t care?
Make it easy, not perfect. Use clear bins, obvious labels, and simple rules like “snacks live here,” “leftovers go in this bin.” The simpler the system, the more likely others will follow it.
3. Is it worth buying organizers or should I just declutter?
Decluttering always comes first. Then, if you still struggle with visibility or access, add a few key organizers (bins, risers, lazy Susans). Buying organizers without editing first just rearranges the clutter.
4. How often should I reorganize my kitchen?
A full reorganization? Maybe once a year or when your life changes (new baby, new diet, etc.).
But a quick weekly reset of 15–20 minutes keeps everything running smoothly without big dramatic overhauls.
5. My kitchen is tiny—do these ideas still work?
Yes, and honestly, small kitchens benefit the most. Focus on vertical storage, the back of doors, tension rods, and lazy Susans. In very small spaces, be extra strict about what earns a spot.
6. How much should I expect to spend on organizing my kitchen?
You can do a basic reset mostly for free by shuffling zones and decluttering.
If you add some organizers (bins, risers, rods, lazy Susans), most people spend somewhere between €60–€200 ($60–$200), often spread over a few months.
If you pick just 2–3 ideas from this list and actually implement them this week—maybe the “win drawer,” a snack station, and a fridge leftovers bin—you’ll feel a real difference in how your kitchen works.
If you’d like, share what your current kitchen layout is like (L-shape, galley, open plan, etc.), and it’s possible to suggest a tailored set of 5–6 organization moves that will give you the biggest impact for your space.