
You know that wall in your home the one that’s too small for a gallery wall but too big to leave bare? Yeah, that one. The awkward middle child of wall spaces that makes you stand there with your hands on your hips, wondering what on earth you’re supposed to do with it.
Let me tell you, styling these tricky spaces doesn’t have to feel like solving a Rubik’s cube blindfolded. I’ve figured out some seriously good tricks over the years, and I’m about to share every single one with them with you. No fluff, no boring generic advice just real, actionable ideas that actually work.
Understanding Your “In-Between” Wall
First things first, what exactly makes a wall “in-between”? It’s that space that’s usually between 3 to 6 feet wide, often sandwiched between doorways, windows, or other architectural features. It’s not quite big enough for your standard decorating rules, but leaving it blank makes the whole room feel unfinished.
I used to have one of these nightmare walls between my kitchen doorway and a window in my dining area. Every time I walked past it, I felt this little pang of design guilt. Too narrow for my favorite oversized mirror, too wide to ignore. Sound familiar?
The key to conquering these spaces is understanding their unique challenge: they need to make a statement without overwhelming the room. Think of it as the Goldilocks zone of home decor—everything has to be just right.
Measure First, Decorate Later
Here’s where most people mess up (I definitely did): they eyeball the space and buy something they think will work. Spoiler alert—it usually doesn’t. 🙂
Grab your measuring tape and get these dimensions:
- Width of the wall space (from edge to edge)
- Height from floor to ceiling (or to where you’d realistically hang something)
- Distance from any nearby furniture (this matters more than you think)
- Proximity to doors or windows (you don’t want to block natural flow)
Once you have these numbers, you can actually make informed decisions instead of guessing. I keep a note in my phone with all my tricky wall measurements so I’m always prepared when I spot something perfect while shopping. Game changer, FYI.
Pro tip: Take photos of the space from different angles. When you’re at the store or browsing online, these photos become your best friend for visualizing how things might look.
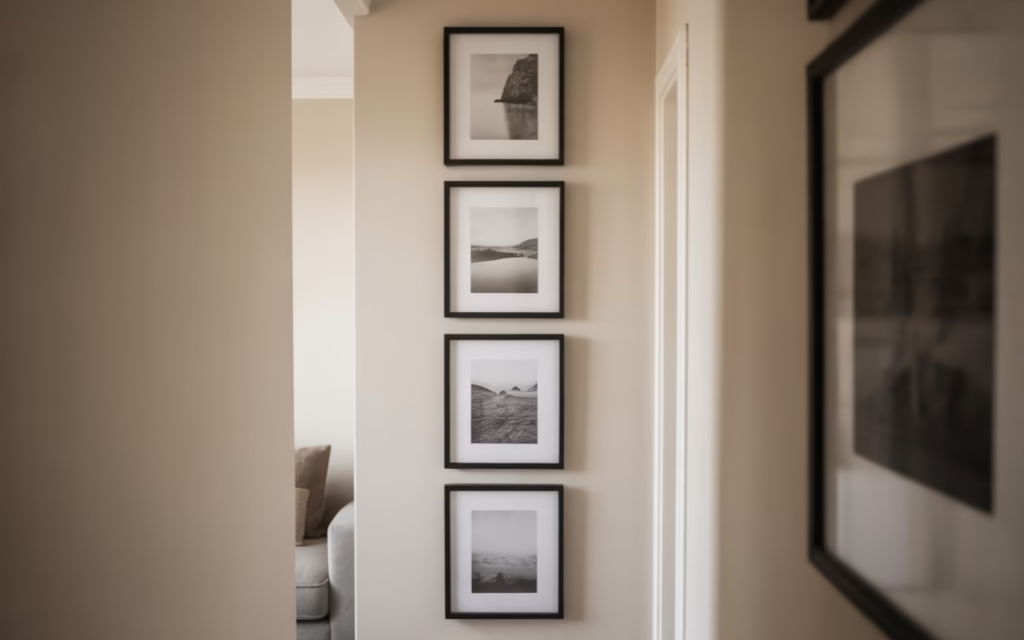
The Vertical Gallery Approach
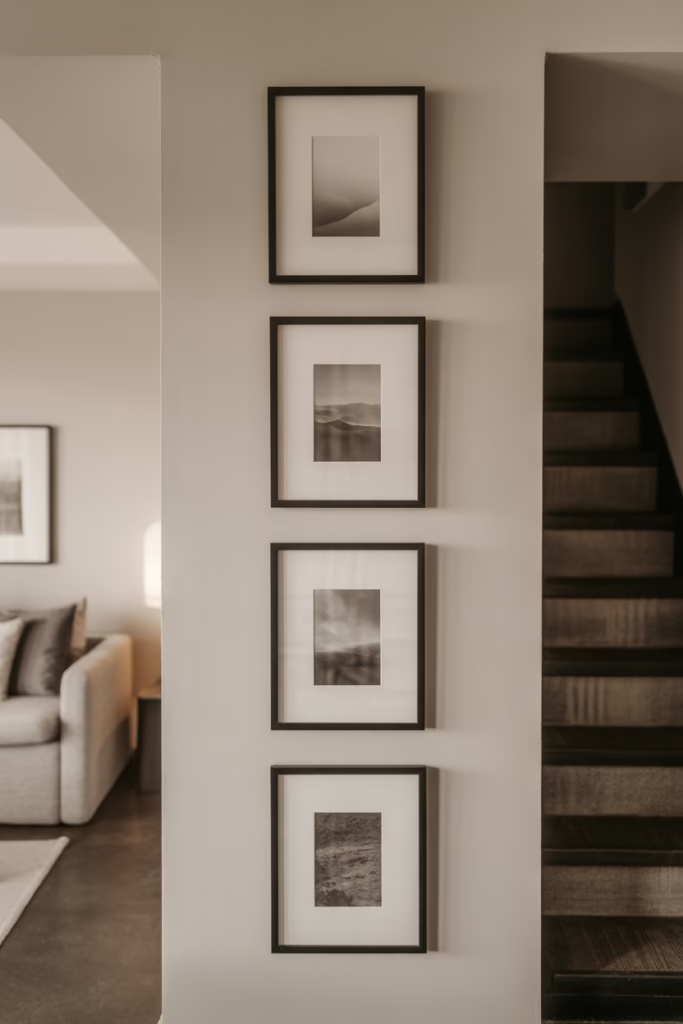
This is probably my favorite solution for in-between walls, and here’s why—it draws the eye upward, making your ceiling feel higher while filling that awkward space perfectly.
How to nail the vertical gallery:
Instead of spreading artwork horizontally (which makes narrow walls look even more cramped), stack your pieces vertically. I’m talking three to five frames arranged in a column. The result? Visual interest without width overwhelm.
Start with your largest or most eye-catching piece at eye level—roughly 57 to 60 inches from the floor to the center of the frame. Then build up and down from there. The spacing between frames should be consistent, usually 2 to 3 inches apart.
Here’s what works really well: mix frame sizes but keep a cohesive color palette or theme. I did this with black-and-white photography prints in different sized frames, and honestly, it looks like something out of a design magazine. The vertical line creates this elegant, sophisticated vibe that tricks people into thinking you hired a professional.
Key things to remember:
- Keep the overall width of your arrangement to about two-thirds of the wall space
- Use picture hanging strips for easy adjustments (because let’s be real, you’ll probably tweak it)
- Odd numbers look more natural than even numbers—go for 3 or 5 pieces rather than 4
The Statement Mirror Strategy
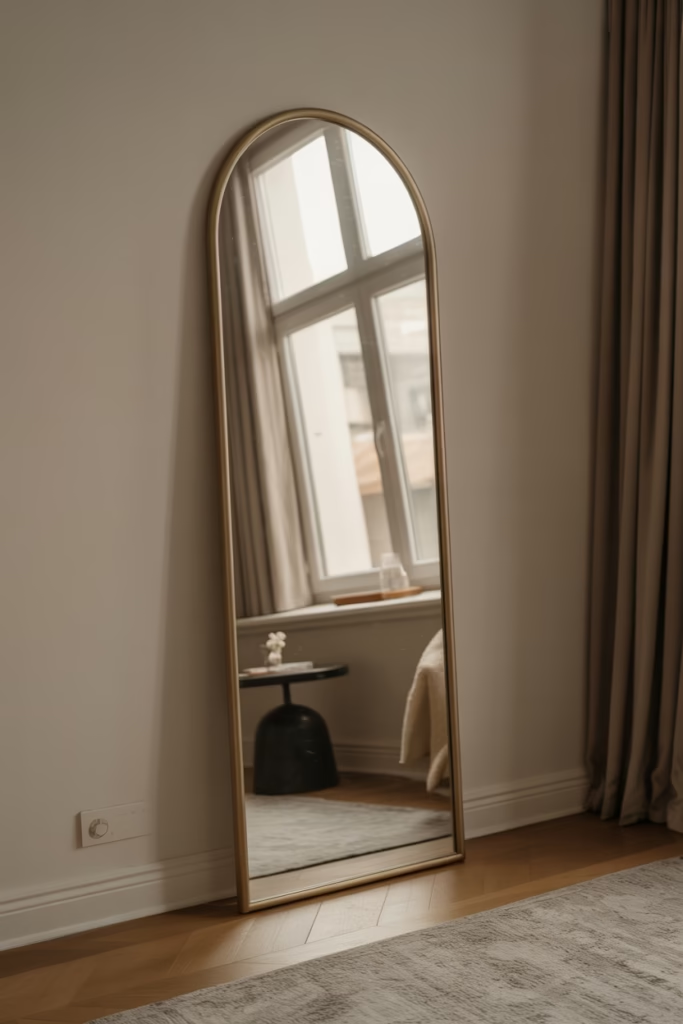
Mirrors are absolute lifesavers for in-between walls, and I’m not just saying that because I’m obsessed with them (though I totally am).
A single statement mirror can transform an awkward wall into a design focal point. The trick is choosing the right size and shape. For narrow walls, I always reach for vertical mirrors—they emphasize height without eating up too much width.
What I’ve learned about mirror placement:
Hang your mirror at the right height so it actually reflects something interesting. There’s nothing sadder than a mirror that only shows your ceiling fan. Position it to bounce light from a window or reflect a beautiful view from across the room.
The frame matters just as much as the mirror itself. A bold, ornate frame makes the mirror feel intentional and decorative rather than just functional. I found this vintage-inspired gold mirror for one of my in-between walls, and it completely changed the energy of the space. Suddenly, that awkward wall became the star of the room.
Circular or arched mirrors work particularly well in narrow spaces because they soften the vertical lines and add visual variety. Plus, they’re having a major moment right now, so you’ll look super trendy. 😉
Floating Shelves: Functional and Fabulous
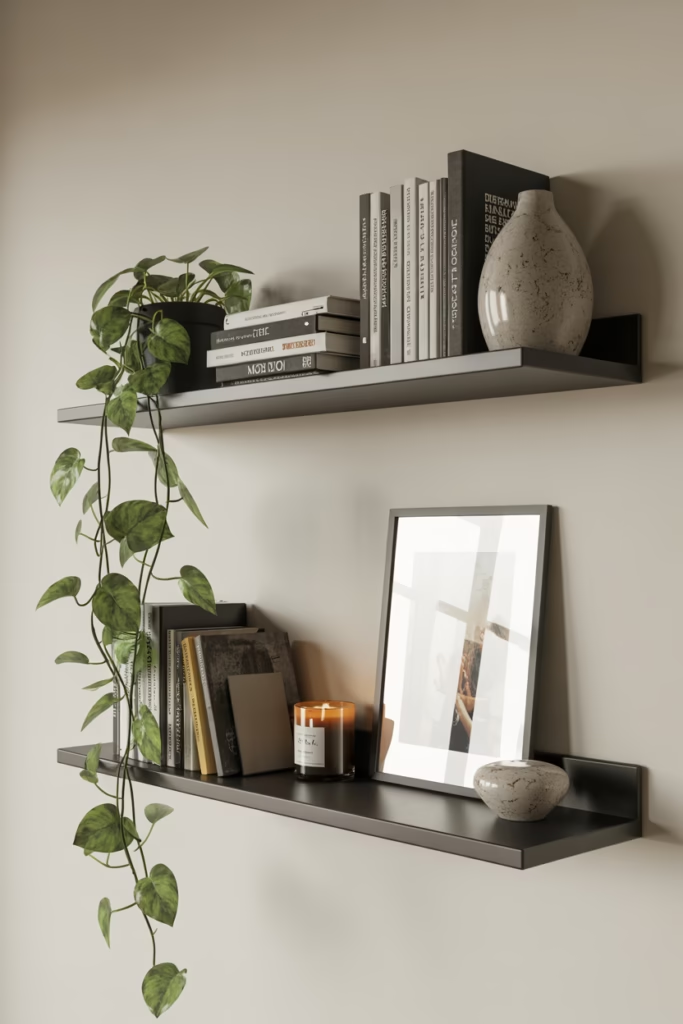
Ever wondered why floating shelves are everywhere in home design content? Because they actually solve problems, especially for tricky wall spaces.
For an in-between wall, one or two floating shelves create both storage and style without requiring much width. I installed two staggered shelves on my narrow hallway wall, and now I have the perfect spot for small plants, candles, and decorative objects that rotate with the seasons.
Styling floating shelves like a pro:
Layer your items—place taller objects in back, medium pieces in the middle, and smaller items in front. This creates depth and makes the arrangement look intentional rather than cluttered.
Mix textures and heights. A small stack of books, a ceramic vase, a framed photo, and a trailing plant create visual interest without overwhelming the space. The key word here is “curate”—less is genuinely more on narrow walls.
Paint the shelves the same color as your wall for a seamless, built-in look, or choose a contrasting color to make them pop. I painted mine a deep forest green against my cream walls, and the contrast is chef’s kiss.
The Oversized Clock Solution
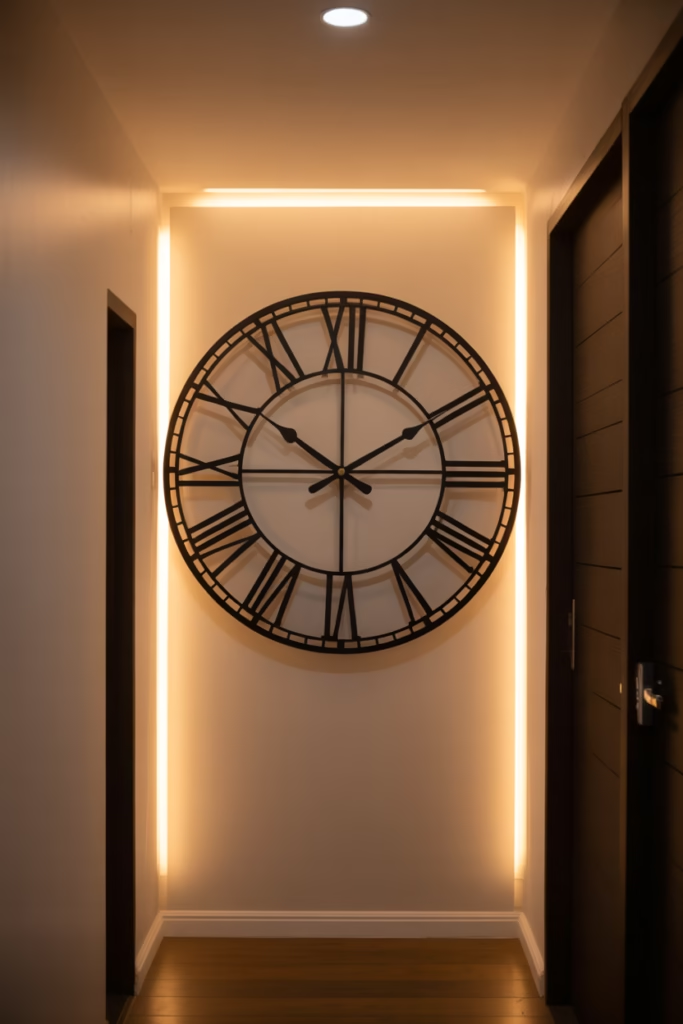
Here’s something people don’t talk about enough: large decorative clocks are perfect for in-between walls. They’re functional, stylish, and they fill space without looking busy.
I’m not talking about your standard kitchen clock here. Think oversized, statement-making timepieces with interesting designs—maybe a Roman numeral face, a minimalist modern look, or even a vintage-inspired piece with visible gears.
Why clocks work so well:
They’re circular (which breaks up boxy room layouts), they serve a purpose (so they never feel like unnecessary decor), and they come in every style imaginable. Plus, IMO, there’s something sophisticated about a beautiful clock on the wall. It gives off those “I have my life together” vibes even if you absolutely don’t.
The sweet spot for clock size on an in-between wall is usually 18 to 24 inches in diameter. Anything smaller gets lost; anything bigger might overwhelm the space.
Textile Art and Wall Hangings
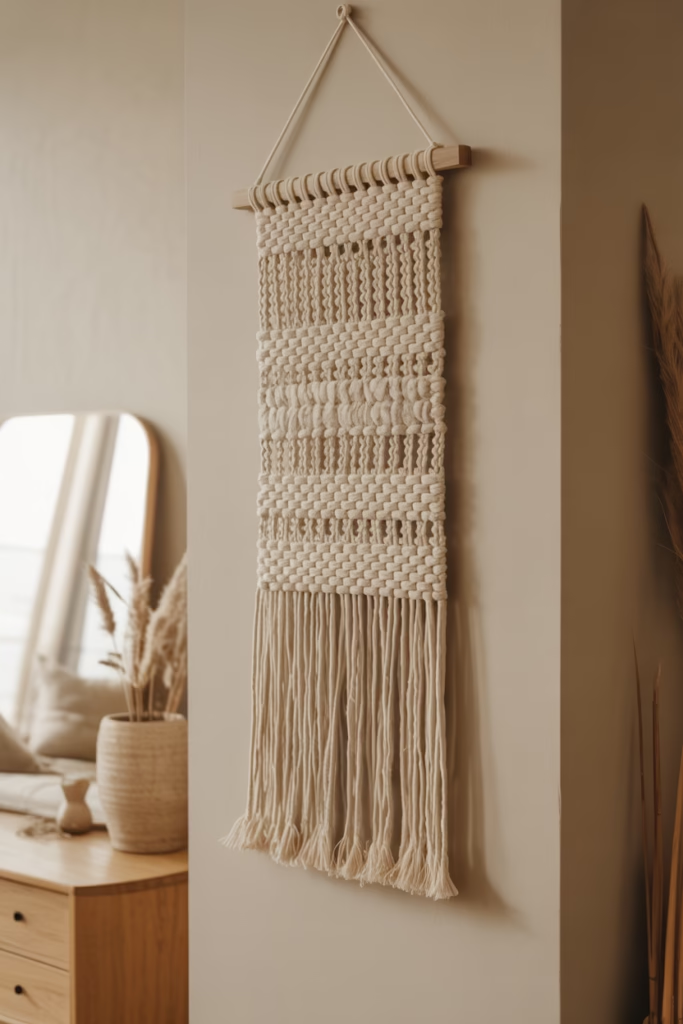
Okay, this is where you can get really creative and show some personality. Textile art—think woven wall hangings, macramé pieces, or even a beautiful throw blanket displayed on a decorative rod—adds warmth and texture that traditional frames just can’t match.
I fell in love with this trend after seeing a small woven wall hanging at a friend’s house. The texture and dimension it added to her narrow entryway wall was incredible. It made the space feel cozy and thoughtfully designed.
Here’s what makes textile art perfect for tricky walls:
The soft materials add warmth to a room, which is especially nice if you have lots of hard surfaces like wood floors and painted walls. They’re also lightweight and easy to hang, usually requiring just a single nail or hook.
For narrow walls, choose pieces that are vertically oriented. A long, narrow macramé or a vertical tapestry emphasizes height without requiring much width. The organic, flowing nature of textiles also softens the space in a way that hard-edged frames don’t.
Color-wise, you can either match your existing palette for a cohesive look or choose something contrasting to make the wall a focal point. I went neutral with cream and beige tones, but I’ve seen bold, colorful pieces that absolutely steal the show.
The Leaning Art Technique
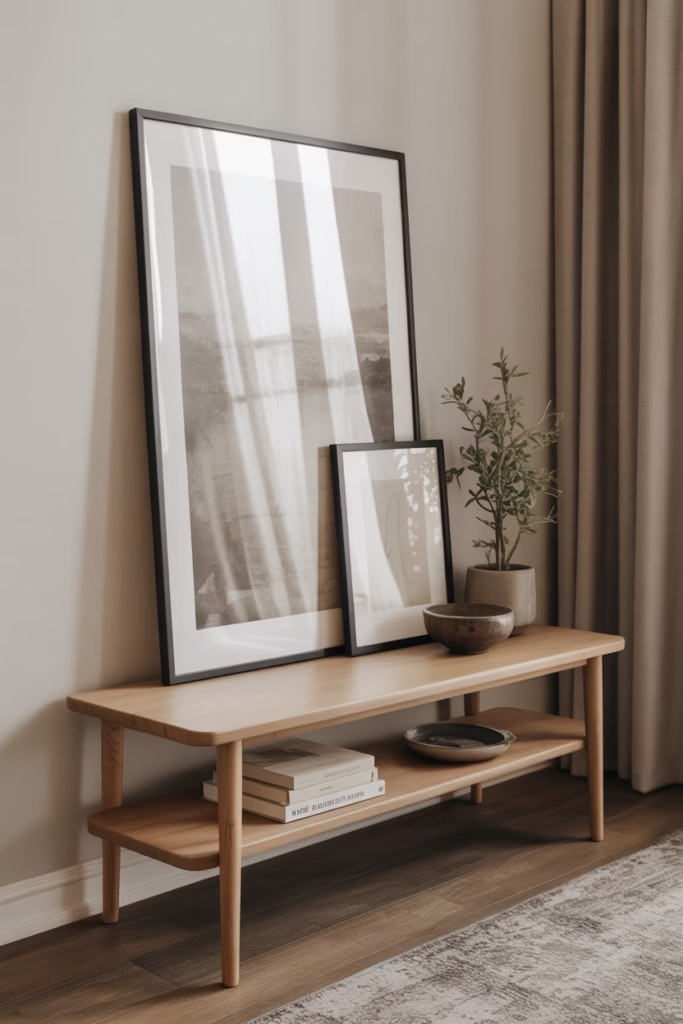
Sometimes the best way to style a wall is to barely use it at all. Sounds weird, right? But hear me out.
The “leaning art” technique involves placing a narrow console table, shelf, or even a small bench against your in-between wall and leaning artwork against the wall on top of it. This creates a casual, effortless vibe that’s somehow more sophisticated than traditional hanging.
Why I love this approach:
It’s completely flexible—you can switch out artwork whenever you want without putting new holes in your wall. It also adds depth because you’re working in layers rather than just a flat hanging.
For this to work, you need a surface at the right height. A narrow console table (as slim as 8 to 10 inches deep works great) or a floating shelf provides the perfect platform. Lean one large piece or layer two to three frames of different sizes for that collected-over-time look.
Add small decorative objects in front of the frames—a small plant, a candle, or a decorative bowl. This grounds the arrangement and makes it feel complete. I did this in my bedroom with vintage botanical prints, and it’s given the space such a relaxed, lived-in feel.
Vertical Planters and Living Walls

If you’ve got a green thumb (or even if you just wish you did), vertical planters are an amazing solution for narrow walls. They bring life into the space literally and figuratively.
You can go as simple as a few wall-mounted planters arranged vertically or as ambitious as a full living wall system. I started small with three ceramic wall planters holding pothos plants, and watching them grow and trail has been so satisfying.
Plant styling tips for narrow walls:
Choose trailing plants like pothos, string of pearls, or ivy that grow downward. This adds movement and softness to the space. The cascading effect also makes your ceiling feel higher.
If direct sunlight is an issue, don’t worry—plenty of beautiful plants thrive in low light. Snake plants, ZZ plants, and pothos all handle shade like champions.
Make sure your planters have proper drainage or use them for faux plants (no judgment—I mix real and faux all the time). Water damage on walls is no joke, so either use planters with catch trays or commit to the high-quality artificial route.
The Bold Wallpaper Feature
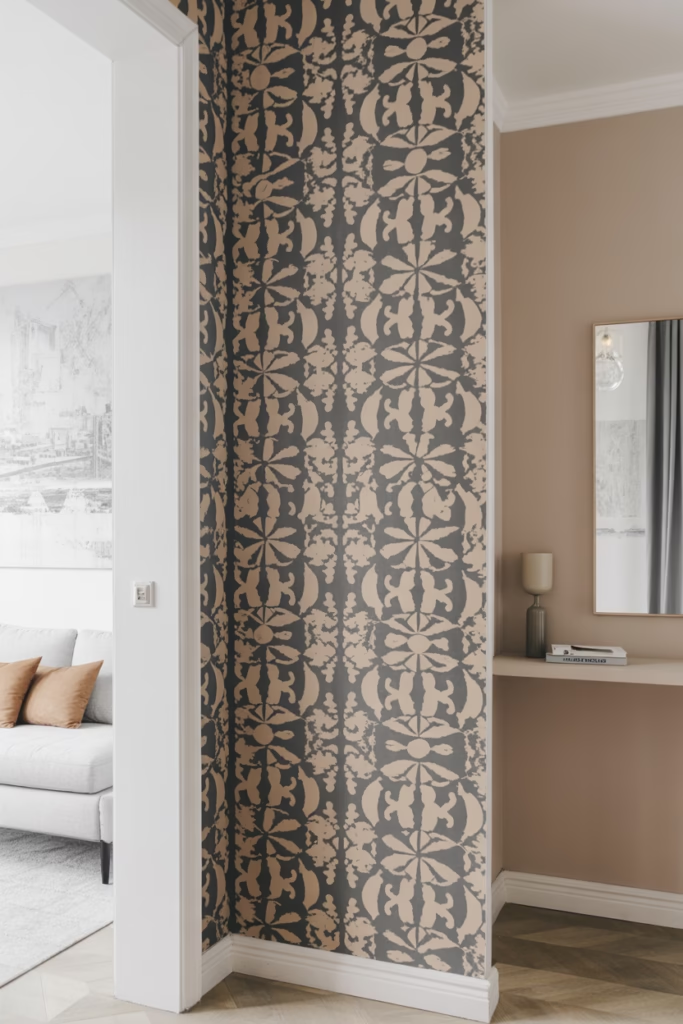
Sometimes the best way to handle an awkward wall is to make it the wall—the one everyone notices first.
Applying bold wallpaper or a fun peel-and-stick option to your in-between wall turns it from a problem into a feature. I’m talking patterns, colors, textures—whatever speaks to you.
Here’s my strategy for wallpapering small spaces:
Go bolder than you think you should. Small walls can handle dramatic patterns that would overwhelm a larger space. A vibrant floral, a geometric pattern, or even a textured grasscloth can transform the entire feel of your room.
Peel-and-stick wallpaper is your friend here. It’s renter-friendly, easy to apply, and removable when you’re ready for a change. I’ve used it multiple times, and the technology has gotten so good that it looks just like traditional wallpaper.
Keep the rest of your wall decor minimal when you go this route. The wallpaper itself becomes the art, so you don’t need much else. Maybe a simple shelf or a small mirror, but that’s it.
Architectural Elements and Molding
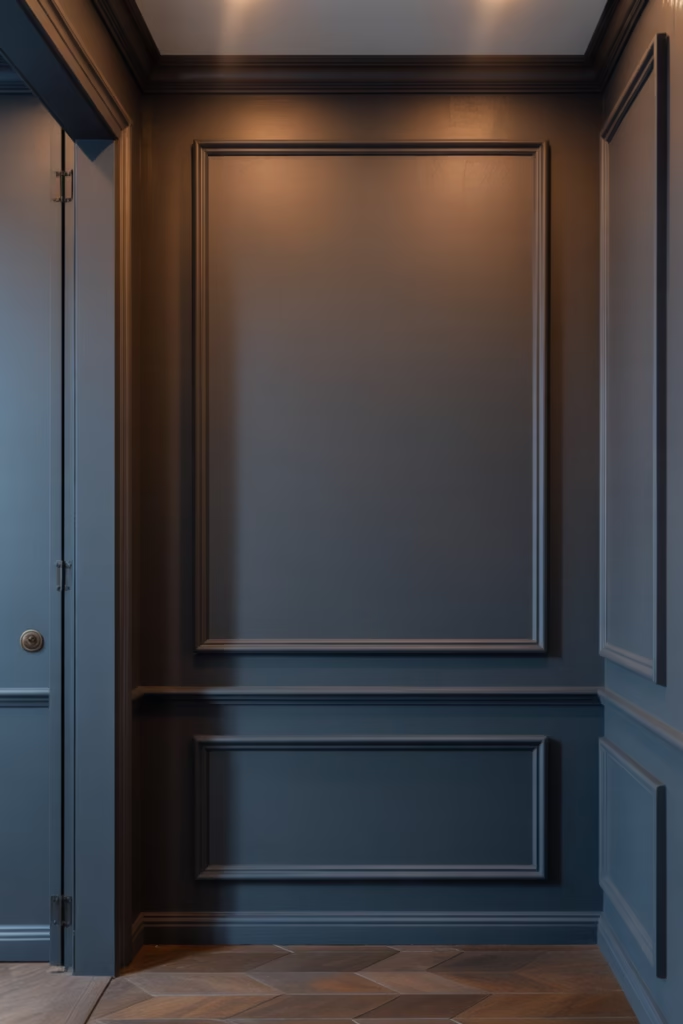
Want to make your in-between wall look like it was always meant to be there? Add architectural interest.
Installing decorative molding, board and batten, or even simple picture frame molding creates structure and visual interest without adding any actual decor items. This approach is especially great if you prefer a more minimalist aesthetic.
I added simple picture frame molding to a narrow wall in my entryway—just painted wood trim creating rectangular shapes—and painted the whole thing in a sophisticated navy blue. The dimension and shadow lines created by the molding make the wall look intentional and expensive. People always assume it was original to the house.
The beauty of this approach:
It’s permanent (or at least semi-permanent), so you’re not constantly adjusting decor. Once it’s done, it’s done. Plus, it adds actual value to your home since it’s a structural design element rather than just decoration.
You can keep the molding the same color as your wall for subtle dimension or paint it a contrasting color for more drama. Both work beautifully depending on your style.
Sconce Lighting Magic
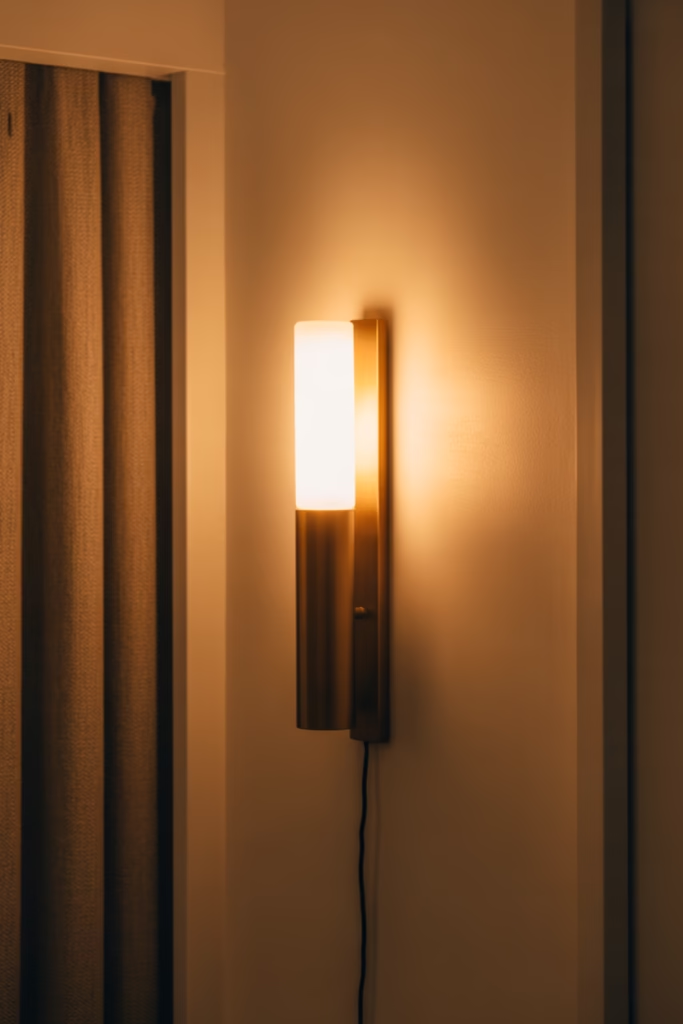
Lighting isn’t just functional—it’s decorative, and wall sconces are criminally underused on in-between walls.
A pair of sconces flanking a narrow wall (or even a single statement sconce centered on the wall) adds ambiance, style, and actually makes the space more usable. I installed plug-in sconces on a narrow wall in my reading nook, and the warm glow completely changed how I use that corner of the room.
Why sconces work for tricky walls:
They don’t take up floor space, they provide task or ambient lighting, and they come in every style you can imagine—from ultra-modern to vintage farmhouse.
If you’re renting or don’t want to deal with electrical work, plug-in sconces with pretty cord covers are just as stylish. I’ve done this myself, and honestly, you can barely tell they’re not hardwired.
Position sconces at eye level (about 60 to 66 inches from the floor) for the most flattering light. The shadows they cast on the wall add another layer of visual interest, especially in the evening.
Final Thoughts
Styling an in-between wall doesn’t have to be the design headache you’ve been treating it as. The secret? Stop seeing it as a problem and start seeing it as an opportunity to get creative with a manageable space.
I’ve tried pretty much all of these approaches over the years (multiple awkward walls in multiple homes will do that to you), and each one brought its own character to the room. Some I loved so much I kept them for years; others I switched out when my style evolved. That’s the beauty of decorating—nothing is permanent, and experimentation is half the fun.
Pick an approach that speaks to your style, measure twice, and commit to making that awkward space work for you. Trust me, once you nail it, you’ll walk past that wall with pride instead of frustration. And isn’t that what good design is all about? Making your home feel complete, thoughtful, and totally you.
Now go show that in-between wall who’s boss. You’ve got this!