
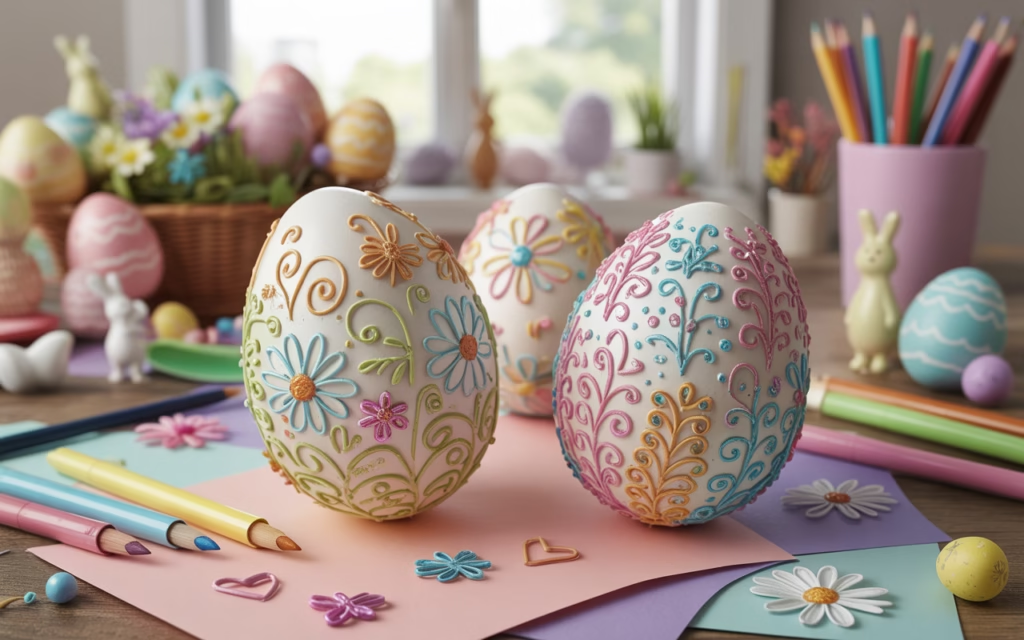
If your Easter egg game still looks like it’s stuck in preschool arts‑and‑crafts class, don’t worry, I’ve been there too. You know that moment when you stare at a bowl of boiled eggs and think, “This is the pinnacle of my creativity?” Yeah, we’ve all had that mini existential crisis before.
But here’s the fun part: Easter eggs are basically blank canvases in egg form. You can get seriously artistic without needing a fine‑arts degree (or even a Pinterest‑perfect craft table).
In this post, I’m sharing 15 artistic Easter egg decorating ideas that are easy to pull off, photo‑worthy, and totally do‑able even if your only “art supplies” are food coloring and a toothpick. Each one keeps the vibe light, practical, and Pinterest‑ready, so whether you’re decorating with little ones or hosting a quiet brunch, you’ll feel more “creative director” than “desperate parent.”
Ready to level up your Easter egg game? Let’s grab some paint, dyes, and maybe a glass of wine (or juice, no judgment 🙂) and get started.
1. Washi Tape Wonders
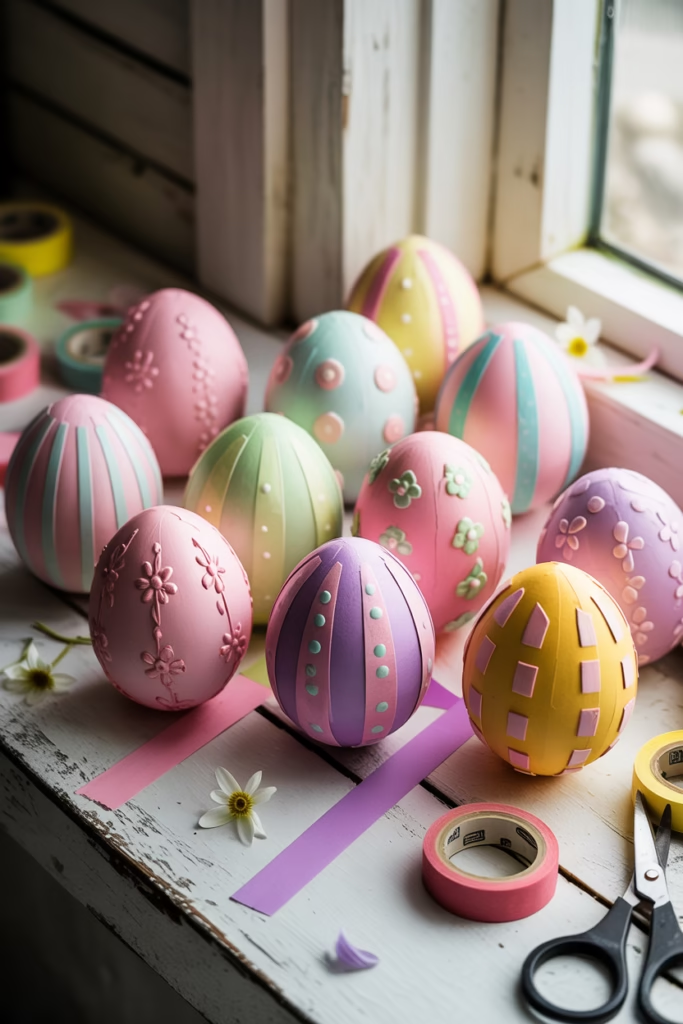
Washi tape is the lazy artist’s best friend, and it’s perfect for Easter eggs too. You don’t need steady hands or fancy tools—just a few rolls of tape and a little patience.
Why washi tape works so well
- It’s removable, so you can tweak designs if they look wonky.
- It comes in so many patterns: stripes, florals, polka dots, glitter, metallics—endless options.
- It’s kid‑friendly and mess‑free compared to paint or markers.
How to turn eggs into washi tape art
- Lightly blow‑dry the eggs so they’re completely dry (no wet spots under the tape).
- Cut short strips of washi tape and wrap them around the egg in geometric patterns like triangles, squares, or zigzags.
- Overlap different colors or patterns to create modern, abstract designs.
- When you’re done, give the egg a gentle seal with a tiny brush of clear nail polish if you want it to last longer.
Ask yourself: Why did I ever spend hours trying to draw perfect stripes with a marker when this existed?
2. Marbled Eggs with Nail Polish
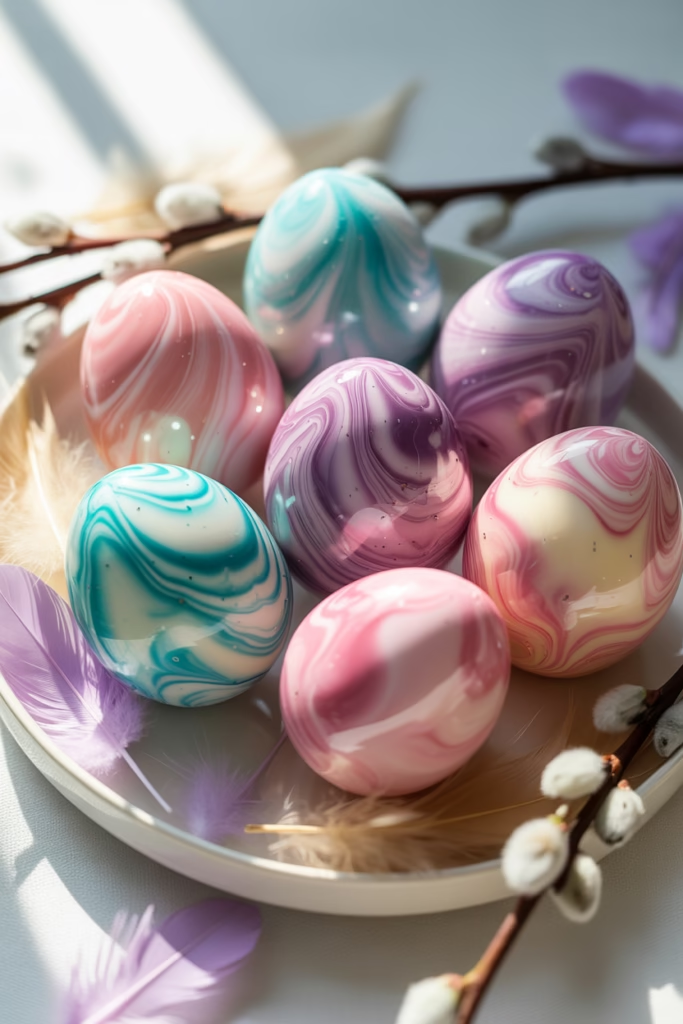
This technique feels like magic the first time you see it, and honestly, it still surprises me every year. You only need water, a disposable container, and a few bottles of nail polish to get beautiful marbled eggs.
What you need
- Hard‑boiled eggs (cooled)
- A shallow container (like a plastic take‑out container)
- Several colors of quick‑drying nail polish
- A toothpick or skewer
How to marble your eggs
- Fill the container with room‑temperature water.
- Drip 2–3 colors of nail polish into the water and let them spread out.
- Use a toothpick to swirl the colors into a marbled pattern.
- Gently roll the egg through the polish floating on the water.
- Lift it out, let it dry, then (optional) seal with clear nail polish.
This works best with satin or matte finishes instead of super‑glossy polishes, which can be too sticky.
Anyway, if you’ve ever tried to paint a perfect swirl by hand and given up, this is nature’s revenge on perfectionists.
3. Watercolor‑Style Dye Bleed
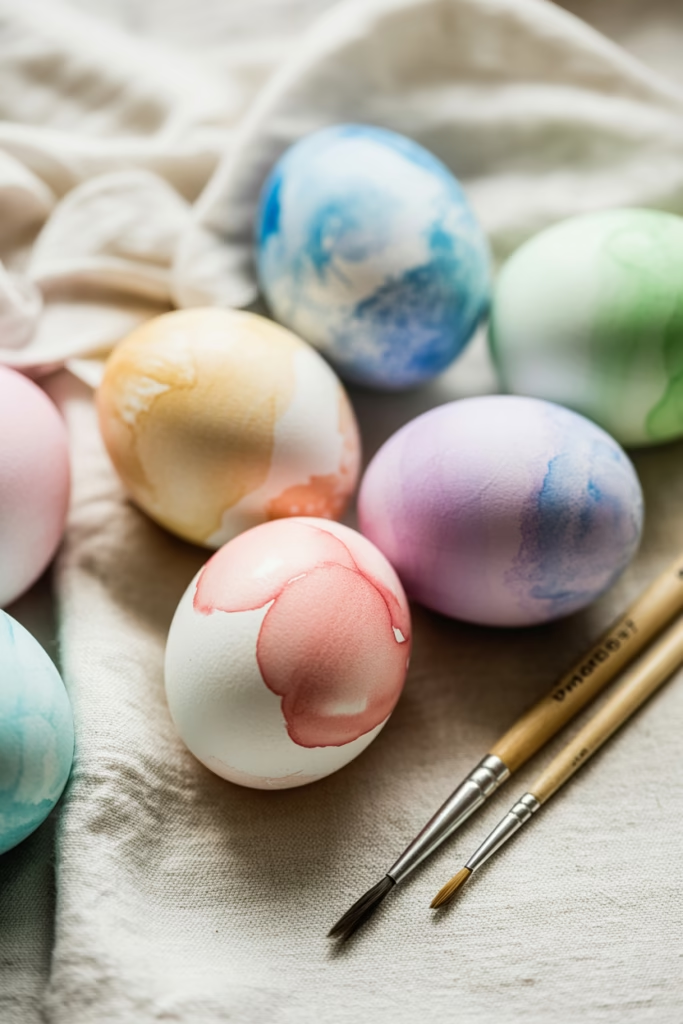
Love watercolor paintings but hate the cleanup? Good news: you can fake that soft, dreamy look on Easter eggs with liquid food coloring and a paintbrush.
Supplies you’ll want
- Hard‑boiled eggs
- Liquid food coloring (primary colors work best)
- Small paintbrush or sponge brush
- Water
- Cotton swabs for “fix‑ups”
How to get that soft watercolor vibe
- Mix a few drops of food coloring with a small amount of water in shallow wells.
- Dip the brush in the diluted color and brush it on the egg in soft strokes.
- While the color is still wet, add a drop of plain water to make it bleed and blend naturally.
- For a more dramatic look, layer two complementary colors while they’re still damp.
This technique is super forgiving—if one side looks a bit streaky, you can just call it “abstract” and nobody will know the difference.
4. Ombré Dip Eggs

An ombré egg is basically an egg that realizes it’s in a fashion shoot. It’s simple to make, looks pro, and you’ll probably embarrass all your relatives’ eggs at the buffet.
What you need
- Food coloring
- Water
- Small bowls
- Hard‑boiled eggs
How to ombre your eggs
- Prepare three bowls with different strengths of dye:
- Bowl 1: very strong dye (dark color)
- Bowl 2: medium dye
- Bowl 3: light dye
- Start by dipping the top of the egg in the darkest color for a few seconds.
- Move it to the medium bowl for a slightly shorter dip.
- Finally, dip the bottom in the lightest color.
- Let it dry vertically so the gradient keeps its shape.
You can play around with warm tones (pinks/purples) or cool tones (blues/greens) for different moods.
And if your ombré looks a bit uneven? Just tell people you went for “rustic, hand‑fashioned vibes.” Trust me, it sells.
5. Gold Leaf Luxe Eggs
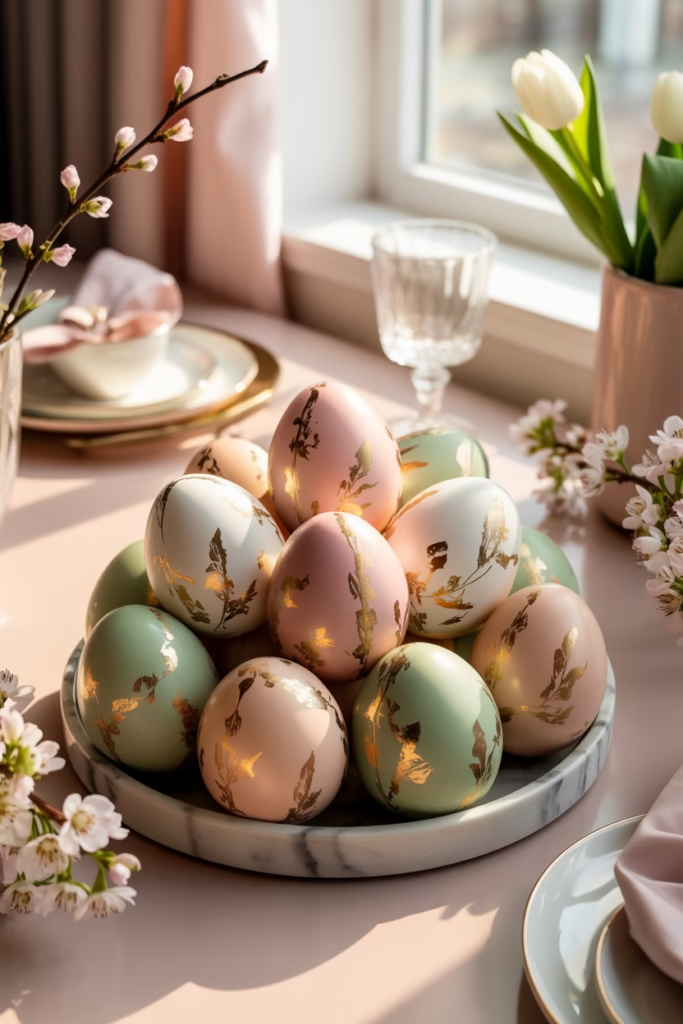
If you want to feel like you’re decorating for a royal brunch instead of a school egg hunt, gold leaf is your secret weapon. It looks fancy, but it’s surprisingly easy to handle.
What works best
- Loose gold leaf or gold leaf sheets
- A small soft brush
- Clear craft glue or mod podge
- Cotton swabs for cleanup
How to use gold leaf on eggs
- Paint small designs on the egg with clear glue (dots, lines, swirls, or half‑moon shapes).
- Let the glue sit for a few seconds so it gets tacky.
- Gently press the gold leaf onto the glue, then brush off the excess.
- Use a clean brush to smooth the leaf and blend edges if needed.
You can pair gold leaf with solid pastel backgrounds or let the egg shine like a tiny disco ball.
Plus, if you drop a tiny piece of gold on the floor and spend 10 minutes chasing it, you can just say you’re “researching reflection techniques.”
6. Stenciled Patterns with Stickers
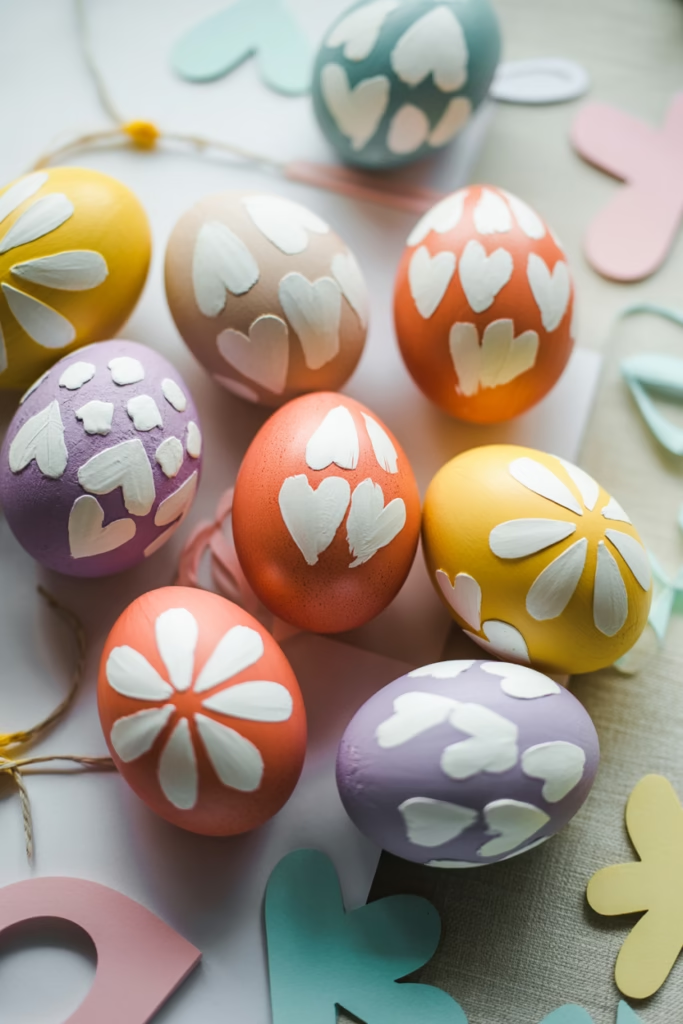
Stencils can be annoying, but stickers? They’re basically stencils that politely hold themselves in place. This is perfect if your hand‑drawn leaves look more like blobs.
Supplies
- White or light‑colored eggs
- Sticker shapes (hearts, stars, flowers, etc.)
- Paint or spray food coloring
- Small sponge or brush
How to stencil with stickers
- Stick your shapes onto the egg, pressing them down firmly.
- Use a dabber or sponge to lightly cover the egg with color around the stickers.
- Once the paint is dry, peel off the stickers to reveal clean, crisp shapes.
- Adjust the layout and repeat if you want more patterns.
You can even cut your own shapes from painter’s tape if you want custom designs.
Ask yourself: Why did I ever try to draw perfect hearts freehand when stickers exist?
7. Tie‑Dye Eggs with Markers
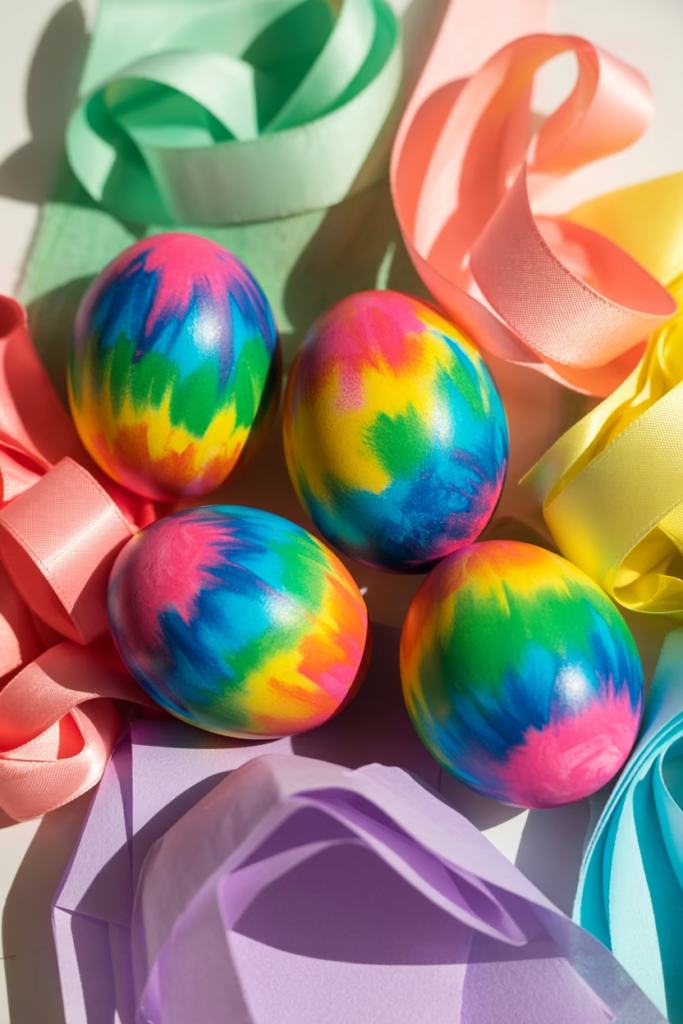
Tie‑dye is timeless, and guess what? You can fake that swirl‑y look on eggs with alcohol markers and a little rubbing alcohol.
What you need
- Alcohol‑based markers (like Sharpies)
- Rubbing alcohol
- Cotton swabs or a small brush
- Hard‑boiled eggs
How to tie‑dye your eggs
- Color the egg with marker in random sections.
- Dip a cotton swab in rubbing alcohol and dot it onto the color.
- Watch the colors bleed and blend into a soft tie‑dye pattern.
- Let it dry and add extra dots if you want a bolder look.
This works best on white eggs because the colors pop more.
If someone asks if you used a magic wand, just wink and say, “Ah, the secret is chemistry.”
8. Botanical Eggs with Real Leaves
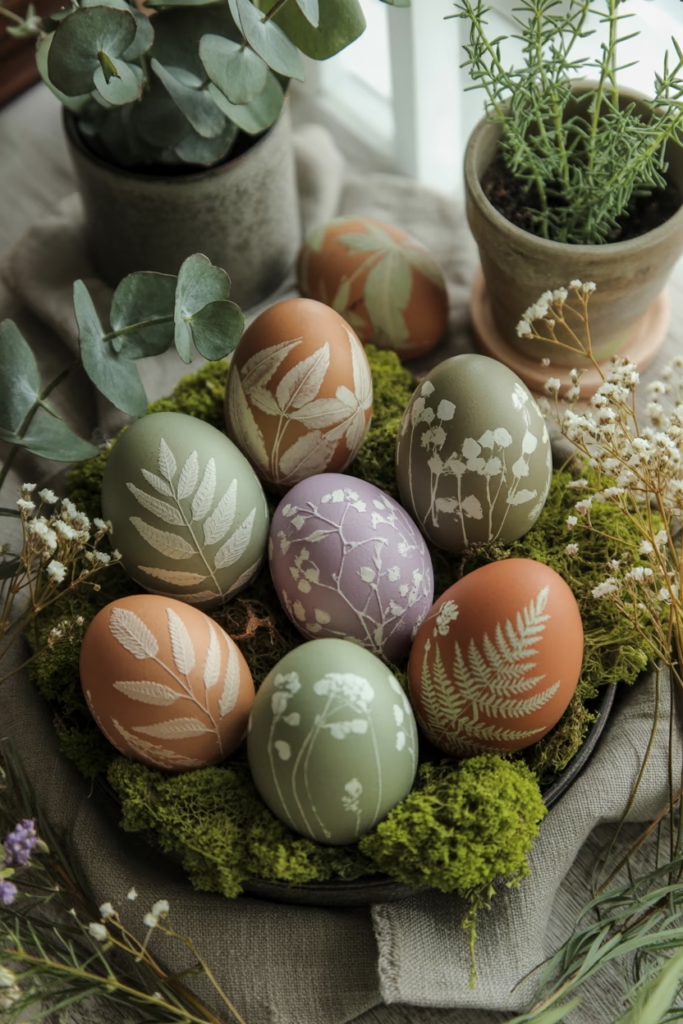
You don’t need to paint a leaf to make one show up on your egg—you can let real leaves do the work. This is one of the coziest, most nature‑focused Easter egg ideas out there.
What you need
- Small, flat leaves or flowers
- Cheesecloth or old tights
- Boiling water and food dye
- Hard‑boiled eggs
How to create botanical imprints
- Wrap the egg in cheesecloth with a few leaves tucked on top.
- Secure the cloth with a rubber band or string.
- Boil the egg in colored water (or dip a cooled egg in dye).
- When it’s done, peel everything off to reveal the leaf outlines.
The result looks like tiny plant fossils on your eggs.
If the leaves come out looking a bit ghostly, just lean into it with a name like “haunted botanical aesthetic.” Works every time.
9. Metallic Marker Masterpieces

If you love a little glam, metallic markers are your best friend. They’re easy to control and give you that “I put effort into this” look without much effort.
Tips for metallic markers
- Use a light base (white or pastel eggs) so the color shines.
- Sketch lightly with a pencil if you’re nervous about committing.
- Try simple patterns: dots, lines, stars, or mini mandalas.
You can also:
- Outline solid‑dyed eggs for contrast.
- Add tiny metallic accents to other designs (like gold edges on marbled eggs).
Just be careful not to shake the marker too hard next to the egg, or you might end up with a “spray‑paint couture” look.
10. Acrylic Paint Landscape Eggs
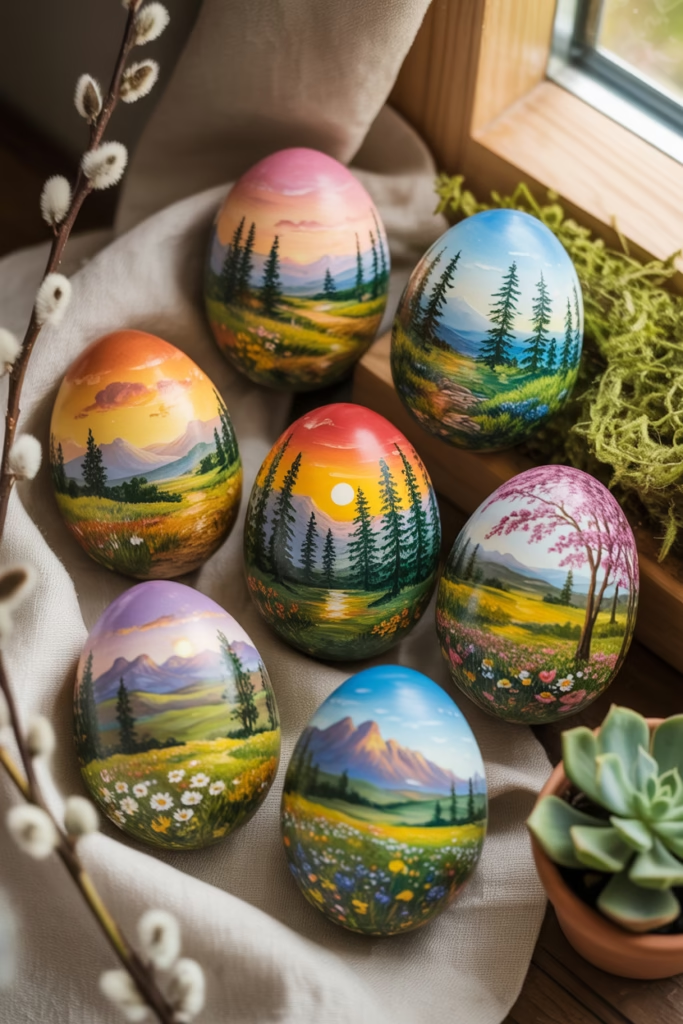
If you’re into art but want something low‑pressure, landscape eggs are a fun way to dabble. Think tiny sunsets, mini forests, or even a tiny beach scene.
How to paint mini landscapes
- Start with a white or pastel base if you want softer colors.
- Use thin layers of acrylic paint so it doesn’t crack.
- Paint a simple horizon line (water, sky, hills, etc.) and add tiny details on top.
You can:
- Use toothpicks for fine lines.
- Blend colors on the egg with a damp brush for soft gradients.
These are great conversation starters at brunch. People will either be impressed or ask, “Can you paint this on my mug next?”
11. Glitter Explosion (But Controlled)
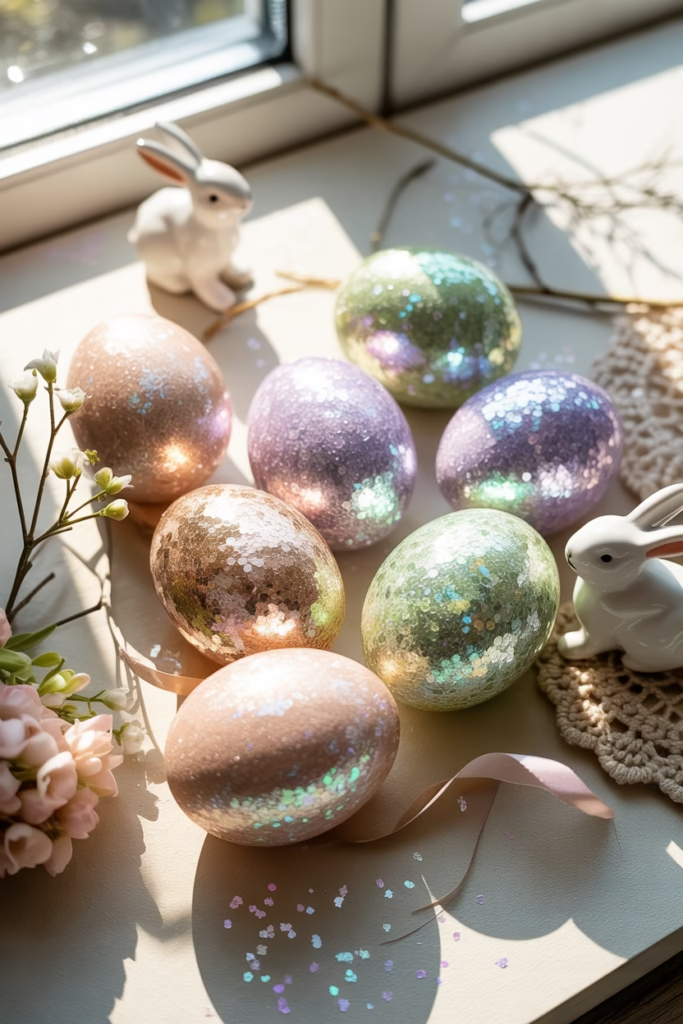
Glitter is either your best friend or your worst nightmare—usually both. The trick is to keep control.
Supplies
- Glue (craft glue or clear nail polish)
- Fine glitter (not chunky)
- Small brushes
- Paper or tray to catch the mess
How to use glitter wisely
- Paint a design with glue (lines, stars, dots, or half‑moon shapes).
- Immediately pour or sprinkle glitter over the wet glue.
- Let it dry, then gently shake off the excess.
- Use a light sealant (clear nail polish or spray) if you want it to last.
Pro tip: If you do glitter today, don’t wear black tomorrow. Trust me on this.
12. Doodle Eggs
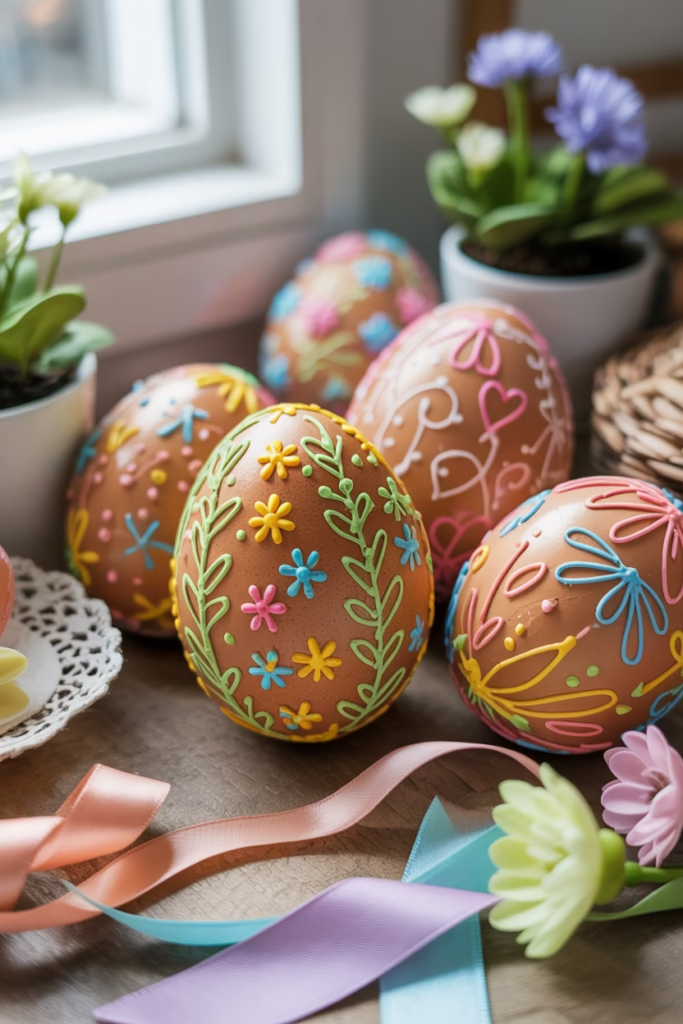
If you enjoy the act of drawing, gel pens are perfect for detailed, playful eggs. You can turn each egg into a tiny doodle paradise.
What to doodle
- Patterns: zigzags, chevrons, stars, hearts
- Nature: vines, flowers, clouds, tiny animals
- Typography: mini words like “hop,” “sun,” or “hoppy”
How to keep it neat
- Start with light pencil lines if you want to be careful.
- Use thin gel pens for small details.
- Leave some white space so it doesn’t look like you had a nervous breakdown.
If your doodles look a bit primitive, hey—intentional kawaii is a valid aesthetic.
13. Embroidery‑Floss Wrapped Eggs
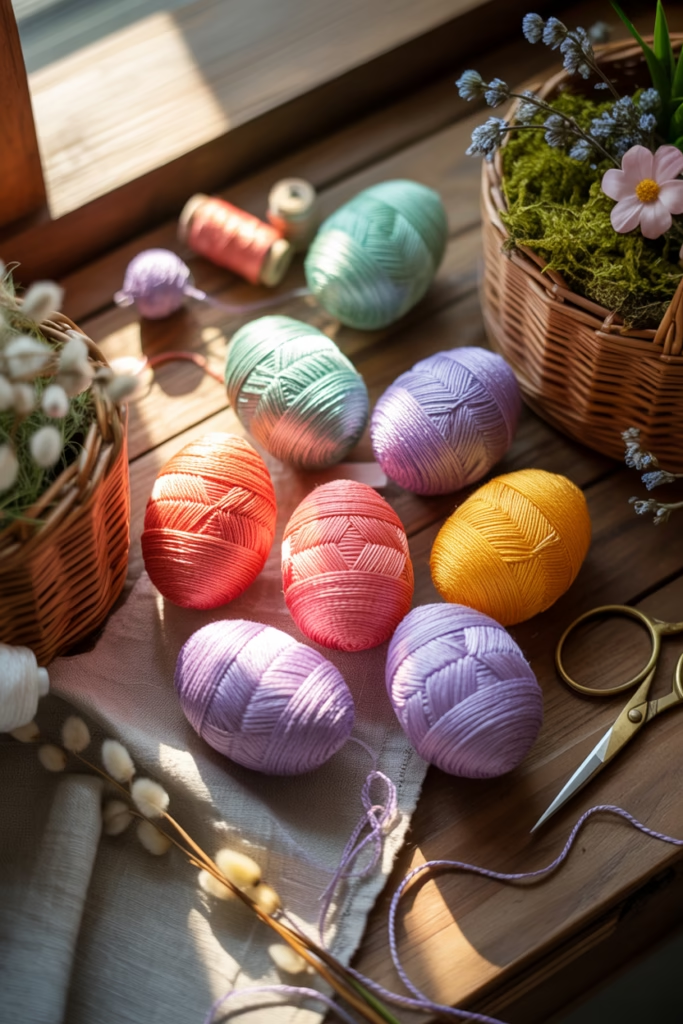
This one is weirdly satisfying. You wrap the egg in embroidery floss, and somehow it looks like a fancy designer egg.
Supplies
- Hard‑boiled eggs
- Embroidery floss
- Glue or clear nail polish
How to wrap an egg
- Glue one end of the floss to the egg.
- Wrap it in a random or geometric pattern until the egg is mostly covered.
- Use a tiny dot of glue at the end to secure it.
You can:
- Use two or three colors for contrast.
- Leave some white space for a modern look.
This also doubles as stress relief. If you’re anxious about Easter prep, just start wrapping eggs and pretend you’re training for a “Great British Egg Wrap Off.”
14. Newspaper or Book Page Eggs
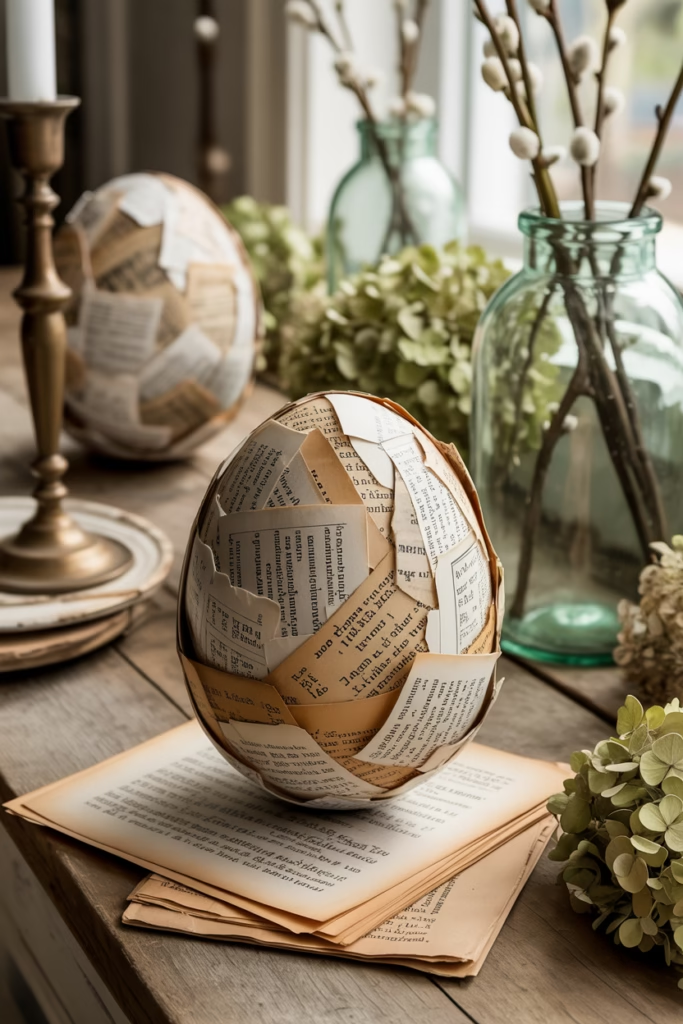
If you’re a book lover or vintage‑style fan, covering an egg with printed pages is a neat way to add texture and a story.
How this works
- Tear tiny pieces of book pages, old comics, or sheet music.
- Brush mod podge or diluted glue on the egg.
- Lay the paper pieces on, overlapping slightly.
- Continue until the egg is covered, then add another layer of glue on top.
Once it’s dry, the egg looks like a tiny time‑capsule.
If someone asks if you recycled a beloved book, just say it’s “artistic deconstruction.”
15. Minimalist Line Art Eggs
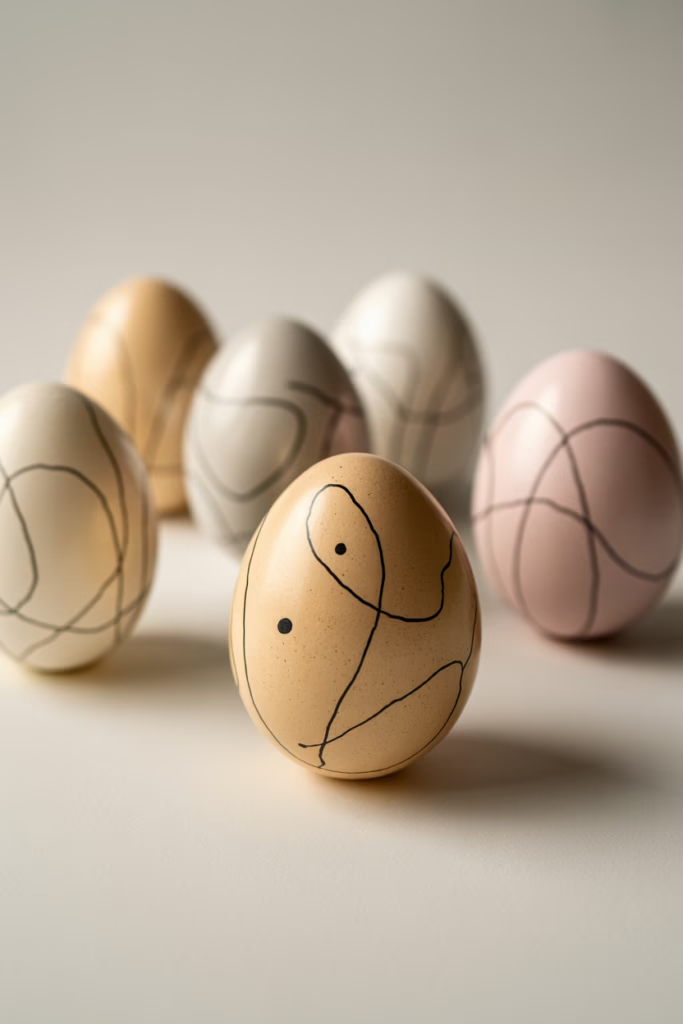
Sometimes, less really is more. Minimalist line art eggs are perfect if you want something elegant and low‑pressure.
What to draw
- Single lines that create a shape (a wave, a hill, a leaf outline).
- Tiny dots arranged in a pattern.
- Subtle swirls that barely touch the surface.
How to keep it classy
- Use one or two colors max.
- Stick to simple shapes and plenty of negative space.
- Don’t overthink it—rough lines can look artistic, not messy.
If you’re worried it looks too simple, remember: minimalism is basically “organized laziness,” and it’s totally allowed.
Final Thoughts: Make Easter Eggs That Actually Excite You
Here’s the thing about Easter egg decorating: you don’t have to be perfect to make something beautiful. In fact, the little “errors” often turn into the coolest details.
If you’re still staring at raw eggs feeling slightly intimidated, just pick one of these 15 artistic Easter egg decorating ideas and start with one. Maybe go wild with glitter one year and minimalist the next. Your style can change, and your eggs can reflect that.
And hey, if someone asks why you spent an hour turning an egg into a tiny work of art, you can simply say you’re researching holiday aesthetics. They’ll either nod respectfully or hand you another snack. Either way, you win.