
So, you’ve got a studio apartment. Maybe you chose it deliberately, low rent, less cleaning, very “minimalist aesthetic.” Or maybe the housing market just laughed in your face and handed you 400 square feet with a wink. Either way, you’re here, and honestly? Studio living can be stunning if you play your cards right.
I’ve spent a lot of time obsessing over small-space design (occupational hazard of running a home decor blog), and I can tell you with full confidence: the layout is everything. You can have the prettiest furniture in the world, but if your bed is staring directly at your stove, something has gone wrong. Let’s fix that.
Here are 15 amazing studio apartment layout ideas that actually work — not just in magazine spreads, but in real life.
1. The Classic Zone Divide
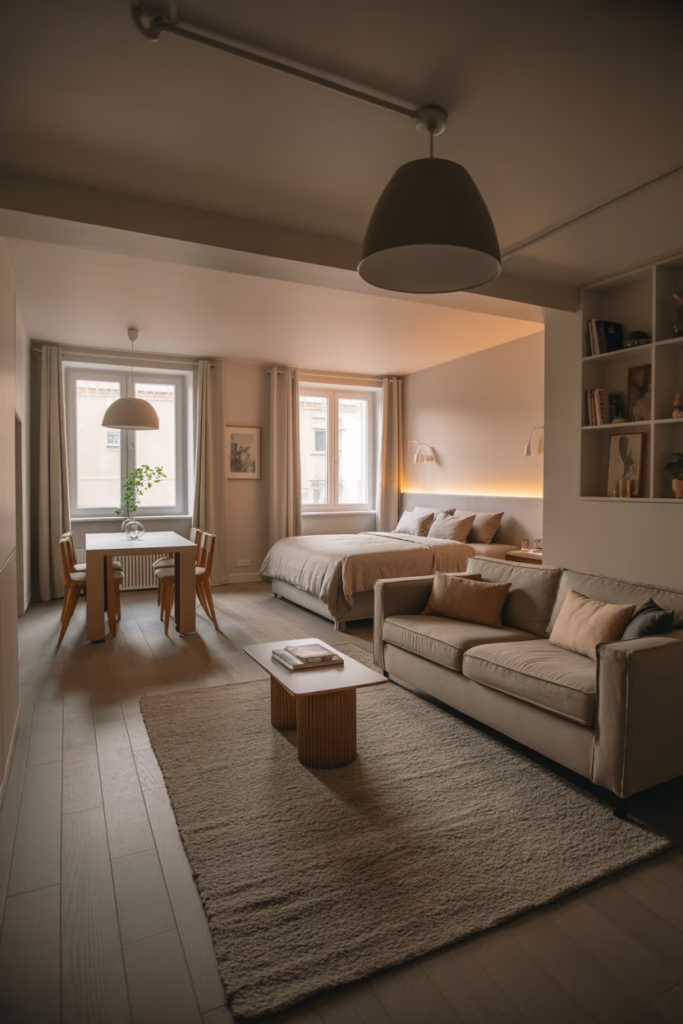
The simplest and most effective trick in studio living is zoning — dividing your single room into distinct “zones” for sleeping, living, and eating.
You don’t need walls to do this. Use rugs, furniture placement, and lighting to create invisible boundaries. A large area rug under your sofa instantly signals “this is the living room,” while a pendant light above a small table says “dining area” without using a single wall.
Why this works: Your brain responds to visual cues. When zones are clear, your space feels organized and intentional — not chaotic.
- Use rugs of different textures to anchor each zone
- Position furniture backs toward each other to “build walls” without losing space
- Vary lighting types per zone (warm for sleeping, brighter for working)
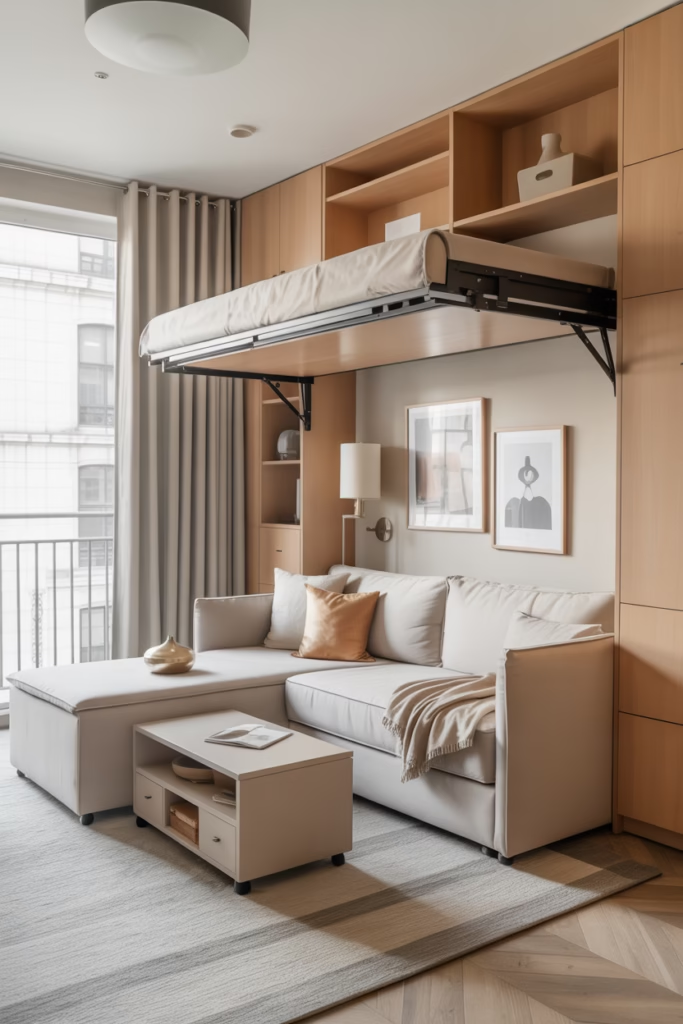
2. The Murphy Bed Magic Layout
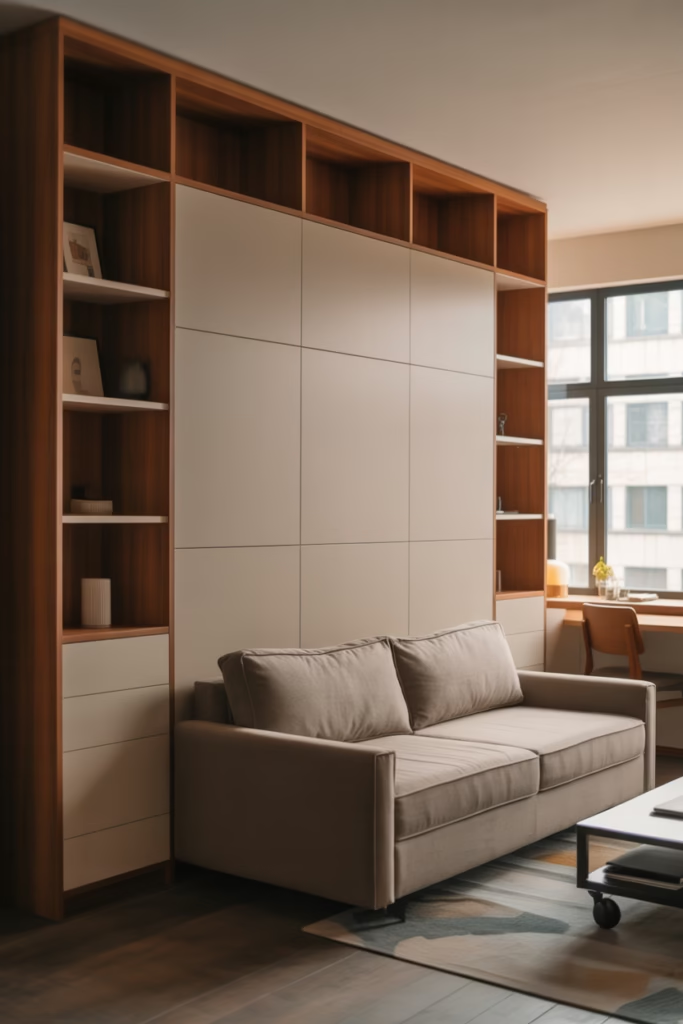
Okay, Murphy beds used to have a reputation. You’d see them in old movies, always folding someone into the wall at 2 AM. But modern Murphy beds are genuinely game-changing for studio layouts.
When your bed folds up, your entire sleeping zone becomes a living room, a yoga studio, or a home office during the day. That’s not a trick — that’s just smart square footage management.
Pair a Murphy bed with built-in shelving on either side, and suddenly you have storage, display space, and a bed all in one wall unit. IMO, this is the single best investment you can make in a studio.
3. The Loft Bed Setup
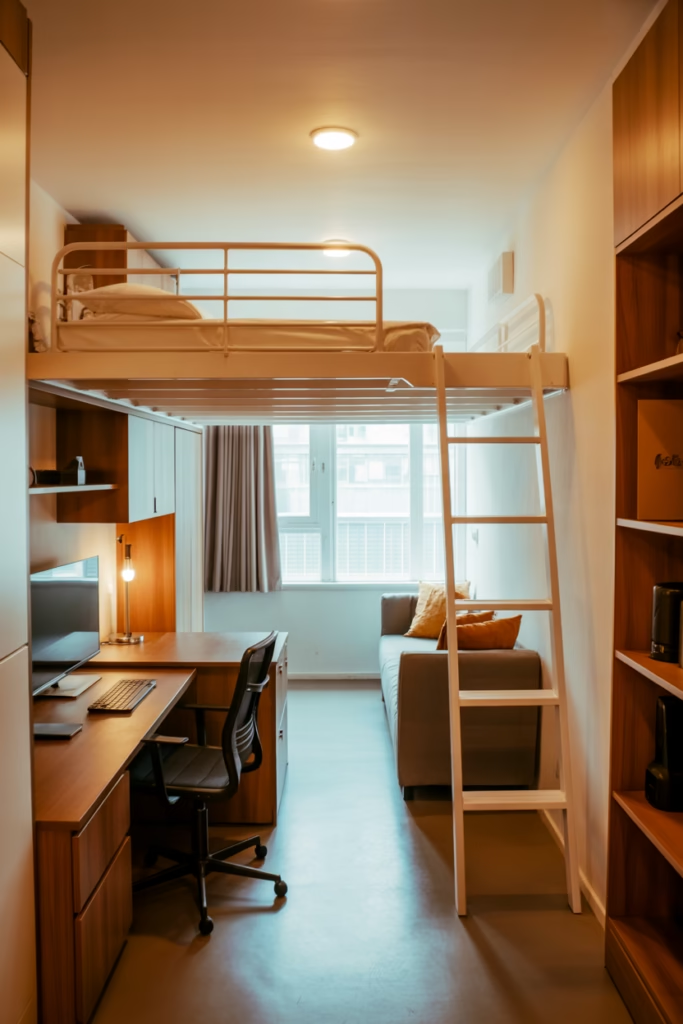
If your studio has ceilings above 9 feet, you’re sitting on prime real estate — the vertical kind. A loft bed elevates your sleeping area and frees up the floor space below for a desk, a sofa, or even a small wardrobe.
This layout works especially well for people who work from home. Tuck your entire home office under the loft and you’ve cleanly separated work life from sleep life without a single wall.
Heads up: Make sure your ceiling height is actually comfortable before committing. Waking up and immediately headbutting a ceiling beam is not the morning routine anyone wants :/
4. The Open Kitchen Integration
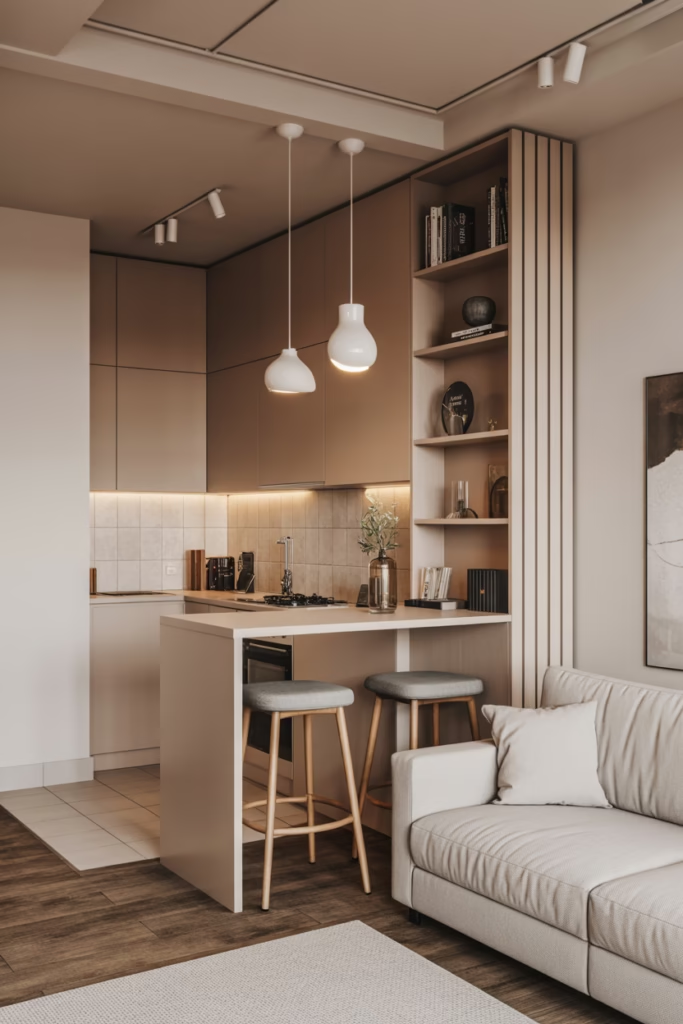
A lot of studio layouts try to “hide” the kitchen. But what if you leaned into it instead? Integrating your kitchen as a design feature rather than a utility corner can make your studio feel intentional and cohesive.
Use a kitchen island or a bar-height counter as the natural divider between your kitchen and living space. Bar stools on the living side double as seating and make the counter do double duty as a dining table.
This layout is perfect for people who love to cook and entertain — even in a small space, it creates a social, open flow.
5. The Bedroom Alcove Layout
Some studios come with a natural alcove or recessed nook. If yours does, treat it like the bedroom it was meant to be. Tuck your bed into the alcove, hang curtains at the entrance, and boom — you have a sleeping “room” within a studio.
Even if your studio doesn’t have a natural alcove, you can create one by positioning a tall bookshelf or open wardrobe on one side of your bed to form a partial enclosure. It gives you privacy and makes the sleeping area feel separate from the rest of the space.
6. The Sliding Partition Layout

This is the grown-up, design-forward version of a room divider. Sliding partitions — whether barn-door style, shoji-inspired, or sleek industrial panels — let you open and close off sections of your studio as needed.
Wake up and slide open the partition to make the whole space feel airy and open. Going to bed? Slide it closed for privacy. It’s flexible, functional, and honestly looks really cool.
- Barn-style sliding doors work well in industrial or rustic-style studios
- Shoji panels suit minimal, Japanese-inspired interiors
- Frosted glass panels keep light flowing while adding privacy
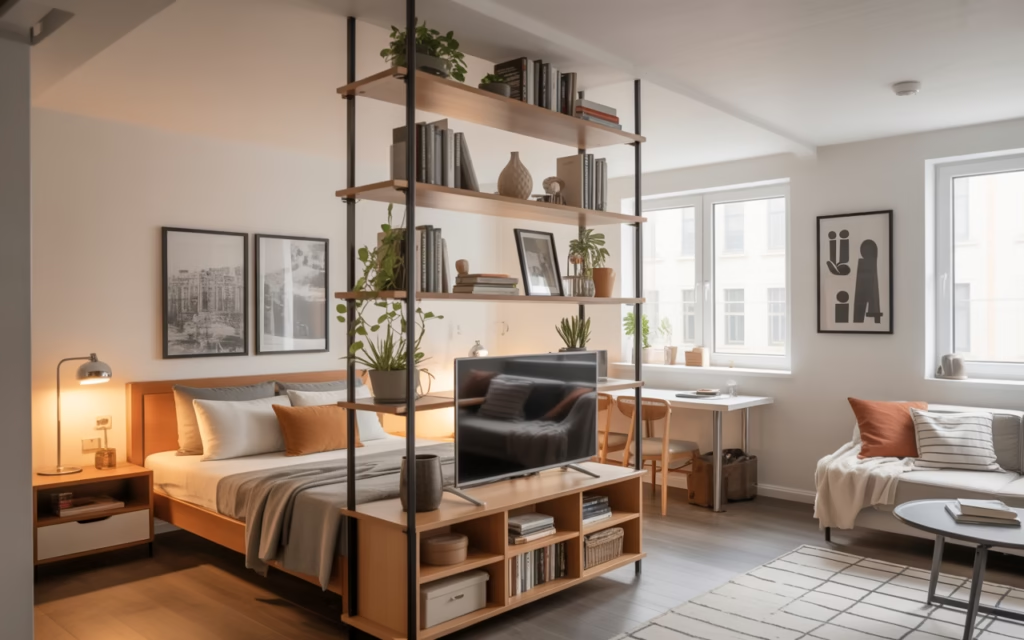
7. The Bookshelf Wall Divider Layout
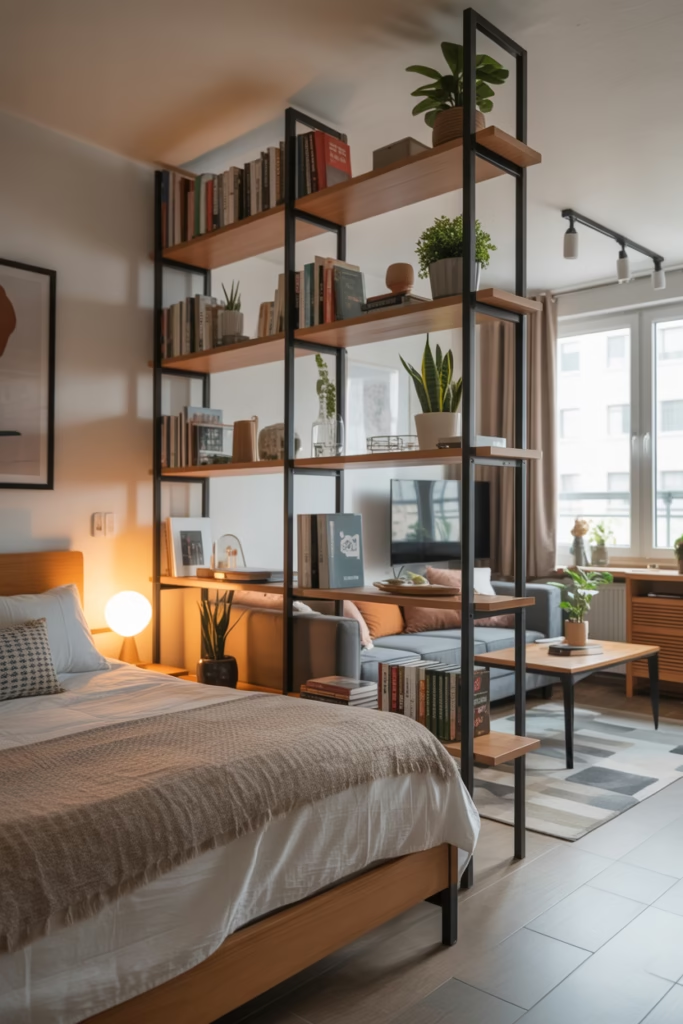
Not everyone wants a permanent partition, and that’s completely fair. A tall bookshelf used as a room divider gives you separation, storage, and decor all at once — triple threat.
Place a double-sided open bookshelf between your living area and sleeping area. Decorate it with books, plants, and small objects. You get a visual break between zones without blocking light or making the space feel cramped.
Bonus: This layout is renter-friendly. No drilling, no permanent changes, just smart furniture placement.
8. The Furniture-Forward Minimalist Layout
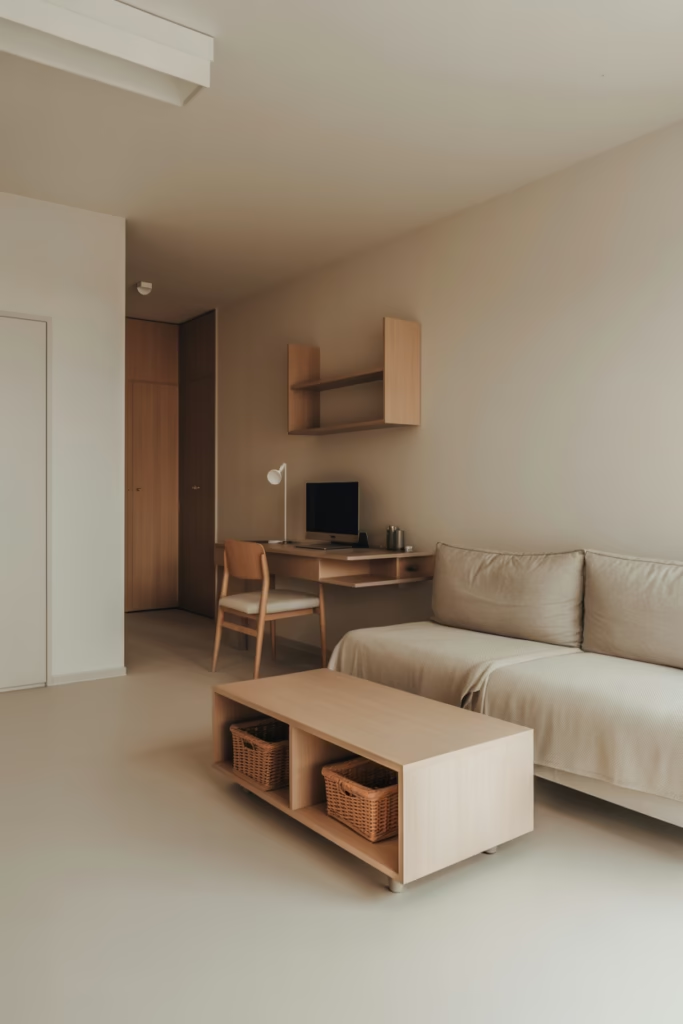
Sometimes the best layout is the one with the least stuff in it. A minimalist studio layout works on one simple principle: every piece of furniture earns its place or it leaves.
Choose a sofa bed, a coffee table with storage, a wall-mounted TV, and a floating desk. That’s it. Keep the floor clear, walls simple, and let the space breathe. You’ll be amazed at how large a studio can feel when you stop filling it with things you don’t actually use.
This layout is ideal for people who hate clutter (and honestly, in a studio, clutter is the enemy).
9. The Dining Nook Layout
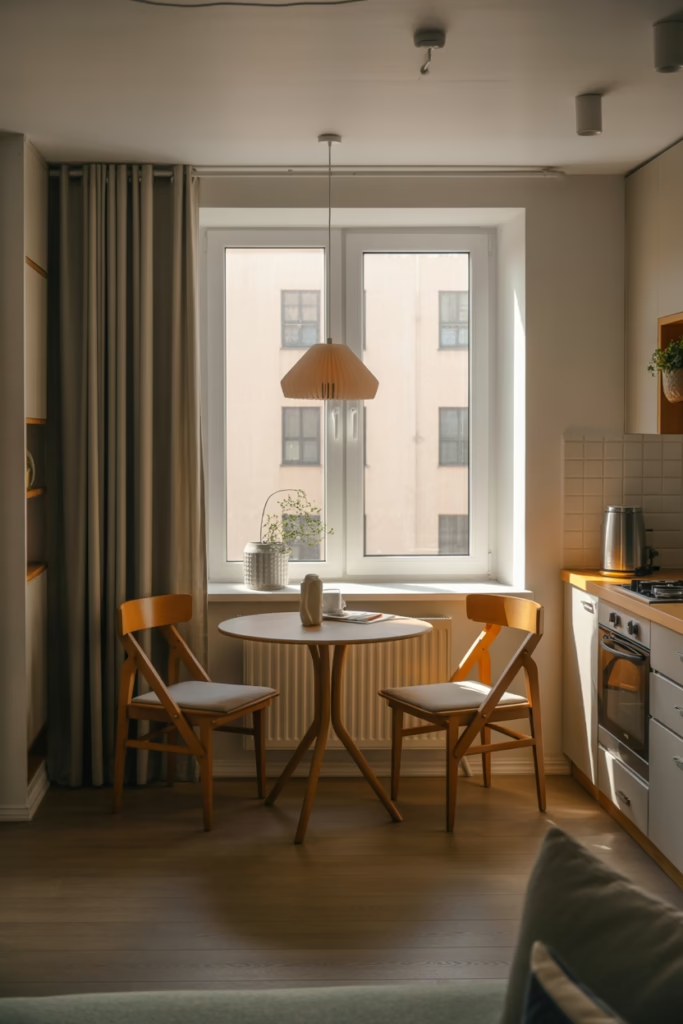
Here’s a question: how often do you actually use a full dining table? If you’re eating at your desk or on the couch 90% of the time, a large dining table is just a space thief. Instead, carve out a cozy dining nook.
A small round table with two chairs tucked into a corner — especially near a window — creates a charming dining spot without eating up (pun intended) valuable square footage. Add a pendant light above it and it becomes the most intentional little corner in your apartment.
10. The Studio With a Dedicated Work Corner
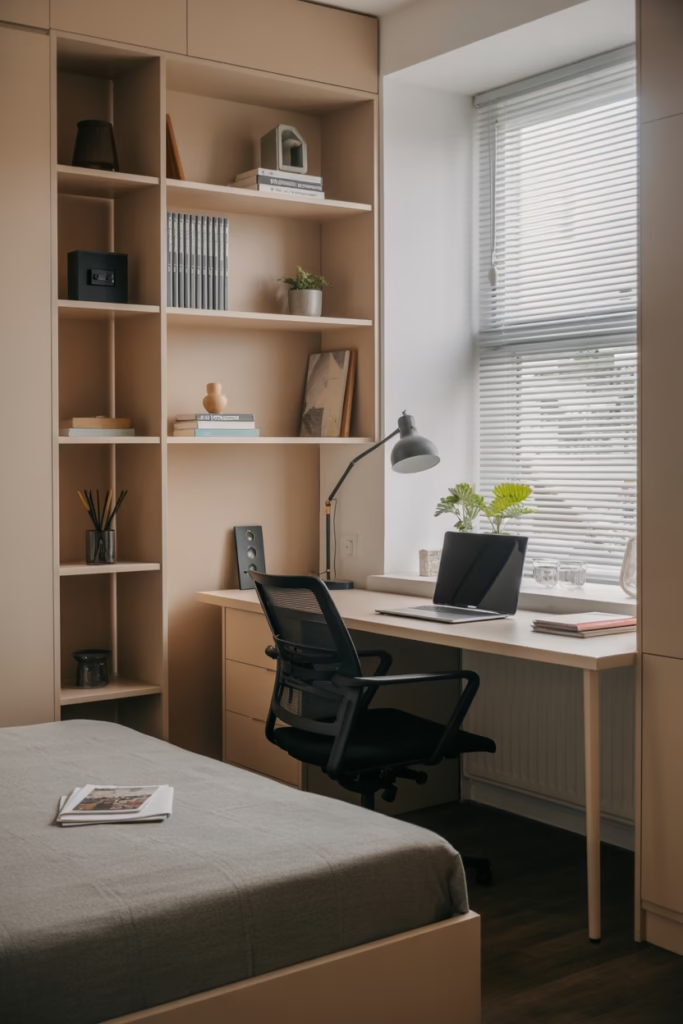
Working from home in a studio is a real challenge. When your bedroom, living room, and office are the same room, separating “work mode” from “rest mode” mentally becomes genuinely hard.
The fix? Give your work corner its own identity. A dedicated desk, a specific lamp, and a small shelf just for work stuff creates a visual and psychological boundary. When you sit there, you’re at work. When you leave, you’re not.
- Face your desk toward a wall or window, not toward your bed
- Use a different light temperature for your work area (cooler, brighter)
- Consider a small folding screen to visually close off the desk after work hours
11. The Mirrored Wall Layout
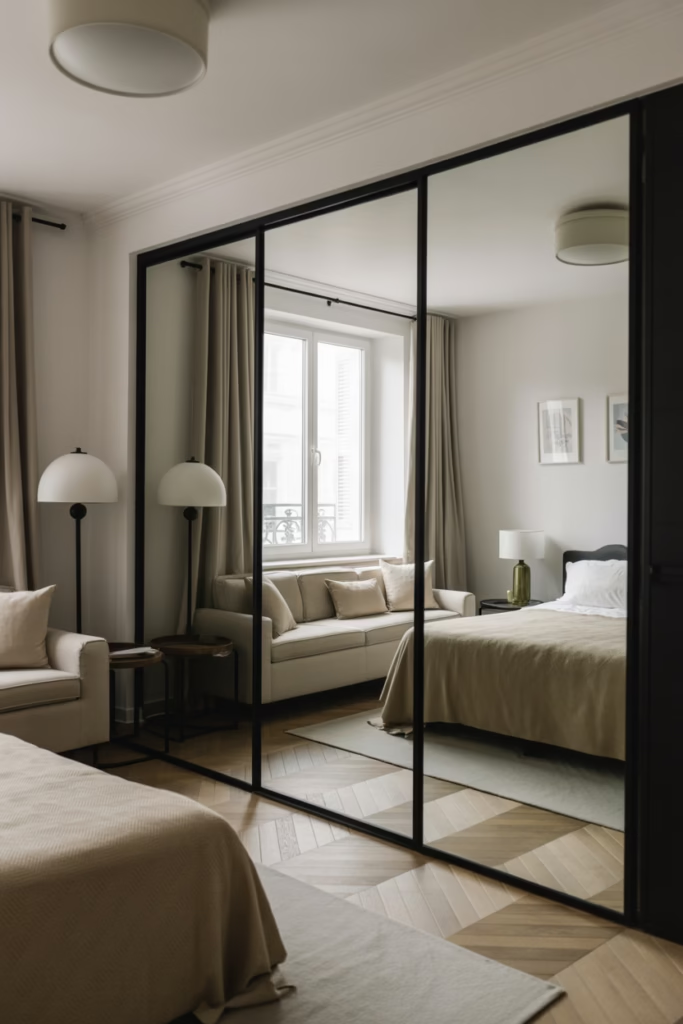
FYI, mirrors are the oldest trick in the small-space playbook — and they still work beautifully. A large mirror or mirrored wall panel reflects light, doubles the visual depth of a room, and makes everything feel bigger.
Position a floor-to-ceiling mirror on the wall opposite your main window. Natural light bounces off it and fills the room. For extra impact, lean two large mirrors at slightly different angles to create depth and dimension.
This layout works especially well in darker studios that don’t get much natural light.
12. The Multi-Level Layout
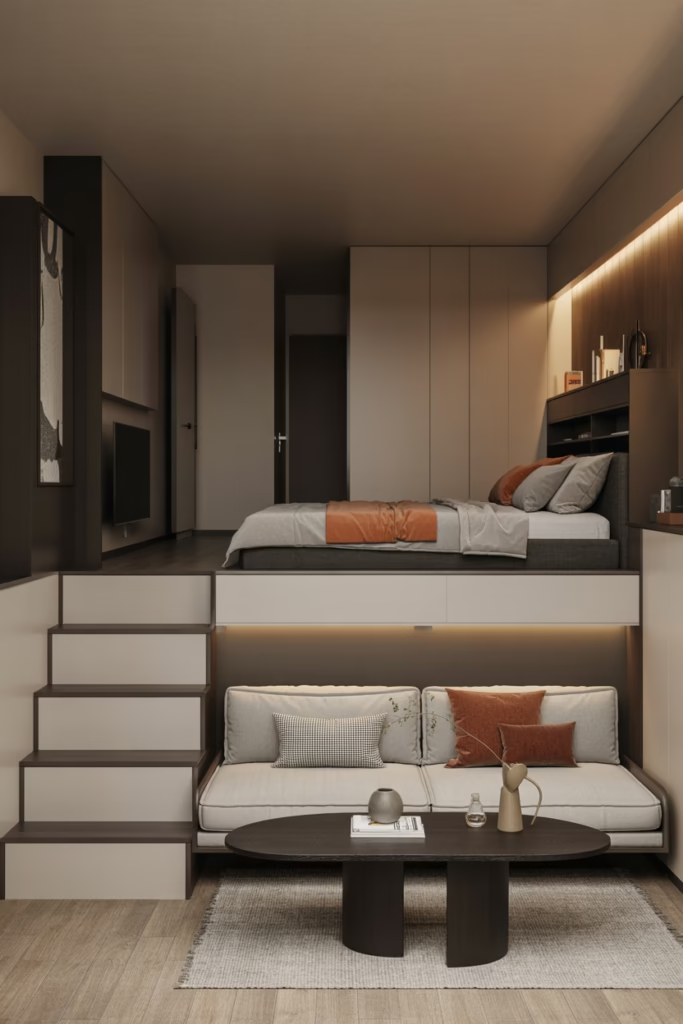
If you love bold, architectural thinking, a multi-level layout introduces a raised platform in part of your studio to define the sleeping area. The platform creates a visual elevation change — your bed sits slightly above the rest of the space, giving it a natural sense of separation.
You can build storage drawers right into the platform base, so you gain sleeping space, room definition, AND hidden storage. Three wins in one.
This layout does require some DIY work (or a carpenter), but the result looks genuinely stunning. Worth it.
13. The Window-Centric Layout
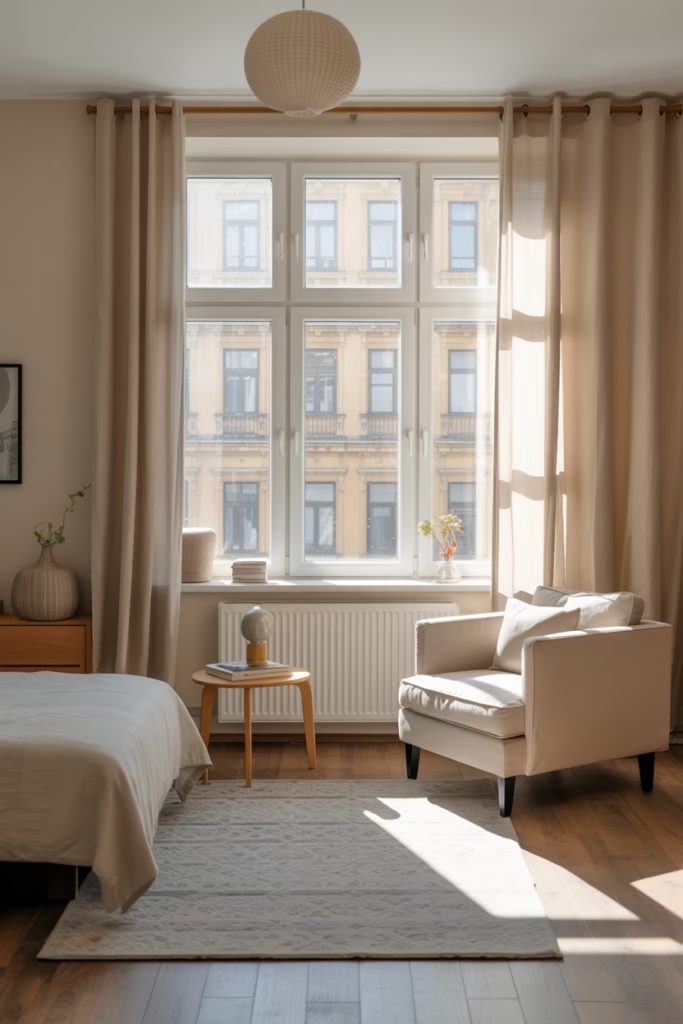
Most people push furniture against walls and forget about their windows entirely. Flip this thinking: build your layout around your best window.
Position your sofa or reading chair to face the window. Let natural light become the design feature of the room. A window seat with storage underneath turns a windowsill into a functional, beautiful focal point.
In a studio, natural light is your most powerful asset. Design toward it, not away from it.
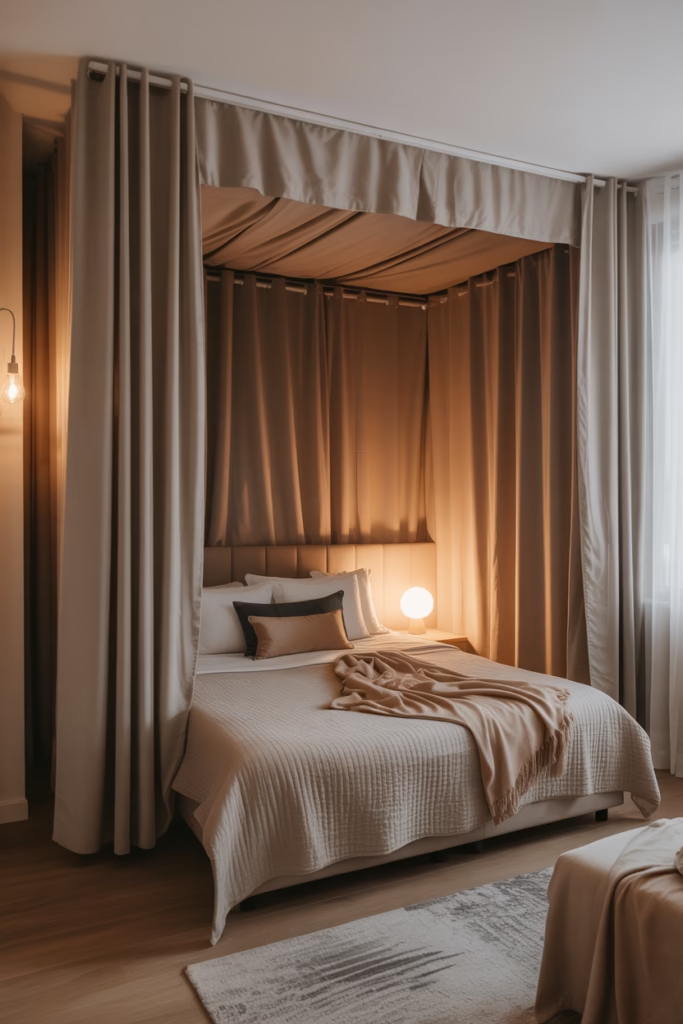
14. The Curtained Bedroom Layout
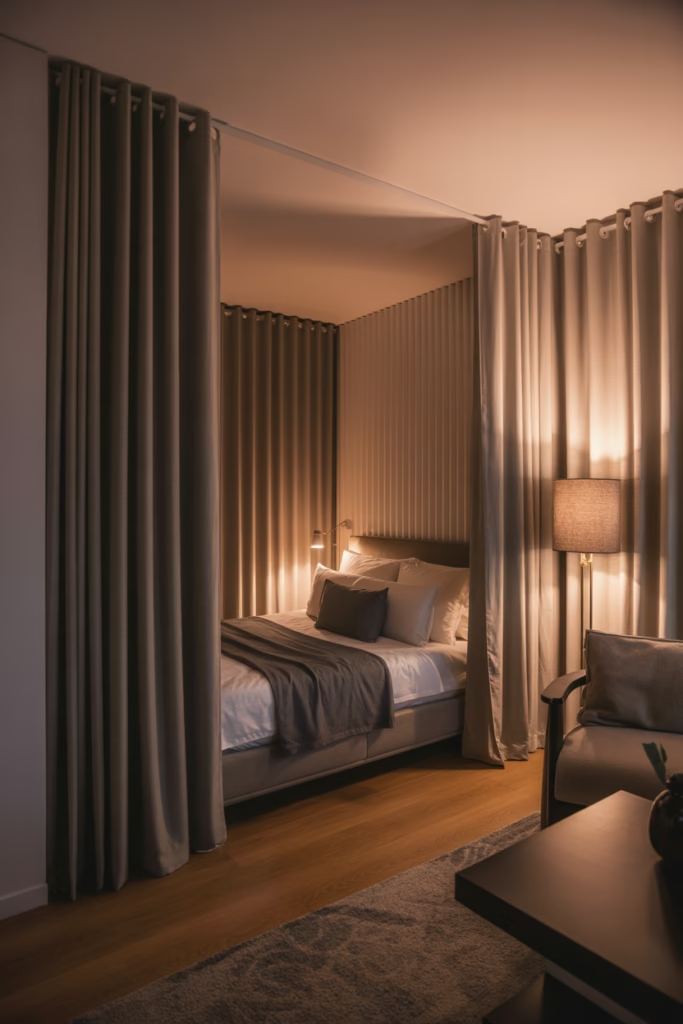
Want the feel of a separate bedroom without any construction? Hang floor-to-ceiling curtains around your bed area. A ceiling-mounted curtain track lets you pull heavy curtains around your sleeping zone whenever you want a cocooned, private sleeping experience.
During the day, pull the curtains back and the space is wide open. At night, close them and you’ve created your own little bedroom sanctuary. This layout is also incredibly renter-friendly — just patch two small ceiling holes when you move out.
Choose curtains in a rich fabric like velvet or linen for a luxurious effect that punches way above the cost.
15. The Convertible Furniture Layout
This is the layout for people who want maximum flexibility — and I’ll be honest, this one requires a bit of investment upfront. But convertible furniture (sofa beds, expandable dining tables, wall-mounted fold-down desks, nesting coffee tables) lets your studio transform throughout the day.
Morning: fold down your desk for work. Afternoon: fold it up, pull out the coffee table. Evening: convert the sofa into a bed. It sounds like a lot of moving parts, but when you get into the rhythm, it becomes second nature.
- Sofa beds with a quality mattress (don’t skimp here)
- Fold-down wall desks with a locking mechanism
- Nesting tables that expand for guests and compress for daily use
- Ottomans with internal storage that double as extra seating
Final Thoughts
Studio apartments get a bad reputation, but honestly, designing a studio well is one of the most satisfying creative challenges out there. Every square foot matters. Every piece of furniture has to earn its place. And when you get it right, the result feels incredibly personal and intentional.
The key takeaways:
- Zone your space visually without building walls
- Use vertical space — lofts and wall-mounted solutions are your best friends
- Choose convertible or multi-functional furniture over single-purpose pieces
- Let natural light drive your layout decisions
- Keep it flexible — your needs will change, and your layout should adapt
Whether you’re working with 300 square feet or 600, one of these 15 layouts will work for your space. The trick is picking the one that fits your lifestyle.
Now go rearrange some furniture you’ve got this.