

Have you ever bought a cute plant stand, set it up outside, and watched as it faded, wobbled, or worse, fell over the first time the wind picked up? I’ve been there. When I started artfullhouses.com, I wanted to fill my patio with plants, but store-bought stands just didn’t cut it they were either too expensive, too flimsy, or just not quite right for the space. That’s when I got serious about building my own. After a lot of trial and error, I realized that making outdoor plant stands is actually easier (and more fun) than most people think.
In this guide, I’ll share 11 of my favorite DIY outdoor plant stand ideas each tested in my own garden with clear steps, practical tips, and honest advice on what works and what doesn’t. Whether you’re a total beginner or already handy with tools, you’ll find ideas you can start today, using materials you might already have. I’ll walk you through the best wood types, rust-proof finishes, and clever ways to repurpose old furniture. By the end, you’ll have a plan for stands that are sturdy, stylish, and built to last in sun, rain, and wind.
1. The Classic Wooden Ladder Stand
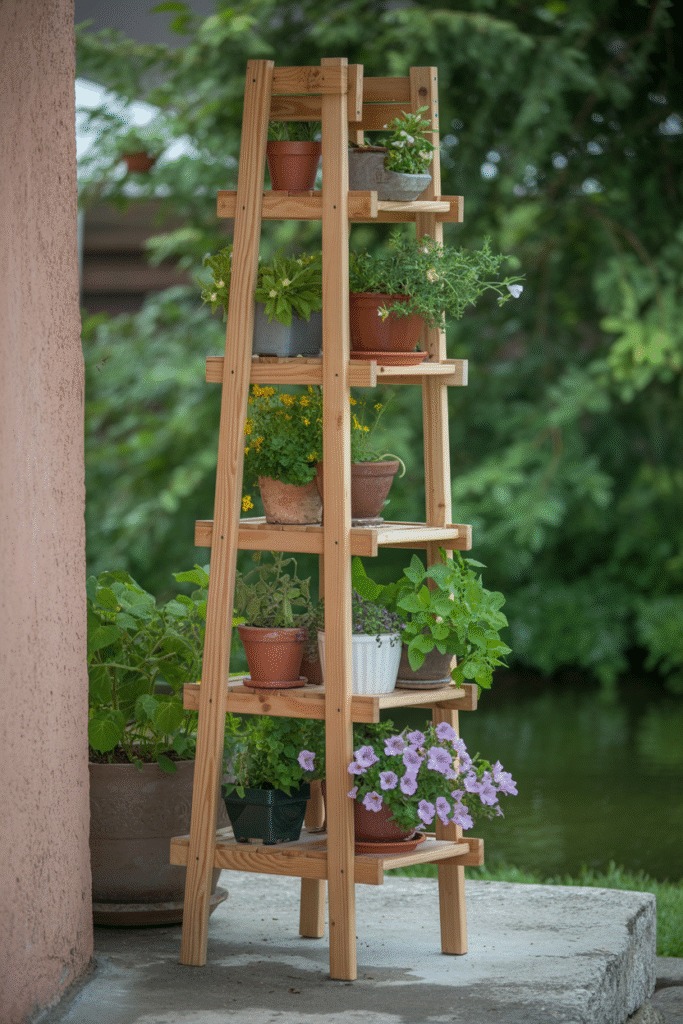
Plants love height, and nothing adds vertical charm like a ladder stand. I’ve built several, and my best advice: skip the straight rungs. Instead, stagger the steps so the pots don’t crowd each other. For outdoor use, pressure-treated pine is your best bet it resists rot and lasts for years. Cut your side rails to 180 cm (6 ft), and rungs at 30 cm (12 in) widths. Angle the bottom rungs outward slightly for extra stability.
What works best is leaving a 40-50 cm (16-20 in) gap between each rung—this gives foliage enough space to breathe. I like to stain mine with a UV-resistant finish, but a couple of coats of exterior-grade paint works too. Pro tip: If you have uneven ground (like my patio), attach small leveling feet to the base.
Avoid this: Don’t nail the rungs; use screws and a dab of waterproof wood glue for a wobble-proof hold. And never place a ladder stand on soft soil without a base—it will tip over.
Materials & Tools
- Pressure-treated pine (2×4, 180 cm/6 ft x 2, 30 cm/12 in x 4-5)
- Exterior-grade screws (5 cm/2 in)
- Waterproof wood glue
- UV-resistant stain or paint
- Leveling feet (optional)
- Circular saw, drill, sandpaper, measuring tape
Time: 1 afternoon
Difficulty: Beginner
Cost: $25–$40
Variations I’ve Tried
- Rustic look: Leave the wood rough-sawn for a farmhouse feel.
- Foldable: Add hinges to the bottom for easy storage.
- Narrow profile: Perfect for tight balconies—just make the rungs shorter, around 20 cm (8 in).
2. The Upcycled Cinder Block Stand

One of the easiest, sturdiest DIY plant stands I’ve made uses standard cinder blocks. Pile them in a zig-zag pattern, or stack them straight and slide planks across for shelves. For outdoor life, I brush each block with a waterproof sealer this keeps the color from fading and prevents moisture from wicking into your deck.
In my experience, a two-side stack with three blocks high is super stable, but add a dab of construction adhesive between each block for windy spots. You can paint the blocks with masonry paint for a pop of color, or leave them rough for an industrial look.
What works best is using smooth boards (like cedar or teak) for the shelves they weather well and look great. Cut them to 60 cm (24 in) for a two-block-wide stand, or 90 cm (36 in) for three. Sand the edges well, since the wood will expand and contract with humidity.
Avoid this: Don’t use untreated plywood for shelves it’ll warp fast outside. And always check that your blocks are level before adding plants.
Materials & Tools
- Cinder blocks (8-12)
- Waterproof sealer
- Cedar or teak boards (2×8, 60 cm/24 in or 90 cm/36 in)
- Construction adhesive (optional)
- Masonry paint (optional)
- Sandpaper, brush
Time: 30 minutes to an hour
Difficulty: Beginner
Cost: $10–$30
Variations I’ve Tried
- Colorful: Paint each block a different shade for boho vibes.
- Tiered: Stagger the blocks for multi-level plant displays.
- Corner stand: Arrange L-shaped for a snug patio corner.
3. The Fold-Out Pallet Stand
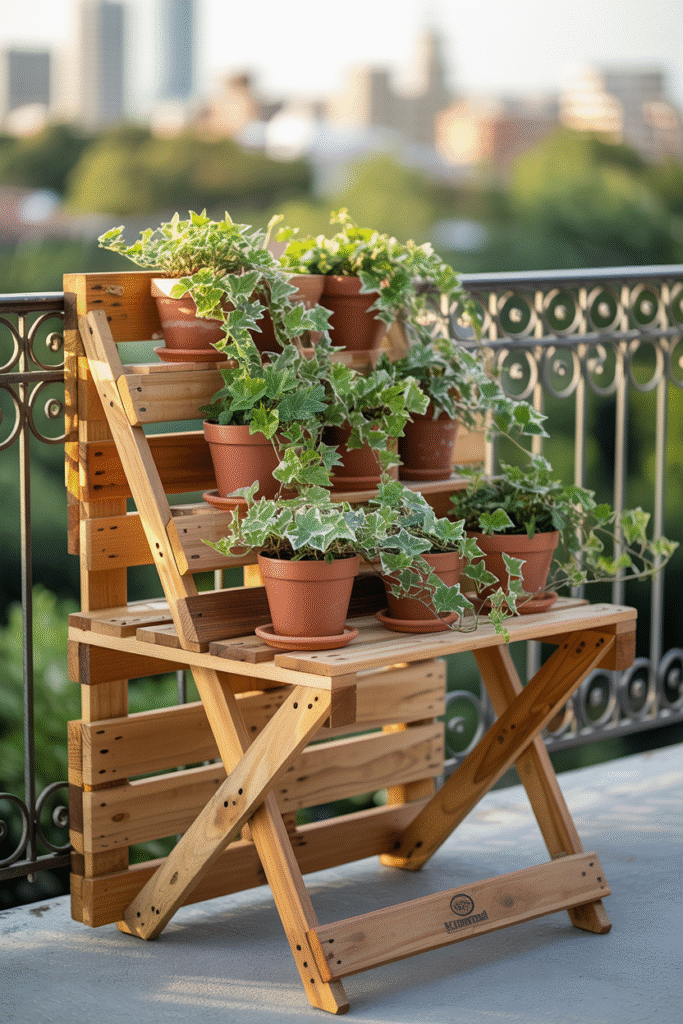
Pallets are a classic DIY material, but most people forget they’re made for outdoor use. I’ve turned several into plant stands by simply cutting one in half, sanding it down, and attaching folding legs. The key here is use a heat-treated pallet (look for the HT stamp) these are safe for plants and people.
In my experience, leave the planks as-is for drainage, or cover them with outdoor fabric for a neater look. For legs, I use thick wooden dowels or steel tubing attached with heavy-duty hinges. The stand folds flat for storage and pops up in seconds.
What works best is sealing the wood with a outdoor-rated polyurethane after sanding it keeps the pallet from splintering and graying too fast. Pro tip: Angle the legs slightly outward for extra stability, especially if your deck is uneven.
Avoid this: Don’t use pallets marked MB (methyl bromide) these aren’t safe for plants. Always sand thoroughly to avoid splinters.
Materials & Tools
- Heat-treated pallet
- Heavy-duty hinges
- Wooden dowels or steel tubing
- Outdoor polyurethane
- Saw, sandpaper, drill, screws
Time: 2–3 hours
Difficulty: Intermediate
Cost: $0–$20 (pallets are often free)
Variations I’ve Tried
- Hanging version: Add hooks and chains to hang baskets.
- Painted slats: Use exterior paint for a coastal feel.
- Rolling base: Add casters for a mobile stand.
4. The Repurposed Chair Stand
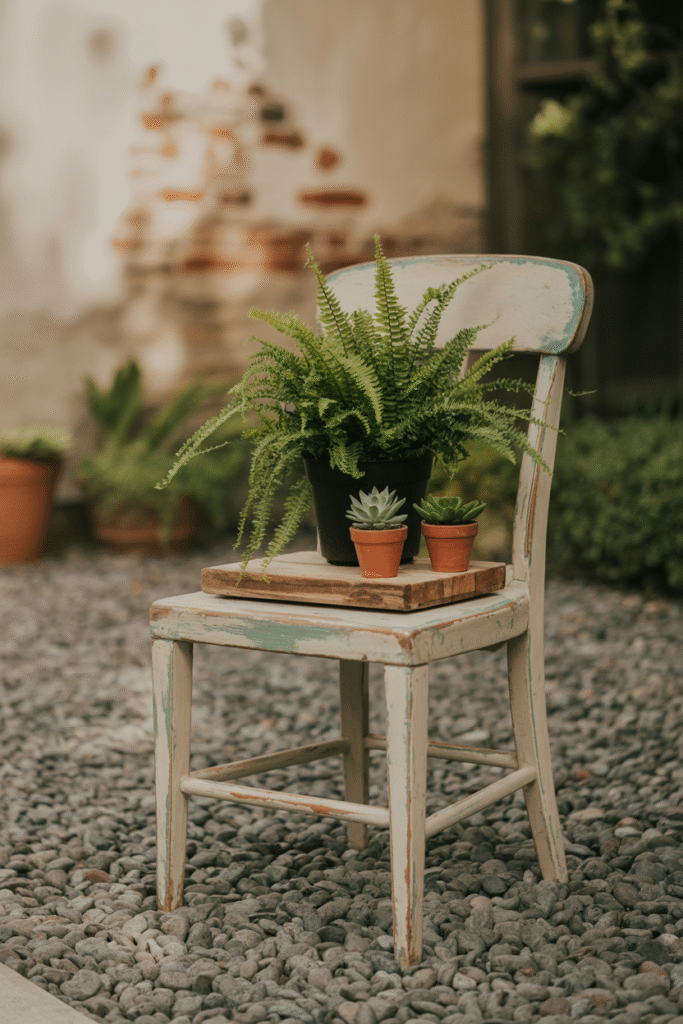
Old wooden chairs are everywhere at thrift stores, and with a little work, they make charming plant stands. I removed the seat from a vintage oak chair, sanded it, and sealed it with marine varnish. Then I just set pots right on the frame or added a small board across the arms for a shelf.
What works best is using chairs with sturdy legs and minimal detailing fussy carvings collect dirt and are hard to clean. If the chair is wobbly, a couple of diagonal braces underneath will stiffen it right up.
In my experience, this is a fantastic weekend project that costs almost nothing. Always use an outdoor-rated finish, and if the chair has metal parts, check for rust sand and spray with rust-resistant paint if needed.
Pro tip: For a shabby-chic look, leave some of the original paint peeling and just seal over it. For a modern twist, paint the frame matte black or navy.
Materials & Tools
- Old wooden chair
- Outdoor marine varnish or paint
- Rust-resistant spray paint (if metal)
- Brush, sandpaper
Time: 1–2 hours
Difficulty: Beginner
Cost: $5–$15 (often less at flea markets)
Variations I’ve Tried
- Tiered: Stack a smaller chair on a larger one.
- Painted stripes: Use painters’ tape for bold lines.
- Tall stand: Saw off the back, use legs as a pedestal.
5. The Stacked Stone Pedestal
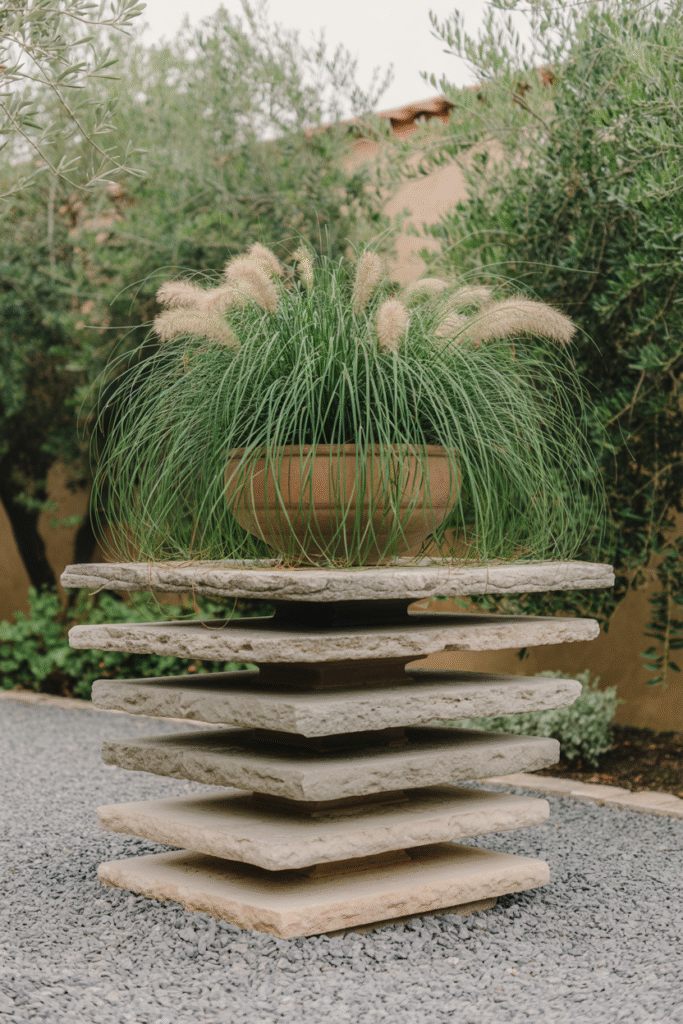
Stone columns give gardens a Mediterranean feel and are surprisingly simple to build. I stack flat, heavy pavers from the garden center (about 30 x 30 cm/12 x 12 in), leaving a hole in the center for a pot. For outdoor use, a dab of landscape adhesive between each layer keeps it steady.
In my experience, dry-stacking without glue works for sheltered spots, but in windy areas, adhesive is a must. Make sure your base is level, and consider adding a drainage hole if your pot doesn’t have one.
What works best is using stones with rough, textured tops glazed tiles are slippery when wet and pots can slide right off. If you want extra stability, bury the bottom layer a couple of inches into the ground.
Avoid this: Don’t use lightweight cinder blocks they’ll tip in strong winds. And skip the mortar unless you’re comfortable with masonry; it’s easy to overdo and end up with a messy look.
Materials & Tools
- Flat pavers or natural stone slabs (30 x 30 cm/12 x 12 in, 4–6)
- Landscape adhesive
- Level
- Spade (optional, for burying base)
Time: 30 minutes to an hour
Difficulty: Beginner
Cost: $20–$50
Variations I’ve Tried
- Curved wall: Arrange stones in a gentle arc for multiple pots.
- Stone and wood: Alternate pavers with cedar rounds.
- Stenciled designs: Paint patterns on each stone with outdoor stencils.
6. The Woven Branch Stand
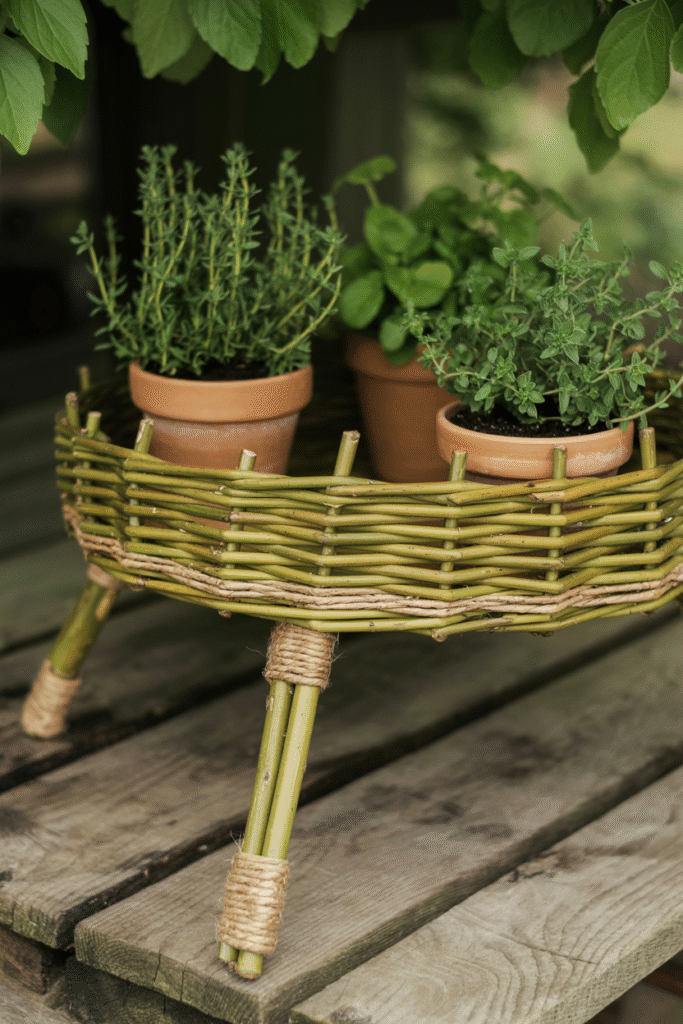
This one’s for the crafty types I built a stand from willow branches gathered after a storm. It’s a bit fiddly, but the organic look is unbeatable. Soak the branches overnight, then weave them into a lattice tray a bit larger than your pots. For legs, use thicker, straight branches lashed together with jute twine.
What works best is weaving the tray about 5 cm (2 in) deep so pots can’t slide off. Use a waterproof wood glue at the joins to help it last outdoors.
In my experience, this is a fun weekend project for teens and adults, but the branches do need replacing every few years as they weather. If you like the look but want more longevity, use copper wire instead of twine for lashing.
Avoid this: Don’t use freshly cut green branches they’ll shrink and loosen as they dry. Weave with dried, flexible ones.
Materials & Tools
- Willow, birch, or other flexible branches
- Jute twine or copper wire
- Waterproof wood glue
- Pruners, bucket for soaking
Time: 3–4 hours
Difficulty: Intermediate
Cost: $0–$10
Variations I’ve Tried
- Hanging tray: Add loops of wire to suspend from a beam.
- Tall stand: Build a grid with vertical posts.
- Stained finish: Use natural wood stain for a richer look.
7. The Cement Block + Rebar Stand
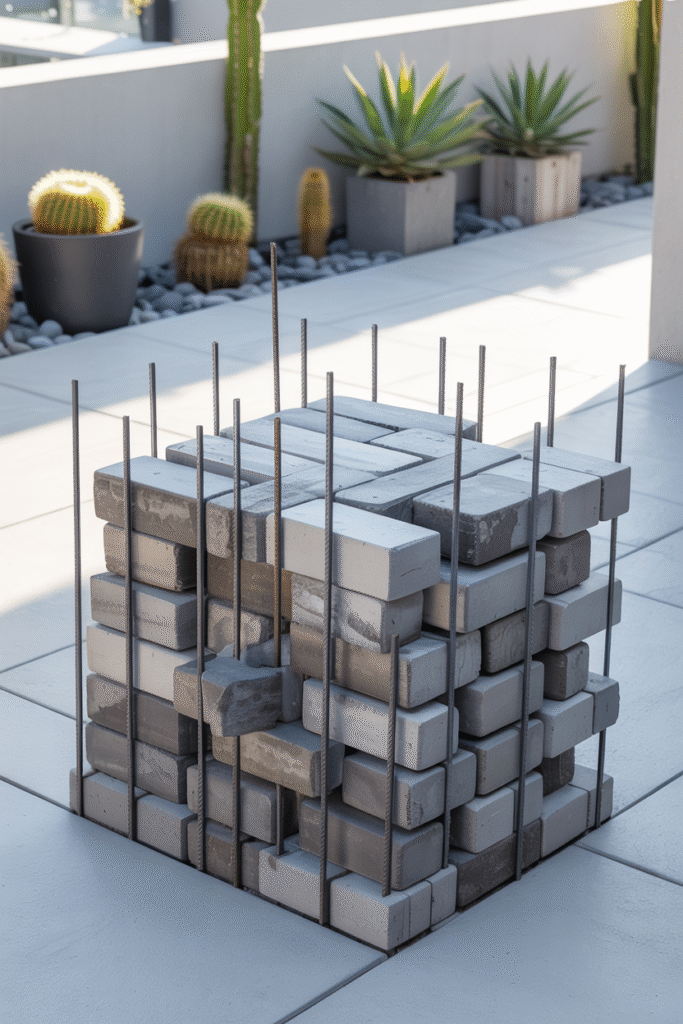
For a modern, graphic look, I’ve stacked concrete masonry units (CMUs) with narrow rebar rods running through them. Place pots on top or in the holes. Stagger the blocks for interest, and paint them with concrete stain if you want color.
What works best is using galvanized rebar it won’t rust and stain your patio. I use 12 mm (½ in) rods, hammered into the ground about 30 cm (12 in) for stability. The blocks just slide right on.
In my experience, this stand takes a bit of strength to build (those blocks are heavy!), but it’s practically indestructible outside. Pro tip: Set the blocks so the holes line up for a repeating pattern.
Avoid this: Don’t use standard bricks (they’re too small and unstable). And never skip anchoring the rebar—the stand will topple if not set firmly.
Materials & Tools
- Concrete masonry units (CMUs)
- Galvanized rebar rods (12 mm/½ in x 1 m/3 ft)
- Concrete stain (optional)
- Mallet, level
Time: 1–2 hours
Difficulty: Intermediate
Cost: $30–$60
Variations I’ve Tried
- Color block: Stain every other block a different shade.
- Angled stand: Cut rebar at angles for a leaning effect.
- Raised corner: Add a wood plank as a shelf for trailing plants.
8. The Tire and Rope Hanging Stand
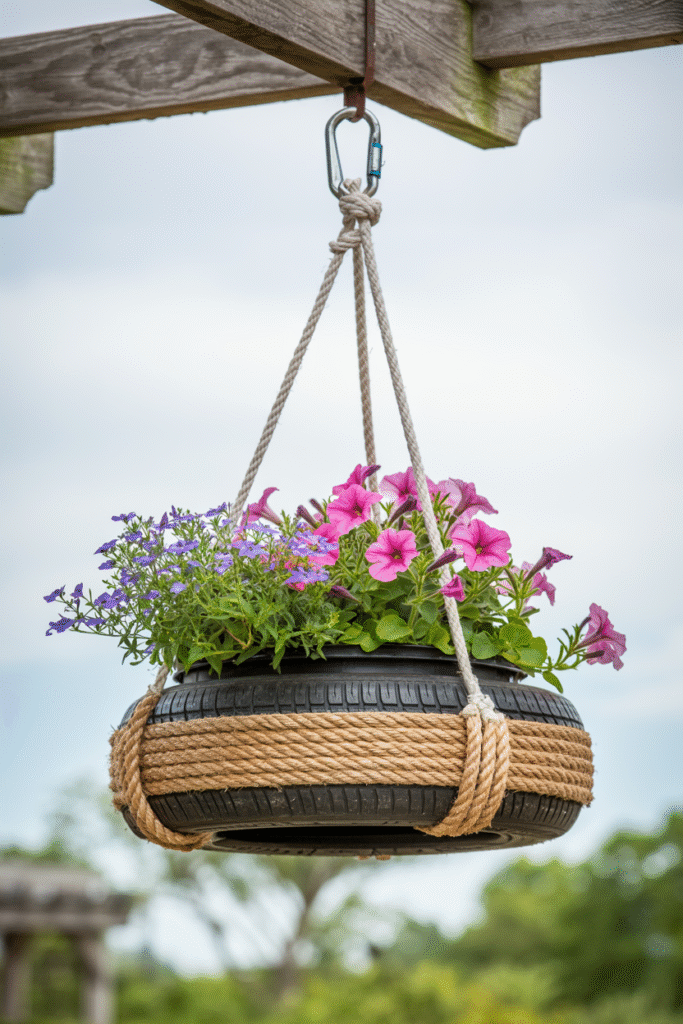
I’ve always loved vintage-style suspended planters, but most hardware-store versions are flimsy or look out of place outdoors. That’s why I started repurposing old car tires yes, really! Sand down the inside, paint or wrap it with rope, attach four strong ropes or chains, and hang it from a beam or a sturdy branch. What works best is lining the inside with thick plastic (I use a cut-up pool liner) to protect the roots from the rubber. The rope I prefer is sisal or polypropylene both hold up to sun and rain.
In my experience, hanging planters are a great way to add height without taking up floor space, but they do swing in the wind. Pro tip: The tire should hang at least 1.5–2 m (5–6 ft) above the ground for safe walking underneath. And always test your hanging hook triple-check that the beam or branch can handle the extra weight, especially after rain when the soil is soaked.
Avoid this: Don’t use old, cracked tires they can split unexpectedly. And skip the thin string always use ropes rated for at least 50 kg (110 lb) to be safe.
Materials & Tools
- Old car tire (cleaned and sanded)
- Rope or chain (minimum 4 m/13 ft per tire)
- Plastic liner (pool liner works)
- Outdoor paint or rope wrap
- Sandpaper, drill, carabiner clips
Time: 2–3 hours
Difficulty: Intermediate
Cost: $10–$25
Variations I’ve Tried
- Color-washed: Lightly paint the rope or tire for a beachy look.
- Double tire stand: Hang two tires at different heights for a cascade effect.
- Copper pipe hangers: Swap rope for copper pipe for a modern twist.
9. The Ceramic Pot Water Feature
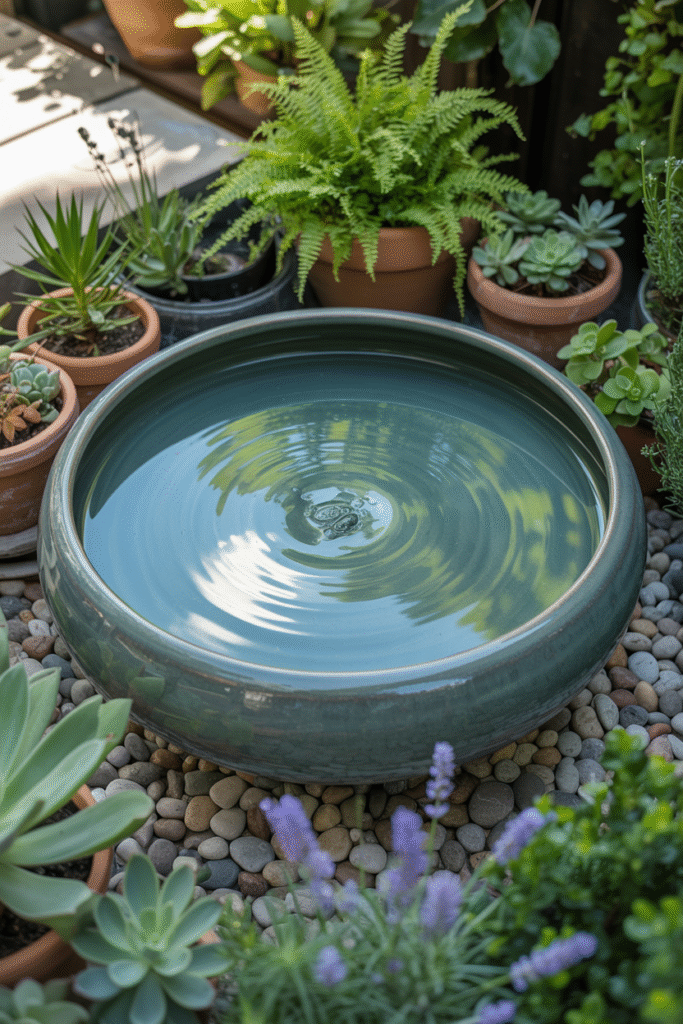
Not exactly a stand, but one of my favorite ways to elevate plants outdoors is to group them on a ceramic pot water feature. I found a large, shallow ceramic bowl at a salvage yard, sealed the drainage hole with marine epoxy, and filled it with a thin layer of water and aquatic-safe plants. The reflected sunlight lifts the look of any plant stand next to it. What works best is a bowl at least 60 cm (24 in) wide big enough to sit pots on the edge or in the water.
In my experience, this is a bit more advanced you’ll want to use a water-level gauge or a solar-powered fountain bubbler to keep the water moving and avoid mosquitoes. If you have little ones or pets, you might want to skip this one, but otherwise it’s a stunning focal point.
Pro tip: Ceramic can crack in freezing weather, so drain it and store it indoors over winter if that’s a risk in your area.
Materials & Tools
- Large ceramic bowl
- Marine epoxy
- Water plants (safe for outdoors)
- Solar fountain (optional)
- Sturdy base for stability
Time: 2 hours (plus curing time for epoxy)
Difficulty: Advanced
Cost: $40–$80
Variations I’ve Tried
- Multi-level feature: Stack bowls for a tiered water curtain.
- Pebble top: Cover the bottom with smooth pebbles for a gravel garden look.
- DIY bubbler: Use a small aquarium pump and copper tubing for a gentle trickle.
10. The Fold-Down Wall Shelf Stand
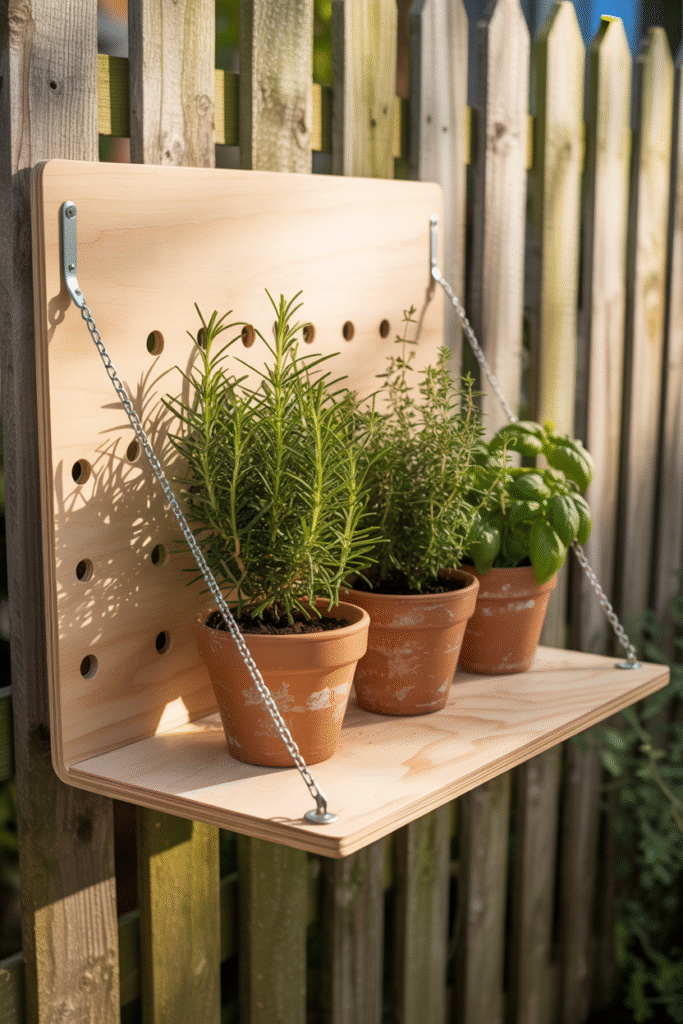
If you’re short on patio space, a fold-down wooden shelf is a genius solution. I built mine from 20 mm (¾ in) plywood, hinged to the wall, with a simple chain or hook to hold it up. When you need extra plant space, just fold it down; when you need to pass through, flip it up. What works best is using exterior-grade plywood and sealing the edges with marine varnish.
In my experience, this works best on a solid fence or masonry wall plasterboard won’t handle the weight. I like to drill a few small drainage holes in the shelf and keep pots in saucers to catch drips. Pro tip: Stain or paint both sides of the shelf for a finished look, and add a small lip at the front to keep pots from sliding.
Avoid this: Don’t attach to a wall with just drywall anchors use screws that bite into solid wood or masonry.
Materials & Tools
- Exterior-grade plywood (20 mm/¾ in, 40 x 60 cm/16 x 24 in)
- Heavy-duty hinges
- Chain or hook
- Marine varnish or outdoor paint
- Drill, screwdriver, sandpaper
Time: 1–2 hours
Difficulty: Intermediate
Cost: $25–$40
Variations I’ve Tried
- Tiered wall shelf: Add a second, shorter shelf above.
- Chalkboard finish: Paint the shelf so you can write plant names.
- Cascading vines: Add a shallow tray at the front for trailing plants.
11. The Repurposed Metal Cart

Old factory carts or medical trolleys often show up at flea markets, and with a fresh lick of rust-proof paint, they’re ready for a second life as a rolling plant stand. In my experience, the metal and caster wheels are already outdoor-ready just sand down any rust, apply a coat of rust-inhibiting primer, and spray on your favorite outdoor paint (I’m partial to forest green).
What works best is to place the tallest pots at the back and gradually lower heights toward the front so all the plants get sunlight. Pro tip: Lock the wheels in place (or add bricks under the cart) if you live in a windy area wheeled stands can wander away on their own.
Avoid this: Don’t use uncoated steel it will rust quickly. Also, skip lightweight carts with plastic wheels they’ll break down in the sun.
Materials & Tools
- Metal rolling cart
- Rust-inhibiting primer
- Outdoor spray paint
- Sandpaper, brush
Time: 1–2 hours
Difficulty: Easy
Cost: $20–$50
Variations I’ve Tried
- Double-decker: Add a wooden shelf across the top.
- Fairy light wrap: Wind outdoor string lights around the frame for evening charm.
- Seasonal swap: Use the cart for pumpkins and gourds in fall, poinsettias in winter.
Last Thoughts: Your Outdoor Plant Stands, Your Way
The most important rule I’ve learned from all my plant stand experiments? There’s no single “right” answer. If you love the look and your plants are happy, you’ve nailed it. I hope these 11 ideas along with the honest talk about what works and what doesn’t help you feel confident to try your own.
Remember: Start simple, pick a project you can finish in a weekend, and don’t stress about perfection. Learn from what doesn’t work, celebrate what does, and most of all, enjoy your outdoor space.